Wednesday, January 28, 2015
Android beginner tutorial Part 42 AlertDialog persistent lists
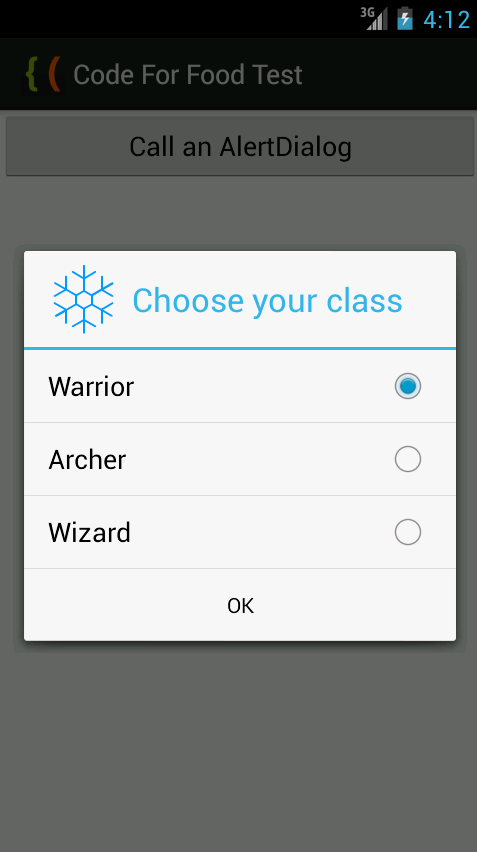
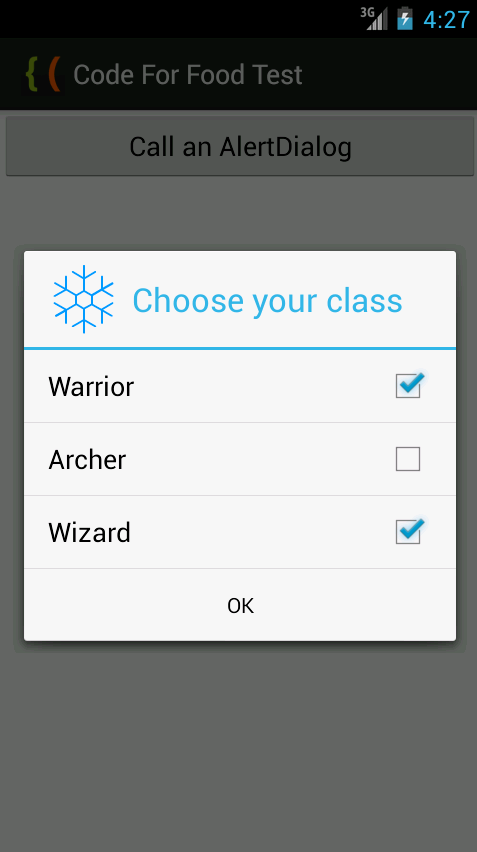
As I said in the previous tutorial, there are 2 types of persistent lists to display - a single choice and a multiple choice ones. The single choice list displays a number of radio buttons, while the multiple choice list displays a column of checkboxes and their labels.
First lets create an AlertDialog with a single choice list. The initial code remains from the previous tutorial, all we have to do is edit it now.
Declare a variable selectedItem:
private String selectedItem = "";
This will hold the selected value. It changes when the user clicks on the radio buttons, but it is only displayed after the OK button was pressed.
When building the AlertDialog in onCreate(), use setSingleChoiceItems() method to create a single choice list. It has 3 parameters - data array, selected index by default and an OnClickListener. In the onClick() event handler, update the value of selectedItem variable to whatever was clicked. Set selectedItem to the first item in the list by default.
AlertDialog.Builder builder = new AlertDialog.Builder(MainActivity.this);
builder.setTitle("Choose your class");
builder.setIcon(R.drawable.snowflake);
selectedItem = items[0];
builder.setSingleChoiceItems(items, 0, new DialogInterface.OnClickListener() {

@Override
public void onClick(DialogInterface dialog, int which) {
selectedItem = items[which];
}
});
Then we add an OK button and make it display the selected choice when clicked:
builder.setPositiveButton("OK", new DialogInterface.OnClickListener() {

@Override
public void onClick(DialogInterface dialog, int which) {
Toast toast = Toast.makeText(getApplicationContext(), "Selected: " + selectedItem, Toast.LENGTH_SHORT);
toast.show();
}
});
Full code:
package com.kircode.codeforfood_test;

import android.app.Activity;
import android.app.AlertDialog;
import android.content.DialogInterface;
import android.os.Bundle;
import android.view.Menu;
import android.view.View;
import android.widget.Button;
import android.widget.Toast;

public class MainActivity extends Activity{

private AlertDialog myDialog;
private String[] items = {"Warrior","Archer","Wizard"};
private String selectedItem = "";

@Override
protected void onCreate(Bundle savedInstanceState) {
super.onCreate(savedInstanceState);
setContentView(R.layout.activity_main);

Button button = (Button)findViewById(R.id.testButton);

AlertDialog.Builder builder = new AlertDialog.Builder(MainActivity.this);
builder.setTitle("Choose your class");
builder.setIcon(R.drawable.snowflake);
selectedItem = items[0];
builder.setSingleChoiceItems(items, 0, new DialogInterface.OnClickListener() {

@Override
public void onClick(DialogInterface dialog, int which) {
selectedItem = items[which];
}
});

builder.setPositiveButton("OK", new DialogInterface.OnClickListener() {

@Override
public void onClick(DialogInterface dialog, int which) {
Toast toast = Toast.makeText(getApplicationContext(), "Selected: " + selectedItem, Toast.LENGTH_SHORT);
toast.show();
}
});

builder.setCancelable(false);
myDialog = builder.create();

button.setOnClickListener(new View.OnClickListener() {

@Override
public void onClick(View v) {
myDialog.show();
}
});
}

@Override
public boolean onCreateOptionsMenu(Menu menu) {
// Inflate the menu; this adds items to the action bar if it is present.
getMenuInflater().inflate(R.menu.activity_main, menu);
return true;
}

}
Results:

Next, well create a multiple choice list.
Instead of a String selectedItem, declare an ArrayList of Integers called selectedItems.
private ArrayList<Integer> selectedItems = new ArrayList<Integer>();
Use setMultiChoiceItems() method to add a multi-choice list. Provide data array, array of booleans of what items are selected by default (set to null if none) and a OnMultiChoiceClickListener.
In the onClick() function of that listener add the clicked item to the array if it became checked, and remove it if it is unchecked.
builder.setMultiChoiceItems(items, null, new DialogInterface.OnMultiChoiceClickListener() {

@Override
public void onClick(DialogInterface dialog, int which, boolean isChecked) {
if (isChecked){
selectedItems.add(which);
} else if (selectedItems.contains(which)){
selectedItems.remove(Integer.valueOf(which));
}

}
});
In the onClick() function of the OK buttons click handler loop through all selectedItems elements using a for loop. Display each item in a Toast:
builder.setPositiveButton("OK", new DialogInterface.OnClickListener() {

@Override
public void onClick(DialogInterface dialog, int which) {
for(int i=0; i<selectedItems.size(); i++){
Toast toast = Toast.makeText(getApplicationContext(), "Selected: " + items[(Integer) selectedItems.get(i)], Toast.LENGTH_SHORT);
toast.show();
}
}
});
Full code:
package com.kircode.codeforfood_test;

import java.util.ArrayList;

import android.app.Activity;
import android.app.AlertDialog;
import android.content.DialogInterface;
import android.os.Bundle;
import android.view.Menu;
import android.view.View;
import android.widget.Button;
import android.widget.Toast;

public class MainActivity extends Activity{

private AlertDialog myDialog;
private String[] items = {"Warrior","Archer","Wizard"};
private ArrayList<Integer> selectedItems = new ArrayList<Integer>();

@Override
protected void onCreate(Bundle savedInstanceState) {
super.onCreate(savedInstanceState);
setContentView(R.layout.activity_main);

Button button = (Button)findViewById(R.id.testButton);

AlertDialog.Builder builder = new AlertDialog.Builder(MainActivity.this);
builder.setTitle("Choose your class");
builder.setIcon(R.drawable.snowflake);
builder.setMultiChoiceItems(items, null, new DialogInterface.OnMultiChoiceClickListener() {

@Override
public void onClick(DialogInterface dialog, int which, boolean isChecked) {
if (isChecked){
selectedItems.add(which);
} else if (selectedItems.contains(which)){
selectedItems.remove(Integer.valueOf(which));
}

}
});

builder.setPositiveButton("OK", new DialogInterface.OnClickListener() {

@Override
public void onClick(DialogInterface dialog, int which) {
for(int i=0; i<selectedItems.size(); i++){
Toast toast = Toast.makeText(getApplicationContext(), "Selected: " + items[(Integer) selectedItems.get(i)], Toast.LENGTH_SHORT);
toast.show();
}
}
});

builder.setCancelable(false);
myDialog = builder.create();

button.setOnClickListener(new View.OnClickListener() {

@Override
public void onClick(View v) {
myDialog.show();
}
});
}

@Override
public boolean onCreateOptionsMenu(Menu menu) {
// Inflate the menu; this adds items to the action bar if it is present.
getMenuInflater().inflate(R.menu.activity_main, menu);
return true;
}

}
Results:

Thanks for reading!
Labels:
42,
alertdialog,
android,
beginner,
lists,
part,
persistent,
tutorial
Subscribe to:
Post Comments (Atom)
No comments:
Post a Comment
Note: Only a member of this blog may post a comment.