Thursday, January 29, 2015
Creating a Pentomino game using AS3 Part 1
Basically, I have a school project to do on Pentomino, and Im going to create a game based on the principle. I also want to share the code with other programmers, so Im writing a step-by-step tutorial series and then releasing the game as an open-source project.
The game is made using Flash and FlashDevelop, although you dont need to follow my example strictly and as long as you understand the code, you can use any IDE you like.
I am going to use Flash for animations and graphics mostly, and have all my code written in FlashDevelop (because I like it a lot better than the built in actions editor in Flash).
If you want to do this the same way as me, create a new AS3 project and add a new empty MovieClip to stage. Make sure its coordinates are 0,0. Set its class path to "pentomino_game".
Now open FlashDevelop, Project > New Project. Choose Flash IDE project and select the folder your Flash file is in. When the project is created, add a new .as class to the directory and edit it using FlashDevelop. Import two classes for now - MovieClip and Sprite. Make the pentomino_game class extend MovieClip.
Declare five private variables - mapGrid, gridShape, gridStartX, gridStartY and gridCellWidth and set their values as shown below:
package
{
import flash.display.MovieClip;
import flash.display.Sprite;

/**
 * Open-source pentomino game engine
 * @author Kirill Poletaev
 */

public class pentomino_game extends MovieClip
{
private var mapGrid:Array = [];

private var gridShape:Sprite = new Sprite();
private var gridStartX:int = 30;
private var gridStartY:int = 30;
private var gridCellWidth:int = 30;

public function pentomino_game() {}

}

}
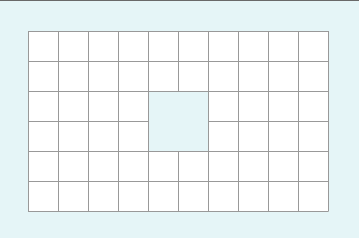
Now, in the constructor, were going to add a temporary value for mapGrid. Why temporary? Because in the future, all the maps will be stored somewhere and not hardcoded in the constructor function. Right now, make it a 10x6 grid with values "1" and "0".
Basically, "1" means a tile and "0" means a hole. Using this method youll be able to create more complex grids than just boring rectangles.
// default map
mapGrid = [
[1, 1, 1, 1, 1, 1, 1, 1, 1, 1],
[1, 1, 1, 1, 1, 1, 1, 1, 1, 1],
[1, 1, 1, 1, 0, 0, 1, 1, 1, 1],
[1, 1, 1, 1, 0, 0, 1, 1, 1, 1],
[1, 1, 1, 1, 1, 1, 1, 1, 1, 1],
[1, 1, 1, 1, 1, 1, 1, 1, 1, 1]
];
Note that the map I created is not a valid one. It will not work for a pentomino puzzle. The reason for that is the number of tiles cant be divided by 5 and remain a round number. But just for the sake of this tutorial and debugging, were going to leave these 4 holes there.
Now we add the gridShape Sprite to stage and set its coordinates:
// grid settings
addChild(gridShape);
gridShape.x = gridStartX;
gridShape.y = gridStartY;
Then we call a function drawGrid() that draws the map.
public function pentomino_game()
{
// default map
mapGrid = [
[1, 1, 1, 1, 1, 1, 1, 1, 1, 1],
[1, 1, 1, 1, 1, 1, 1, 1, 1, 1],
[1, 1, 1, 1, 0, 0, 1, 1, 1, 1],
[1, 1, 1, 1, 0, 0, 1, 1, 1, 1],
[1, 1, 1, 1, 1, 1, 1, 1, 1, 1],
[1, 1, 1, 1, 1, 1, 1, 1, 1, 1]
];

// grid settings
addChild(gridShape);
gridShape.x = gridStartX;
gridShape.y = gridStartY;

// draw tiles
drawGrid();
}
The map is drawn by first clearing gridShapes graphics, then looping through all mapGrid items and drawing a cell where it is needed:
private function drawGrid():void {
gridShape.graphics.clear();
var width:int = mapGrid[0].length;
var height:int = mapGrid.length;

var i:int;
var u:int;

// draw background
for (i = 0; i < height; i++) {
for (u = 0; u < width; u++) {
if (mapGrid[i][u] == 1) drawCell(u, i, 0xffffff, 1, 0x999999);
}
}
}

private function drawCell(width:int, height:int, fill:uint, thick:Number, line:uint):void {
gridShape.graphics.beginFill(fill);
gridShape.graphics.lineStyle(thick, line);
gridShape.graphics.drawRect(width * gridCellWidth, height * gridCellWidth, gridCellWidth, gridCellWidth);
}
You can see that we use the drawing API to draw the tiles.
Now we have a working tile map system. You can create maps and change their appearance. The results may vary, but it should look something like this:
Full code so far:
package
{
import flash.display.MovieClip;
import flash.display.Sprite;

/**
 * Open-source pentomino game engine
 * @author Kirill Poletaev
 */

public class pentomino_game extends MovieClip
{
private var mapGrid:Array = [];

private var gridShape:Sprite = new Sprite();
private var gridStartX:int = 30;
private var gridStartY:int = 30;
private var gridCellWidth:int = 30;

public function pentomino_game()
{
// default map
mapGrid = [
[1, 1, 1, 1, 1, 1, 1, 1, 1, 1],
[1, 1, 1, 1, 1, 1, 1, 1, 1, 1],
[1, 1, 1, 1, 0, 0, 1, 1, 1, 1],
[1, 1, 1, 1, 0, 0, 1, 1, 1, 1],
[1, 1, 1, 1, 1, 1, 1, 1, 1, 1],
[1, 1, 1, 1, 1, 1, 1, 1, 1, 1]
];

// grid settings
addChild(gridShape);
gridShape.x = gridStartX;
gridShape.y = gridStartY;

// draw tiles
drawGrid();
}

private function drawGrid():void {
gridShape.graphics.clear();
var width:int = mapGrid[0].length;
var height:int = mapGrid.length;

var i:int;
var u:int;

// draw background
for (i = 0; i < height; i++) {
for (u = 0; u < width; u++) {
if (mapGrid[i][u] == 1) drawCell(u, i, 0xffffff, 1, 0x999999);
}
}
}

private function drawCell(width:int, height:int, fill:uint, thick:Number, line:uint):void {
gridShape.graphics.beginFill(fill);
gridShape.graphics.lineStyle(thick, line);
gridShape.graphics.drawRect(width * gridCellWidth, height * gridCellWidth, gridCellWidth, gridCellWidth);
}

}

}
Thanks for reading!
Subscribe to:
Post Comments (Atom)
No comments:
Post a Comment
Note: Only a member of this blog may post a comment.