Showing posts with label as3. Show all posts
Showing posts with label as3. Show all posts
Thursday, February 5, 2015
Creating a Pentomino game using AS3 Part 3
In this part well add our first draggable shape.
By saying "first" I mean that only one type of shape is going to be available, and all it is going to do is follow the mouse and scale itself to have cell sizes of the ones in the grid.
Start by creating a new movie clip in your Flash project. Draw a 5x1vertical tiled shape inside of it, make sure each cells dimensions are exactly 100x100 pixels and the center of the movieclip is exactly in the center of the middle square:
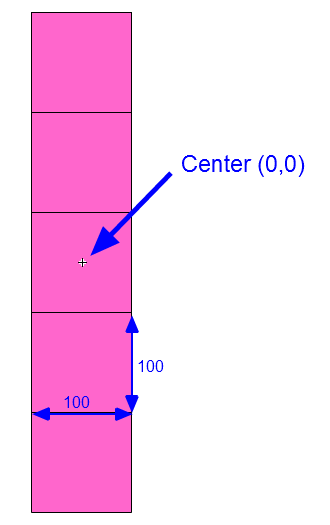
Later on, well be able to add more shapes to this movieclip in other frames. One frame holds one shape, basically. The reason were doing this like that is because this way it is very easy to use nicely drawn game assets instead of simple squares drawn by Flash API. The example above is simply a placeholder.
Now, give this movie clip a class name of "game_shape". Then remove this movie clip from the scene, keeping it only in the library.
Go to pentomino_game.as file. Declare a new "cursor" MovieClip:
In the constructor, set this cursor to a new game_shape instance and add it to the stage. Disable its mouseEnabled, mouseChildren and visible properties, add a MOUSE_MOVE event listener.
Then we also call startDragShape(1). This is temporary line, were only leaving it in the constructor for now:
The mouseMove() function simply makes the cursor follow the mouse:
Now create the startDragShape() function. The "1" that we passed in the parameter is a variable called shapeType, it represents the frame in game_shape MovieClip that holds the wanted graphic.
Because we set the width and height of each single cell in the shape to 100 pixels, we can now easily find the scale multiplier to properly size the shape. Update the cursors size, alpha, visibility and make it go to the shapeType frame.
Full code:
Thanks for reading!
The results:
Read more »
By saying "first" I mean that only one type of shape is going to be available, and all it is going to do is follow the mouse and scale itself to have cell sizes of the ones in the grid.
Start by creating a new movie clip in your Flash project. Draw a 5x1vertical tiled shape inside of it, make sure each cells dimensions are exactly 100x100 pixels and the center of the movieclip is exactly in the center of the middle square:
Later on, well be able to add more shapes to this movieclip in other frames. One frame holds one shape, basically. The reason were doing this like that is because this way it is very easy to use nicely drawn game assets instead of simple squares drawn by Flash API. The example above is simply a placeholder.
Now, give this movie clip a class name of "game_shape". Then remove this movie clip from the scene, keeping it only in the library.
Go to pentomino_game.as file. Declare a new "cursor" MovieClip:
private var cursor:MovieClip;
In the constructor, set this cursor to a new game_shape instance and add it to the stage. Disable its mouseEnabled, mouseChildren and visible properties, add a MOUSE_MOVE event listener.
// cursor
cursor = new game_shape();
addChild(cursor);
cursor.mouseEnabled = false;
cursor.mouseChildren = false;
cursor.visible = false;
addEventListener(MouseEvent.MOUSE_MOVE, mouseMove);
Then we also call startDragShape(1). This is temporary line, were only leaving it in the constructor for now:
// temporary shape
startDragShape(1);
The mouseMove() function simply makes the cursor follow the mouse:
private function mouseMove(evt:MouseEvent):void {
cursor.x = mouseX;
cursor.y = mouseY;
}
Now create the startDragShape() function. The "1" that we passed in the parameter is a variable called shapeType, it represents the frame in game_shape MovieClip that holds the wanted graphic.
Because we set the width and height of each single cell in the shape to 100 pixels, we can now easily find the scale multiplier to properly size the shape. Update the cursors size, alpha, visibility and make it go to the shapeType frame.
private function startDragShape(shapeType:int):void {
cursor.scaleX = gridCellWidth / 100;
cursor.scaleY = gridCellWidth / 100;
cursor.alpha = 0.75;
cursor.visible = true;
cursor.gotoAndStop(shapeType);
}
Full code:
package
{
import flash.display.MovieClip;
import flash.display.Sprite;
import flash.events.MouseEvent;

/**
 * Open-source pentomino game engine
 * @author Kirill Poletaev
 */

public class pentomino_game extends MovieClip
{
private var mapGrid:Array = [];

private var gridShape:Sprite = new Sprite();
private var gridStartX:int;
private var gridStartY:int;
private var gridCellWidth:int;

private var cursor:MovieClip;

public function pentomino_game()
{
// default map
mapGrid = [
[1, 1, 1, 1, 1, 1, 1, 1, 1, 1],
[1, 1, 1, 1, 1, 1, 1, 1, 1, 1],
[1, 1, 1, 1, 0, 0, 1, 1, 1, 1],
[1, 1, 1, 1, 0, 0, 1, 1, 1, 1],
[1, 1, 1, 1, 1, 1, 1, 1, 1, 1],
[1, 1, 1, 1, 1, 1, 1, 1, 1, 1]
];

// grid settings
calculateGrid();
addChild(gridShape);
gridShape.x = gridStartX;
gridShape.y = gridStartY;

// draw tiles
drawGrid();

// cursor
cursor = new game_shape();
addChild(cursor);
cursor.mouseEnabled = false;
cursor.mouseChildren = false;
cursor.visible = false;
addEventListener(MouseEvent.MOUSE_MOVE, mouseMove);

// temporary shape
startDragShape(1);
}

private function calculateGrid():void {
var columns:int = mapGrid[0].length;
var rows:int = mapGrid.length;

// free size: 520x460
// fit in: 510x450

// calculate width of a cell:
gridCellWidth = Math.round(510 / columns);

var width:int = columns * gridCellWidth;
var height:int = rows * gridCellWidth;

// calculate side margin
gridStartX = (520 - width) / 2;

if (height < 450) {
gridStartY = (450 - height) / 2;
}
if (height >= 450) {
gridCellWidth = Math.round(450 / rows);
height = rows * gridCellWidth;
width = columns * gridCellWidth;
gridStartY = (460 - height) / 2;
gridStartX = (520 - width) / 2;
}
}

private function drawGrid():void {
gridShape.graphics.clear();
var width:int = mapGrid[0].length;
var height:int = mapGrid.length;

var i:int;
var u:int;

// draw background
for (i = 0; i < height; i++) {
for (u = 0; u < width; u++) {
if (mapGrid[i][u] == 1) drawCell(u, i, 0xffffff, 1, 0x999999);
}
}
}

private function drawCell(width:int, height:int, fill:uint, thick:Number, line:uint):void {
gridShape.graphics.beginFill(fill);
gridShape.graphics.lineStyle(thick, line);
gridShape.graphics.drawRect(width * gridCellWidth, height * gridCellWidth, gridCellWidth, gridCellWidth);
}

private function mouseMove(evt:MouseEvent):void {
cursor.x = mouseX;
cursor.y = mouseY;
}

private function startDragShape(shapeType:int):void {
cursor.scaleX = gridCellWidth / 100;
cursor.scaleY = gridCellWidth / 100;
cursor.alpha = 0.75;
cursor.visible = true;
cursor.gotoAndStop(shapeType);
}

}

}
Thanks for reading!
The results:

Monday, February 2, 2015
Creating a Pentomino game using AS3 Part 44
Today we continue working on the level selection menu.
We first need to go to level_item.as and fix some fundamental problems with selecting a level there.
Move the line that adds Click event listener for the button to constructor, and use theGrid and theShapes values instead of mapGrid and shapes.
Declare these variables:
And set their values in setLevel():
Full level_item.as code:
Go to level_select.as and add a new variable levelWidth. We will use it store the value of a level thumbnails width:
We set that value in the constructor, and immediately used it a few lines below - when setting levelHolders x value.
Also, add CLICK event handlers for btn_next and btn_prev buttons in the constructor. Add a line that calls updatePage():
The goNext() and goPrev() functions increase or decrease currentLevel value by one, call selectLevel and then reposition levelHolder on the x axis. Call updatePage().
The updatePage() function updates the displayed page value. This is displayed using a dynamic text field in the MovieClip - so open Flash and add a text field with id "tPage" somewhere on the screen on the sixth frame inside level_select MC. Heres the function that updates the value:
Full level_select.as code so far:
Thanks for reading!
The results:
Read more »
We first need to go to level_item.as and fix some fundamental problems with selecting a level there.
Move the line that adds Click event listener for the button to constructor, and use theGrid and theShapes values instead of mapGrid and shapes.
public function level_item()
{
btn.addEventListener(MouseEvent.CLICK, function() { (root as MovieClip).playLevel(theGrid, theShapes); } );
}
Declare these variables:
private var theGrid:Array;
private var theShapes:Array;
And set their values in setLevel():
public function setLevel(mapGrid:Array, shapes:Array, title:String):void {
tTitle.text = title;
levelPreview.mouseEnabled = false;
drawPreview(levelPreview, mapGrid);
theGrid = mapGrid;
theShapes = shapes;
}
Full level_item.as code:
package
{
import flash.display.MovieClip;
import flash.events.MouseEvent;

/**
 * Open-source pentomino game engine
 * @author Kirill Poletaev
 */

public class level_item extends MovieClip
{
private var theGrid:Array;
private var theShapes:Array;

public function level_item()
{
btn.addEventListener(MouseEvent.CLICK, function() { (root as MovieClip).playLevel(theGrid, theShapes); } );
}

public function setLevel(mapGrid:Array, shapes:Array, title:String):void {
tTitle.text = title;
levelPreview.mouseEnabled = false;
drawPreview(levelPreview, mapGrid);
theGrid = mapGrid;
theShapes = shapes;
}

private function drawPreview(levelPreview:MovieClip, mapGrid:Array):void {
var columns:int = mapGrid[0].length;
var rows:int = mapGrid.length;
var frameWidth:int = levelPreview.width;
var frameHeight:int = levelPreview.height;
var padding:int = 5;
var fitWidth:int = levelPreview.width - (padding * 2);
var fitHeight:int = levelPreview.height - (padding * 2);
var gridStartX:int;
var gridStartY:int;

// calculate width of a cell:
var gridCellWidth:int = Math.round(fitWidth / columns);

var width:int = columns * gridCellWidth;
var height:int = rows * gridCellWidth;

// calculate side margin
gridStartX = (frameWidth - width) / 2;

if (height < fitHeight) {
gridStartY = (fitHeight - height) / 2;
}
if (height >= fitHeight) {
gridCellWidth = Math.round(fitHeight / rows);
height = rows * gridCellWidth;
width = columns * gridCellWidth;
gridStartY = (frameHeight - height) / 2;
gridStartX = (frameWidth - width) / 2;
}

// draw map
levelPreview.x = gridStartX;
levelPreview.y = gridStartY;
levelPreview.graphics.clear();
var i:int;
var u:int;

for (i = 0; i < rows; i++) {
for (u = 0; u < columns; u++) {
if (mapGrid[i][u] == 1) drawCell(u, i, 0xffffff, 1, 0x999999, gridCellWidth, levelPreview);
}
}
}

private function drawCell(width:int, height:int, fill:uint, thick:Number, line:uint, gridCellWidth:int, gridShape:MovieClip):void {
gridShape.graphics.beginFill(fill);
gridShape.graphics.lineStyle(thick, line);
gridShape.graphics.drawRect(width * gridCellWidth, height * gridCellWidth, gridCellWidth, gridCellWidth);
}
}

}
Go to level_select.as and add a new variable levelWidth. We will use it store the value of a level thumbnails width:
private var levelWidth:int;
We set that value in the constructor, and immediately used it a few lines below - when setting levelHolders x value.
Also, add CLICK event handlers for btn_next and btn_prev buttons in the constructor. Add a line that calls updatePage():
public function level_select()
{
(root as MovieClip).stop();
btn_back.addEventListener(MouseEvent.CLICK, doBack);

levelHolder = new MovieClip();
for (var i:int = 0; i < 5; i++) {
var level:MovieClip = new level_item();
levelHolder.addChild(level);
levelItems.push(level);
level.x = (level.width + distance) * i;
levelWidth = level.width;
}
addChild(levelHolder);
levelHolder.y = 120;
levelHolder.x = -(levelWidth + distance) * 2 + levelWidth / 2;
goX = levelHolder.x;
selectLevel();
setChildIndex(btn_next, numChildren - 1);
setChildIndex(btn_prev, numChildren - 1);
addEventListener(Event.ENTER_FRAME, onFrame);
btn_next.addEventListener(MouseEvent.CLICK, goNext);
btn_prev.addEventListener(MouseEvent.CLICK, goPrev);
updatePage();
}
The goNext() and goPrev() functions increase or decrease currentLevel value by one, call selectLevel and then reposition levelHolder on the x axis. Call updatePage().
private function goNext(evt:MouseEvent):void {
currentLevel++;
selectLevel();
levelHolder.x = -(levelWidth + distance) * 1 + levelWidth / 2;
updatePage();
}

private function goPrev(evt:MouseEvent):void {
currentLevel--;
selectLevel();
levelHolder.x = -(levelWidth + distance) * 3 + levelWidth / 2;
updatePage();
}
The updatePage() function updates the displayed page value. This is displayed using a dynamic text field in the MovieClip - so open Flash and add a text field with id "tPage" somewhere on the screen on the sixth frame inside level_select MC. Heres the function that updates the value:
private function updatePage():void {
tPage.text = (currentLevel + 1) + "/" + levels.length;
}
Full level_select.as code so far:
package
{
import flash.display.MovieClip;
import flash.events.Event;
import flash.events.MouseEvent;

/**
 * Open-source pentomino game engine
 * @author Kirill Poletaev
 */

public class level_select extends MovieClip
{

private var levels:Array = [
{grid:
[
[1, 1, 1, 1, 1, 1, 1, 1, 1, 1],
[1, 1, 1, 1, 1, 1, 1, 1, 1, 1],
[1, 1, 1, 1, 1, 1, 1, 1, 1, 1],
[1, 1, 1, 1, 1, 1, 1, 1, 1, 1],
[1, 1, 1, 1, 1, 1, 1, 1, 1, 1],
[1, 1, 1, 1, 1, 1, 1, 1, 1, 1]
],
shapes:
[2, 2, 2, 2, 2, 2, 2, 2, 2, 2, 2, 2],
title:
"Standard 10x6"
},
{grid:
[
[1, 1, 1, 1, 1, 1, 1, 1, 1, 1],
[1, 1, 1, 1, 1, 1, 1, 1, 1, 1],
[1, 1, 1, 1, 1, 1, 1, 1, 1, 1],
[1, 1, 1, 1, 1, 1, 1, 1, 1, 1],
[1, 1, 1, 1, 1, 1, 1, 1, 1, 1],
[1, 1, 1, 1, 1, 1, 1, 1, 1, 1]
],
shapes:
[2, 2, 2, 2, 2, 2, 2, 2, 2, 2, 2, 2],
title:
"Standard 2"
},
{grid:
[
[1, 1, 1, 1, 1, 1, 1, 1, 1, 1],
[1, 1, 1, 1, 1, 1, 1, 1, 1, 1],
[1, 1, 1, 1, 1, 1, 1, 1, 1, 1],
[1, 1, 1, 1, 1, 1, 1, 1, 1, 1],
[1, 1, 1, 1, 1, 1, 1, 1, 1, 1],
[1, 1, 1, 1, 1, 1, 1, 1, 1, 1]
],
shapes:
[2, 2, 2, 2, 2, 2, 2, 2, 2, 2, 2, 2],
title:
"Standard 3"
},
{grid:
[
[1, 1, 1, 1, 1, 1, 1, 1, 1, 1],
[1, 1, 1, 1, 1, 1, 1, 1, 1, 1],
[1, 1, 1, 1, 1, 1, 1, 1, 1, 1],
[1, 1, 1, 1, 1, 1, 1, 1, 1, 1],
[1, 1, 1, 1, 1, 1, 1, 1, 1, 1],
[1, 1, 1, 1, 1, 1, 1, 1, 1, 1]
],
shapes:
[2, 2, 2, 2, 2, 2, 2, 2, 2, 2, 2, 2],
title:
"Standard 4"
},
{grid:
[
[1, 1, 1, 1, 1, 1, 1, 1, 1, 1],
[1, 1, 1, 1, 1, 1, 1, 1, 1, 1],
[1, 1, 1, 1, 1, 1, 1, 1, 1, 1],
[1, 1, 1, 1, 1, 1, 1, 1, 1, 1],
[1, 1, 1, 1, 1, 1, 1, 1, 1, 1],
[1, 1, 1, 1, 1, 1, 1, 1, 1, 1]
],
shapes:
[2, 2, 2, 2, 2, 2, 2, 2, 2, 2, 2, 2],
title:
"Standard 5"
}
];

private var currentLevel:int = 0;
private var distance:int = 100;
private var levelHolder:MovieClip;
private var levelItems:Array = [];
private var goX:int;
private var levelWidth:int;

public function level_select()
{
(root as MovieClip).stop();
btn_back.addEventListener(MouseEvent.CLICK, doBack);

levelHolder = new MovieClip();
for (var i:int = 0; i < 5; i++) {
var level:MovieClip = new level_item();
levelHolder.addChild(level);
levelItems.push(level);
level.x = (level.width + distance) * i;
levelWidth = level.width;
}
addChild(levelHolder);
levelHolder.y = 120;
levelHolder.x = -(levelWidth + distance) * 2 + levelWidth / 2;
goX = levelHolder.x;
selectLevel();
setChildIndex(btn_next, numChildren - 1);
setChildIndex(btn_prev, numChildren - 1);
addEventListener(Event.ENTER_FRAME, onFrame);
btn_next.addEventListener(MouseEvent.CLICK, goNext);
btn_prev.addEventListener(MouseEvent.CLICK, goPrev);
updatePage();
}

private function updatePage():void {
tPage.text = (currentLevel + 1) + "/" + levels.length;
}

private function goNext(evt:MouseEvent):void {
currentLevel++;
selectLevel();
levelHolder.x = -(levelWidth + distance) * 1 + levelWidth / 2;
updatePage();
}

private function goPrev(evt:MouseEvent):void {
currentLevel--;
selectLevel();
levelHolder.x = -(levelWidth + distance) * 3 + levelWidth / 2;
updatePage();
}

private function selectLevel():void {
setLevelPreview(0, currentLevel - 2);
setLevelPreview(1, currentLevel - 1);
setLevelPreview(2, currentLevel);
setLevelPreview(3, currentLevel + 1);
setLevelPreview(4, currentLevel + 2);

if (currentLevel < levels.length - 1) {
btn_next.alpha = 1;
btn_next.mouseEnabled = true;
}else {
btn_next.alpha = 0;
btn_next.mouseEnabled = false;
}

if (currentLevel > 0) {
btn_prev.alpha = 1;
btn_prev.mouseEnabled = true;
}else {
btn_prev.alpha = 0;
btn_prev.mouseEnabled = false;
}
}

private function setLevelPreview(ind:int, num:int):void {
if (num >= 0 && num < levels.length) {
levelItems[ind].alpha = 1;
levelItems[ind].mouseChildren = true;
levelItems[ind].setLevel(levels[num].grid, levels[num].shapes, levels[num].title);
}else {
levelItems[ind].alpha = 0;
levelItems[ind].mouseChildren = false;
}
}

private function onFrame(evt:Event):void {
levelHolder.x += Math.round((goX - levelHolder.x) / 5);
}

private function doBack(evt:MouseEvent):void {
(root as MovieClip).gotoAndStop(1);
}
}

}
Thanks for reading!
The results:
Creating a Pentomino game using AS3 Part 10
In this tutorial well make the placed shapes moveable.
Well start by modifying the startDragShape() function. Add 3 new function parameters - rot, scalex, scaley, set their default values to 0. Apply the rot value to cursors rotation property, scalex to scaleX and scaley to scaleY. Then check if scalex is 0 (the value was not changed) and set scaleX and scaleY to gridCellWidth / 100:
Now go to mouseUp() function and add a line that adds a MOUSE_DOWN event listener to newShape, also push the newShape value to placedShapes array:
Create the placeShapeDown() function. In the first line, we set the selectedShape value to the current frame of the placed shape:
After that we call startDragShape() function and pass values to all of the parameters as shown below:
Then we need to call updateCurrentValues() to fill the currentValues array with relative cell coordinates of an already rotated and flipped shape. Calculate the position of the said shape on the grid, and using these values, loop through the 5 cells in mapGrid and set their values to 1.
Next we simply remove the listener and the shape:
And finally we call checkPut():
Full code so far:
Thanks for reading!
Results:
Read more »
Well start by modifying the startDragShape() function. Add 3 new function parameters - rot, scalex, scaley, set their default values to 0. Apply the rot value to cursors rotation property, scalex to scaleX and scaley to scaleY. Then check if scalex is 0 (the value was not changed) and set scaleX and scaleY to gridCellWidth / 100:
private function startDragShape(shapeType:int, rot:int = 0, scalex:Number = 0, scaley:Number = 0):void {
cursor.rotation = rot;
cursor.scaleX = scalex;
cursor.scaleY = scaley;
if (scalex == 0) {
cursor.scaleX = gridCellWidth / 100;
cursor.scaleY = gridCellWidth / 100;
}
cursor.alpha = 0.75;
cursor.visible = true;
cursor.gotoAndStop(shapeType);
}
Now go to mouseUp() function and add a line that adds a MOUSE_DOWN event listener to newShape, also push the newShape value to placedShapes array:
private function mouseUp(evt:MouseEvent):void {
stopDragShape();
if (selectedShape > 0) {
if (!canPutHere) {
availableShapes[selectedShape-1]++;
shapeButtons[selectedShape-1].count.text = availableShapes[selectedShape-1];
selectedShape = 0;
}
if (canPutHere) {
var mousePos:Point = new Point(Math.floor((mouseX - gridStartX) / gridCellWidth), Math.floor((mouseY - gridStartY) / gridCellWidth));
var newShape:MovieClip = new game_shape();
addChild(newShape);
newShape.x = gridStartX + (mousePos.x+1) * gridCellWidth - gridCellWidth / 2;
newShape.y = gridStartY + (mousePos.y + 1) * gridCellWidth - gridCellWidth / 2;
newShape.rotation = cursor.rotation;
newShape.scaleX = cursor.scaleX;
newShape.scaleY = cursor.scaleY;
newShape.gotoAndStop(selectedShape);
newShape.addEventListener(MouseEvent.MOUSE_DOWN, placedShapeDown);
placedShapes.push(newShape);
for (var i:int = 0; i < currentValues.length; i++) {
var cellX:int = currentValues[i][0] + mousePos.x;
var cellY:int = currentValues[i][1] + mousePos.y;
mapGrid[cellY][cellX] = 2;
}
cursor.parent.setChildIndex(cursor, cursor.parent.numChildren - 1);
selectedShape = 0;
}
}
}
Create the placeShapeDown() function. In the first line, we set the selectedShape value to the current frame of the placed shape:
selectedShape = evt.currentTarget.currentFrame;
After that we call startDragShape() function and pass values to all of the parameters as shown below:
// start dragging
startDragShape(evt.currentTarget.currentFrame, evt.currentTarget.rotation, evt.currentTarget.scaleX, evt.currentTarget.scaleY);
Then we need to call updateCurrentValues() to fill the currentValues array with relative cell coordinates of an already rotated and flipped shape. Calculate the position of the said shape on the grid, and using these values, loop through the 5 cells in mapGrid and set their values to 1.
// update grid values
updateCurrentValues();
var shapePos:Point = new Point(Math.floor((evt.currentTarget.x - gridStartX) / gridCellWidth), Math.floor((evt.currentTarget.y - gridStartY) / gridCellWidth));
for (var i:int = 0; i < 5; i++) {
mapGrid[shapePos.y + currentValues[i][1]][shapePos.x + currentValues[i][0]] = 1;
}
Next we simply remove the listener and the shape:
// remove shape
evt.currentTarget.removeEventListener(MouseEvent.MOUSE_DOWN, placedShapeDown);
evt.currentTarget.parent.removeChild(evt.currentTarget);
And finally we call checkPut():
checkPut();
Full code so far:
package
{
import flash.display.MovieClip;
import flash.display.Sprite;
import flash.events.Event;
import flash.events.KeyboardEvent;
import flash.events.MouseEvent;
import flash.geom.Point;
import flash.utils.ByteArray;

/**
 * Open-source pentomino game engine
 * @author Kirill Poletaev
 */

public class pentomino_game extends MovieClip
{
private var mapGrid:Array = [];
private var availableShapes:Array = [];
private var shapeButtons:Array = [];
private var shapeValues:Array = [];
private var placedShapes:Array = [];

private var gridShape:Sprite = new Sprite();
private var canPutShape:Sprite = new Sprite();
private var gridStartX:int;
private var gridStartY:int;
private var gridCellWidth:int;

private var cursor:MovieClip;
private var rolledShape:MovieClip;
private var selectedShape:int = 0;
private var canPutHere:Boolean = false;
private var currentValues:Array = [];

public function pentomino_game()
{
// default map
mapGrid = [
[1, 1, 1, 1, 1, 1, 1, 1, 1, 1],
[1, 1, 1, 1, 1, 1, 1, 1, 1, 1],
[1, 1, 1, 1, 1, 1, 1, 1, 1, 1],
[1, 1, 1, 1, 1, 1, 1, 1, 1, 1],
[1, 1, 1, 1, 1, 1, 1, 1, 1, 1],
[1, 1, 1, 1, 1, 1, 1, 1, 1, 1]
];

availableShapes = [2, 2, 2, 2, 2, 2, 2, 2, 2, 2, 2, 2];

shapeValues = [
[[0, 0], [0, 1], [0, 2], [0, -1], [0, -2]],
[[0, 0], [0, -1], [0, 1], [1, 0], [1, -1]],
[[0, 0], [0, 1], [0, 2], [0, -1], [ -1, -1]],
[[0, 0], [0, 1], [0, -1], [ -1, 0], [1, -1]],
[[0, 0], [ -1, 0], [ -2, 0], [0, -1], [1, -1]],
[[0, 0], [0, 1], [0, -1], [1, -1], [ -1, -1]],
[[0, 0], [1, 0], [ -1, 0], [1, -1], [ -1, -1]],
[[0, 0], [ -1, 0], [ -2, 0], [0, -1], [0, -2]],
[[0, 0], [0, 1], [ -1, 1], [1, 0], [1, -1]],
[[0, 0], [0, 1], [0, -1], [1, 0], [ -1, 0]],
[[0, 0], [ -1, 0], [ -2, 0], [1, 0], [0, -1]],
[[0, 0], [0, 1], [1, 1], [0, -1], [-1, -1]]
];

// grid settings
calculateGrid();
addChild(gridShape);
gridShape.x = gridStartX;
gridShape.y = gridStartY;

// draw tiles
drawGrid();

// can put shape
addChild(canPutShape);
canPutShape.x = gridStartX;
canPutShape.y = gridStartY;

// add shape buttons
for (var i:int = 0; i < 4; i++) {
for (var u:int = 0; u < 3; u++) {
var shapeButton:MovieClip = new select_shape();
shapeButton.x = 528 + u * 62;
shapeButton.y = 55 + i * 62;
addChild(shapeButton);
shapeButton.bg.alpha = 0.3;
shapeButton.count.text = String(availableShapes[3 * i + u]);
shapeButton.shape.gotoAndStop(3 * i + u + 1);
shapeButtons.push(shapeButton);
shapeButton.addEventListener(MouseEvent.ROLL_OVER, buttonOver);
shapeButton.addEventListener(MouseEvent.ROLL_OUT, buttonOut);
shapeButton.addEventListener(MouseEvent.MOUSE_DOWN, buttonDown);
}
}

// cursor
cursor = new game_shape();
addChild(cursor);
cursor.mouseEnabled = false;
cursor.mouseChildren = false;
cursor.visible = false;
addEventListener(MouseEvent.MOUSE_MOVE, mouseMove);
addEventListener(MouseEvent.MOUSE_WHEEL, mouseWheel);
stage.addEventListener(KeyboardEvent.KEY_DOWN, keyDown);
addEventListener(Event.ENTER_FRAME, everyFrame);
addEventListener(MouseEvent.MOUSE_UP, mouseUp);
}

private function calculateGrid():void {
var columns:int = mapGrid[0].length;
var rows:int = mapGrid.length;

// free size: 520x460
// fit in: 510x450

// calculate width of a cell:
gridCellWidth = Math.round(510 / columns);

var width:int = columns * gridCellWidth;
var height:int = rows * gridCellWidth;

// calculate side margin
gridStartX = (520 - width) / 2;

if (height < 450) {
gridStartY = (450 - height) / 2;
}
if (height >= 450) {
gridCellWidth = Math.round(450 / rows);
height = rows * gridCellWidth;
width = columns * gridCellWidth;
gridStartY = (460 - height) / 2;
gridStartX = (520 - width) / 2;
}
}

private function drawGrid():void {
gridShape.graphics.clear();
var width:int = mapGrid[0].length;
var height:int = mapGrid.length;

var i:int;
var u:int;

// draw background
for (i = 0; i < height; i++) {
for (u = 0; u < width; u++) {
if (mapGrid[i][u] == 1) drawCell(u, i, 0xffffff, 1, 0x999999);
}
}
}

private function drawCell(width:int, height:int, fill:uint, thick:Number, line:uint):void {
gridShape.graphics.beginFill(fill);
gridShape.graphics.lineStyle(thick, line);
gridShape.graphics.drawRect(width * gridCellWidth, height * gridCellWidth, gridCellWidth, gridCellWidth);
}

private function mouseMove(evt:MouseEvent):void {
cursor.x = mouseX;
cursor.y = mouseY;
checkPut();
}

private function checkPut():void {
if (selectedShape > 0) {
var mousePos:Point = new Point(Math.floor((mouseX - gridStartX) / gridCellWidth), Math.floor((mouseY - gridStartY) / gridCellWidth));
canPutHere = true;
updateCurrentValues();
for (var i:int = 0; i < currentValues.length; i++) {
var cellX:int = currentValues[i][0] + mousePos.x;
var cellY:int = currentValues[i][1] + mousePos.y;
if (cellX < 0 || cellY < 0 || cellX >= mapGrid[0].length || cellY >= mapGrid.length || mapGrid[cellY][cellX]!=1) {
canPutHere = false;
}
}
if (canPutHere) {
cursor.alpha = 0.8;
}
if (!canPutHere) {
canPutShape.graphics.clear();
cursor.alpha = 0.4;
}
}
}

private function drawCanPut():void {
canPutShape.graphics.clear();
var mousePos:Point = new Point(Math.floor((mouseX - gridStartX) / gridCellWidth), Math.floor((mouseY - gridStartY) / gridCellWidth));
for (var i:int = 0; i < currentValues.length; i++) {
var cellX:int = (currentValues[i][0] + mousePos.x) * gridCellWidth;
var cellY:int = (currentValues[i][1] + mousePos.y) * gridCellWidth;
canPutShape.graphics.beginFill(0x00ff00, 0.2);
canPutShape.graphics.drawRect(cellX, cellY, gridCellWidth, gridCellWidth);
}
}

private function mouseWheel(evt:MouseEvent):void {
if (evt.delta > 0) cursor.rotation += 90;
if (evt.delta < 0) cursor.rotation -= 90;
if (selectedShape > 0) checkPut();
}

private function keyDown(evt:KeyboardEvent):void {
if (evt.keyCode == 68) cursor.rotation += 90;
if (evt.keyCode == 65) cursor.rotation -= 90;
if (evt.keyCode == 32) cursor.scaleX *= -1;
if (selectedShape > 0) checkPut();
}

private function updateCurrentValues():void {
currentValues = clone(shapeValues[selectedShape-1]);
for (var i:int = 0; i < 5; i++) {
if (cursor.rotation == 90) {
currentValues[i].reverse();
currentValues[i][0] *= -1;
}
if (cursor.rotation == 180 || cursor.rotation == -180) {
currentValues[i][0] *= -1;
currentValues[i][1] *= -1;
}
if (cursor.rotation == -90) {
currentValues[i].reverse();
currentValues[i][1] *= -1;
}
if (cursor.scaleX < 0 && (cursor.rotation != -90 || cursor.rotation != 90)) {
currentValues[i][0] *= -1;
}
if (cursor.scaleX < 0 && (cursor.rotation == -90 || cursor.rotation == 90)) {
currentValues[i][0] *= -1;
currentValues[i][1] *= -1;
}
}
drawCanPut();
}

private function clone(source:Object):*{
var myBA:ByteArray = new ByteArray();
myBA.writeObject(source);
myBA.position = 0;
return(myBA.readObject());
}

private function startDragShape(shapeType:int, rot:int = 0, scalex:Number = 0, scaley:Number = 0):void {
cursor.rotation = rot;
cursor.scaleX = scalex;
cursor.scaleY = scaley;
if (scalex == 0) {
cursor.scaleX = gridCellWidth / 100;
cursor.scaleY = gridCellWidth / 100;
}
cursor.alpha = 0.75;
cursor.visible = true;
cursor.gotoAndStop(shapeType);
}

private function stopDragShape():void {
canPutShape.graphics.clear();
cursor.alpha = 0;
cursor.visible = false;
}

private function everyFrame(evt:Event):void {
if (rolledShape != null) {
rolledShape.rotation += 4;
}
}

private function buttonOver(evt:MouseEvent):void {
if(selectedShape==0){
evt.currentTarget.bg.alpha = 1;
rolledShape = evt.target.shape;
}
}

private function buttonOut(evt:MouseEvent):void {
evt.currentTarget.bg.alpha = 0.3;
rolledShape = null;
}

private function buttonDown(evt:MouseEvent):void {
selectedShape = evt.currentTarget.shape.currentFrame;
if(availableShapes[selectedShape-1]>0){
startDragShape(selectedShape);
availableShapes[selectedShape-1]--;
evt.currentTarget.count.text = availableShapes[selectedShape-1];
evt.currentTarget.bg.alpha = 0.3;
rolledShape = null;
}else {
selectedShape = 0;
}
}

private function mouseUp(evt:MouseEvent):void {
stopDragShape();
if (selectedShape > 0) {
if (!canPutHere) {
availableShapes[selectedShape-1]++;
shapeButtons[selectedShape-1].count.text = availableShapes[selectedShape-1];
selectedShape = 0;
}
if (canPutHere) {
var mousePos:Point = new Point(Math.floor((mouseX - gridStartX) / gridCellWidth), Math.floor((mouseY - gridStartY) / gridCellWidth));
var newShape:MovieClip = new game_shape();
addChild(newShape);
newShape.x = gridStartX + (mousePos.x+1) * gridCellWidth - gridCellWidth / 2;
newShape.y = gridStartY + (mousePos.y + 1) * gridCellWidth - gridCellWidth / 2;
newShape.rotation = cursor.rotation;
newShape.scaleX = cursor.scaleX;
newShape.scaleY = cursor.scaleY;
newShape.gotoAndStop(selectedShape);
newShape.addEventListener(MouseEvent.MOUSE_DOWN, placedShapeDown);
placedShapes.push(newShape);
for (var i:int = 0; i < currentValues.length; i++) {
var cellX:int = currentValues[i][0] + mousePos.x;
var cellY:int = currentValues[i][1] + mousePos.y;
mapGrid[cellY][cellX] = 2;
}
cursor.parent.setChildIndex(cursor, cursor.parent.numChildren - 1);
selectedShape = 0;
}
}
}

private function placedShapeDown(evt:MouseEvent):void {
selectedShape = evt.currentTarget.currentFrame;

// start dragging
startDragShape(evt.currentTarget.currentFrame, evt.currentTarget.rotation, evt.currentTarget.scaleX, evt.currentTarget.scaleY);

// update grid values
updateCurrentValues();
var shapePos:Point = new Point(Math.floor((evt.currentTarget.x - gridStartX) / gridCellWidth), Math.floor((evt.currentTarget.y - gridStartY) / gridCellWidth));
for (var i:int = 0; i < 5; i++) {
mapGrid[shapePos.y + currentValues[i][1]][shapePos.x + currentValues[i][0]] = 1;
}

// remove shape
evt.currentTarget.removeEventListener(MouseEvent.MOUSE_DOWN, placedShapeDown);
evt.currentTarget.parent.removeChild(evt.currentTarget);

checkPut();
}
}

}
Thanks for reading!
Results:
Friday, January 30, 2015
Flash AS3 Brush Drawing application source code

Highly customizable and very smooth AS3 Brush Drawing application source code. Now available for just $8.
Visit Activeden for more info and a live example!
Have fun!
Creating a Pentomino game using AS3 Part 39
In this tutorial well improve our solution finding algorithm by fixing some bugs and adding a more advanced pre-check.
Go to tryRemainingShapes() function and before the if..statement that calls hasSpace() function add another if..statement that checks if the cell with provided coordinates has value of 1. This is basically what we have in hasSpace() right now, but well be completely rewriting that function and checking for different things in it.
We need to label the while... loop by writing "outerLoop: " before the loop. This will allow us to break this loop from inside another loop. We break outerLoop if hasSpace() returns false.
Another change here is that we declare a new passedShapes Array that we can use to later remove the first element from and pass it to the next tryRemaininShapes() cycle. Simply passing a clone of innerTempShapes with .splice() does not work - it returns the element instead of the array.
Go to onFrame() and add the hasSpace() check there as well:
The hasSpace() function checks if the area on the grid that the cell is located in has more than 5 cells in it. Well call these cells neighbours. However, the cell itself counts as a neighbour too.
Declare a variable called "neighbours" and set its value to 1. Clone the grid data and set the current cells value in the grid to "n". All cells that are connected to this cell will have value "n".
Then add a line that adds returned value of getNeighbours() function to neighbours. Check if the number is greater than or equals 5, return true. Otherwise, return false.
The getNeighbours() function is a recursive function that loops through neighbours and checks their neighbours as well, and goes on before it meets a wall.
Our solving algorithm is now more efficient (uses considerably less attempts => computes faster) and more accurate in finding solutions. Still, it is not fast enough to solve medium or bigger sized puzzles.
Full code so far:
Thanks for reading!
Read more »
Go to tryRemainingShapes() function and before the if..statement that calls hasSpace() function add another if..statement that checks if the cell with provided coordinates has value of 1. This is basically what we have in hasSpace() right now, but well be completely rewriting that function and checking for different things in it.
We need to label the while... loop by writing "outerLoop: " before the loop. This will allow us to break this loop from inside another loop. We break outerLoop if hasSpace() returns false.
Another change here is that we declare a new passedShapes Array that we can use to later remove the first element from and pass it to the next tryRemaininShapes() cycle. Simply passing a clone of innerTempShapes with .splice() does not work - it returns the element instead of the array.
private function tryRemainingShapes(tShapes:Array, tGrid:Array):void {
var innerTempShapes:Array = clone(tShapes);
var innerTempGrid:Array = clone(tGrid);
var e:int;
var t:int;
var passedShapes:Array;
// ...take each remaining shape...
outerLoop: while (innerTempShapes.length > 0) {
var currentShapeValues:Array = clone(shapeValues[innerTempShapes[0]]);
// ...try putting it in each cell...
for (e = 0; e < allCells.length; e++) {
// ...rotate the shape...
if (innerTempGrid[allCells[e].y][allCells[e].x] == 1) {
if (hasSpace(innerTempGrid, allCells[e].x, allCells[e].y)) {
for (t = 0; t < 8; t++) {
// ...check if it can be put...
if (canPut(currentShapeValues, allCells[e].x, allCells[e].y, innerTempGrid, t)) {
// ...on success, put this shape and try all remaining shapes...
putHere(currentShapeValues, allCells[e].x, allCells[e].y, innerTempGrid, t, innerTempShapes[0] + 2);
passedShapes = innerTempShapes.concat();
passedShapes.splice(0, 1);
tryRemainingShapes(passedShapes, innerTempGrid);
// ...if no empty cells remaining, then the puzzle is solved.
if (checkWin(innerTempGrid)) doWin(clone(innerTempGrid));
// ...step backwards...
removeHere(currentShapeValues, allCells[e].x, allCells[e].y, innerTempGrid, t);
}
}
}else {
break outerLoop;
}
}
}
// ...get rid of the shape and continue...
innerTempShapes.shift();
}
}
Go to onFrame() and add the hasSpace() check there as well:
private function onFrame(evt:Event):void {
// set temporary values
tempGrid = clone(givenGrid);
tempShapes = clone(givenShapes);
// perform a new cycle
var i:int;
var u:int;
var currentShapeValues:Array;
// Take the first shape in this cycle...
currentShapeValues = clone(shapeValues[tempShapes[cycleNum]]);
// ...remove current shape from shapes array (so that it isnt used twice)...
var shapeType:int = tempShapes[cycleNum] + 2;
tempShapes.splice(cycleNum, 1);
// ...try putting it in each available cell...
for (i = 0; i < allCells.length; i++) {
// ...try putting the shape in all 8 possible positions...
if(hasSpace(tempGrid, allCells[i].x, allCells[i].y)){
for (u = 0; u < 8; u++) {
// ...if successful, continue placing other cells...
if (canPut(currentShapeValues, allCells[i].x, allCells[i].y, tempGrid, u)) {
// ...first put the first shape on the grid...
putHere(currentShapeValues, allCells[i].x, allCells[i].y, tempGrid, u, shapeType);
// ...try all remaining shapes...
tryRemainingShapes(tempShapes, tempGrid);
removeHere(currentShapeValues, allCells[i].x, allCells[i].y, tempGrid, u);
}
}
}
}
// display info
tInfo.text = Solving level " + levelName + "
Attempts:  + attempts + "
Solutions: " + solutions.length;
// next cycle
nextCycle();
}
The hasSpace() function checks if the area on the grid that the cell is located in has more than 5 cells in it. Well call these cells neighbours. However, the cell itself counts as a neighbour too.
Declare a variable called "neighbours" and set its value to 1. Clone the grid data and set the current cells value in the grid to "n". All cells that are connected to this cell will have value "n".
Then add a line that adds returned value of getNeighbours() function to neighbours. Check if the number is greater than or equals 5, return true. Otherwise, return false.
private function hasSpace(mapGrid:Array, cX:int, cY:int):Boolean {
var neighbours:int = 1; // count self as neighbour
var nGrid:Array = clone(mapGrid);
nGrid[cY][cX] = "n"; // set to "n" if together
neighbours += getNeighbours(cX, cY, nGrid);
if (neighbours >= 5) return true;
return false;
}
The getNeighbours() function is a recursive function that loops through neighbours and checks their neighbours as well, and goes on before it meets a wall.
private function getNeighbours(cX:int, cY:int, grid:Array):int {
var n:int = 0;
if (cY != 0 && grid[cY - 1][cX] == 1) {
n++;
grid[cY - 1][cX] = "n";
n += getNeighbours(cX, cY - 1, grid);
}
if (cY != grid.length - 1 && grid[cY + 1][cX] == 1) {
n++;
grid[cY + 1][cX] = "n";
n += getNeighbours(cX, cY + 1, grid);
}
if (cX != 0 && grid[cY][cX - 1] == 1) {
n++;
grid[cY][cX - 1] = "n";
n += getNeighbours(cX - 1, cY, grid);
}
if (cX != grid[0].length - 1 && grid[cY][cX + 1] == 1) {
n++;
grid[cY][cX + 1] = "n";
n += getNeighbours(cX + 1, cY, grid);
}
return n;
}
Our solving algorithm is now more efficient (uses considerably less attempts => computes faster) and more accurate in finding solutions. Still, it is not fast enough to solve medium or bigger sized puzzles.
Full code so far:
package
{
import fl.controls.TextInput;
import flash.display.MovieClip;
import flash.display.Shape;
import flash.events.Event;
import flash.events.MouseEvent;
import flash.geom.Point;
import flash.net.SharedObject;
import flash.text.TextField;
import flash.utils.ByteArray;

/**
 * Open-source pentomino game engine
 * @author Kirill Poletaev
 */

public class level_solver extends MovieClip
{

private var allCells:Array;
private var tempGrid:Array;
private var tempShapes:Array;
private var givenGrid:Array;
private var givenShapes:Array;
private var cycleNum:int;
private var attempts:int;
private var solutions:Array;
private var levelName:String;
private var shapeValues:Array;
private var currentSol:int = 0;

public function level_solver()
{
}

public function solve(levelItem:Object):void {
drawPreview(levelPreview, levelItem.grid);
tInfo.text = Solving level " + levelItem.name + ";
var shapes:Array = levelItem.shapes;
var i:int
var u:int;
givenShapes = [];
for (i = 1; i <= 12; i++) {
this["tShape" + i].text = shapes[i - 1];
for (u = 0; u < shapes[i - 1]; u++) {
givenShapes.push(i - 1);
}
}
allCells = [];
for (i = 0; i < levelItem.grid.length; i++) {
for (u = 0; u < levelItem.grid.length; u++) {
if (levelItem.grid[i][u] == 1) {
allCells.push(new Point(u, i));
}
}
}
givenGrid = levelItem.grid;
tempGrid = [];
tempShapes = [];
solutions = [];
levelName = levelItem.name;
attempts = 0;
cycleNum = 0;
shapeValues = [
[[0, 0], [0, 1], [0, 2], [0, -1], [0, -2]],
[[0, 0], [0, -1], [0, 1], [1, 0], [1, -1]],
[[0, 0], [0, 1], [0, 2], [0, -1], [ -1, -1]],
[[0, 0], [0, 1], [0, -1], [ -1, 0], [1, -1]],
[[0, 0], [ -1, 0], [ -2, 0], [0, -1], [1, -1]],
[[0, 0], [0, 1], [0, -1], [1, -1], [ -1, -1]],
[[0, 0], [1, 0], [ -1, 0], [1, -1], [ -1, -1]],
[[0, 0], [ -1, 0], [ -2, 0], [0, -1], [0, -2]],
[[0, 0], [0, 1], [ -1, 1], [1, 0], [1, -1]],
[[0, 0], [0, 1], [0, -1], [1, 0], [ -1, 0]],
[[0, 0], [ -1, 0], [ -2, 0], [1, 0], [0, -1]],
[[0, 0], [0, 1], [1, 1], [0, -1], [-1, -1]]
];
addEventListener(Event.ENTER_FRAME, onFrame);
btn_prev.addEventListener(MouseEvent.CLICK, goPrev);
btn_next.addEventListener(MouseEvent.CLICK, goNext);
}

private function onFrame(evt:Event):void {
// set temporary values
tempGrid = clone(givenGrid);
tempShapes = clone(givenShapes);
// perform a new cycle
var i:int;
var u:int;
var currentShapeValues:Array;
// Take the first shape in this cycle...
currentShapeValues = clone(shapeValues[tempShapes[cycleNum]]);
// ...remove current shape from shapes array (so that it isnt used twice)...
var shapeType:int = tempShapes[cycleNum] + 2;
tempShapes.splice(cycleNum, 1);
// ...try putting it in each available cell...
for (i = 0; i < allCells.length; i++) {
// ...try putting the shape in all 8 possible positions...
if(hasSpace(tempGrid, allCells[i].x, allCells[i].y)){
for (u = 0; u < 8; u++) {
// ...if successful, continue placing other cells...
if (canPut(currentShapeValues, allCells[i].x, allCells[i].y, tempGrid, u)) {
// ...first put the first shape on the grid...
putHere(currentShapeValues, allCells[i].x, allCells[i].y, tempGrid, u, shapeType);
// ...try all remaining shapes...
tryRemainingShapes(tempShapes, tempGrid);
removeHere(currentShapeValues, allCells[i].x, allCells[i].y, tempGrid, u);
}
}
}
}
// display info
tInfo.text = Solving level " + levelName + "
Attempts:  + attempts + "
Solutions: " + solutions.length;
// next cycle
nextCycle();
}

private function tryRemainingShapes(tShapes:Array, tGrid:Array):void {
var innerTempShapes:Array = clone(tShapes);
var innerTempGrid:Array = clone(tGrid);
var e:int;
var t:int;
var passedShapes:Array;
// ...take each remaining shape...
outerLoop: while (innerTempShapes.length > 0) {
var currentShapeValues:Array = clone(shapeValues[innerTempShapes[0]]);
// ...try putting it in each cell...
for (e = 0; e < allCells.length; e++) {
// ...rotate the shape...
if (innerTempGrid[allCells[e].y][allCells[e].x] == 1) {
if (hasSpace(innerTempGrid, allCells[e].x, allCells[e].y)) {
for (t = 0; t < 8; t++) {
// ...check if it can be put...
if (canPut(currentShapeValues, allCells[e].x, allCells[e].y, innerTempGrid, t)) {
// ...on success, put this shape and try all remaining shapes...
putHere(currentShapeValues, allCells[e].x, allCells[e].y, innerTempGrid, t, innerTempShapes[0] + 2);
passedShapes = innerTempShapes.concat();
passedShapes.splice(0, 1);
tryRemainingShapes(passedShapes, innerTempGrid);
// ...if no empty cells remaining, then the puzzle is solved.
if (checkWin(innerTempGrid)) doWin(clone(innerTempGrid));
// ...step backwards...
removeHere(currentShapeValues, allCells[e].x, allCells[e].y, innerTempGrid, t);
}
}
}else {
break outerLoop;
}
}
}
// ...get rid of the shape and continue...
innerTempShapes.shift();
}
}

private function hasSpace(mapGrid:Array, cX:int, cY:int):Boolean {
var neighbours:int = 1; // count self as neighbour
var nGrid:Array = clone(mapGrid);
nGrid[cY][cX] = "n"; // set to "n" if together
neighbours += getNeighbours(cX, cY, nGrid);
if (neighbours >= 5) return true;
return false;
}

private function getNeighbours(cX:int, cY:int, grid:Array):int {
var n:int = 0;
if (cY != 0 && grid[cY - 1][cX] == 1) {
n++;
grid[cY - 1][cX] = "n";
n += getNeighbours(cX, cY - 1, grid);
}
if (cY != grid.length - 1 && grid[cY + 1][cX] == 1) {
n++;
grid[cY + 1][cX] = "n";
n += getNeighbours(cX, cY + 1, grid);
}
if (cX != 0 && grid[cY][cX - 1] == 1) {
n++;
grid[cY][cX - 1] = "n";
n += getNeighbours(cX - 1, cY, grid);
}
if (cX != grid[0].length - 1 && grid[cY][cX + 1] == 1) {
n++;
grid[cY][cX + 1] = "n";
n += getNeighbours(cX + 1, cY, grid);
}
return n;
}

private function checkWin(mapGrid:Array):Boolean {
var i:int;
var u:int;
var didWin:Boolean = true;
var width:int = mapGrid[0].length;
var height:int = mapGrid.length;

for (i = 0; i < height; i++) {
for (u = 0; u < width; u++) {
if (mapGrid[i][u] == 1) {didWin = false;}
}
}

return didWin;
}

private function doWin(grid:Array):void {
var exists:Boolean = false;
for (var i:int = 0; i < solutions.length; i++) {
if (compare(solutions[i], grid)) {
exists = true;
break;
}
}
if (!exists) solutions.push(grid);
}

private function compare(arr1:Array, arr2:Array):Boolean {
for (var i:int = 0; i < arr1.length; i++) {
for (var u:int = 0; u < arr1[i].length; u++){
if (arr1[i][u] != arr2[i][u]) {
return false;
break;
}
}
}
return true;
}

private function goPrev(evt:MouseEvent):void {
currentSol--;
updateCurrentInfo();
}

private function goNext(evt:MouseEvent):void {
currentSol++;
updateCurrentInfo();
}

private function updateCurrentInfo():void {
var sol:int = (solutions.length > 0)?(currentSol + 1):(0);
tSol.text = sol + "/" + solutions.length;
if (sol <= 1) {
btn_prev.alpha = 0.5;
btn_prev.mouseEnabled = false;
}else {
btn_prev.alpha = 1;
btn_prev.mouseEnabled = true;
}
if (sol == solutions.length) {
btn_next.alpha = 0.5;
btn_next.mouseEnabled = false;
}else {
btn_next.alpha = 1;
btn_next.mouseEnabled = true;
}
if (solutions.length > 0) drawPreview(levelPreview, solutions[currentSol]);
}

private function nextCycle():void {
cycleNum++;
updateCurrentInfo();
if (cycleNum == givenShapes.length) {
removeEventListener(Event.ENTER_FRAME, onFrame);
// display info
tInfo.text = Finished solving " + levelName + "
Attempts:  + attempts + "
Solutions: " + solutions.length;
}
}

private function canPut(cValues:Array, cellX:int, cellY:int, mapGrid:Array, rotation:int):Boolean {
attempts++;
var canPutHere:Boolean = true;
var currentValues:Array = clone(cValues);
updateCurrentValues(currentValues, rotation);
for (var i:int = 0; i < currentValues.length; i++) {
var cX:int = currentValues[i][0] + cellX;
var cY:int = currentValues[i][1] + cellY;
if (cX < 0 || cY < 0 || cX >= mapGrid[0].length || cY >= mapGrid.length || mapGrid[cY][cX]!=1) {
canPutHere = false;
}
}
return canPutHere;
}

private function putHere(currentValues:Array, cellX:int, cellY:int, mapGrid:Array, rotation:int, shape:int):void {
currentValues = clone(currentValues);
updateCurrentValues(currentValues, rotation);
for (var i:int = 0; i < currentValues.length; i++) {
var cX:int = currentValues[i][0] + cellX;
var cY:int = currentValues[i][1] + cellY;
mapGrid[cY][cX] = shape;
}
}

private function removeHere(currentValues:Array, cellX:int, cellY:int, mapGrid:Array, rotation:int):void {
currentValues = clone(currentValues);
updateCurrentValues(currentValues, rotation);
for (var i:int = 0; i < currentValues.length; i++) {
var cX:int = currentValues[i][0] + cellX;
var cY:int = currentValues[i][1] + cellY;
mapGrid[cY][cX] = 1;
}
}

private function updateCurrentValues(currentValues:Array, rot:int):void{
for (var i:int = 0; i < 5; i++) {
// do nothing if rot == 0
if (rot == 1) {
currentValues[i].reverse();
currentValues[i][0] *= -1;
}
if (rot == 2) {
currentValues[i][0] *= -1;
currentValues[i][1] *= -1;
}
if (rot == 3) {
currentValues[i].reverse();
currentValues[i][1] *= -1;
}
if (rot == 4) {
currentValues[i][0] *= -1;
}
if (rot == 5) {
currentValues[i].reverse();
}
if (rot == 6) {
currentValues[i][1] *= -1;
}
if (rot == 7) {
currentValues[i].reverse();
currentValues[i][1] *= -1;
currentValues[i][0] *= -1;
}
}
}

private function clone(source:Object):*{
var myBA:ByteArray = new ByteArray();
myBA.writeObject(source);
myBA.position = 0;
return(myBA.readObject());
}

private function drawPreview(levelPreview:MovieClip, mapGrid:Array):void {
var columns:int = mapGrid[0].length;
var rows:int = mapGrid.length;
var frameWidth:int = levelPreview.width;
var frameHeight:int = levelPreview.height;
var padding:int = 5;
var fitWidth:int = levelPreview.width - (padding * 2);
var fitHeight:int = levelPreview.height - (padding * 2);
var gridStartX:int;
var gridStartY:int;

// calculate width of a cell:
var gridCellWidth:int = Math.round(fitWidth / columns);

var width:int = columns * gridCellWidth;
var height:int = rows * gridCellWidth;

// calculate side margin
gridStartX = (frameWidth - width) / 2;

if (height < fitHeight) {
gridStartY = (fitHeight - height) / 2;
}
if (height >= fitHeight) {
gridCellWidth = Math.round(fitHeight / rows);
height = rows * gridCellWidth;
width = columns * gridCellWidth;
gridStartY = (frameHeight - height) / 2;
gridStartX = (frameWidth - width) / 2;
}

// draw map
levelPreview.shape.x = gridStartX;
levelPreview.shape.y = gridStartY;
levelPreview.shape.graphics.clear();
var i:int;
var u:int;

for (i = 0; i < rows; i++) {
for (u = 0; u < columns; u++) {
if (mapGrid[i][u] == 1) drawCell(u, i, 0xffffff, 1, 0x999999, gridCellWidth, levelPreview.shape);
if (mapGrid[i][u] == 2) drawCell(u, i, 0xff66cc, 1, 0x000000, gridCellWidth, levelPreview.shape);
if (mapGrid[i][u] == 3) drawCell(u, i, 0x00FF66, 1, 0x000000, gridCellWidth, levelPreview.shape);
if (mapGrid[i][u] == 4) drawCell(u, i, 0x99ff00, 1, 0x000000, gridCellWidth, levelPreview.shape);
if (mapGrid[i][u] == 5) drawCell(u, i, 0x00ccff, 1, 0x000000, gridCellWidth, levelPreview.shape);
if (mapGrid[i][u] == 6) drawCell(u, i, 0xffcc66, 1, 0x000000, gridCellWidth, levelPreview.shape);
if (mapGrid[i][u] == 7) drawCell(u, i, 0x66cc33, 1, 0x000000, gridCellWidth, levelPreview.shape);
if (mapGrid[i][u] == 8) drawCell(u, i, 0x9900ff, 1, 0x000000, gridCellWidth, levelPreview.shape);
if (mapGrid[i][u] == 9) drawCell(u, i, 0xff5858, 1, 0x000000, gridCellWidth, levelPreview.shape);
if (mapGrid[i][u] == 10) drawCell(u, i, 0xff6600, 1, 0x000000, gridCellWidth, levelPreview.shape);
if (mapGrid[i][u] == 11) drawCell(u, i, 0x00ffff, 1, 0x000000, gridCellWidth, levelPreview.shape);
if (mapGrid[i][u] == 12) drawCell(u, i, 0xff6b20, 1, 0x000000, gridCellWidth, levelPreview.shape);
if (mapGrid[i][u] == 13) drawCell(u, i, 0xffff66, 1, 0x000000, gridCellWidth, levelPreview.shape);
}
}
}

private function drawCell(width:int, height:int, fill:uint, thick:Number, line:uint, gridCellWidth:int, gridShape:MovieClip):void {
gridShape.graphics.beginFill(fill);
gridShape.graphics.lineStyle(thick, line);
gridShape.graphics.drawRect(width * gridCellWidth, height * gridCellWidth, gridCellWidth, gridCellWidth);
}
}

}
Thanks for reading!
Creating a Pentomino game using AS3 Part 23
In this tutorial well start working on the Saved Levels screen.
The Saved Levels screen is basically a browser for levels that are stored in the users local Shared Object.
Go to the main menu screen and add a new button with an id "btn_saved". Go to main_menu.as script file and add a click event handler for this button, which directs the user to the fourth frame:
Go to the 4th frame on the main timeline in Flash and create a new MovieClip there. Give the new MC a class path saved_levels.
The saved levels screen consists of 3 parts - header, body and footer:
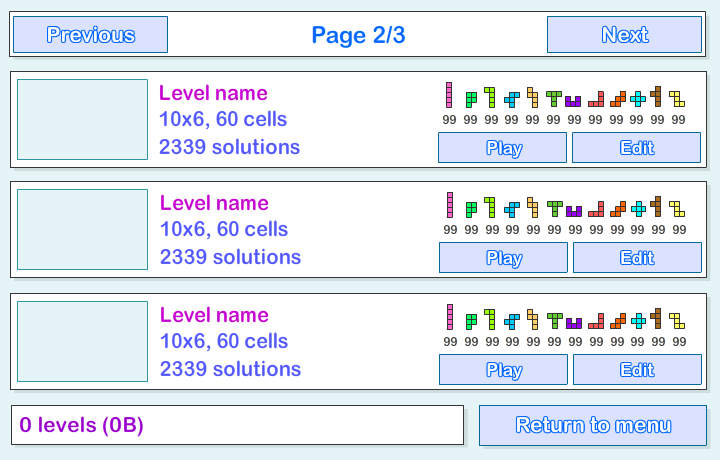
The header contains info about current page of the level browser and buttons to navigate through the pages.
The body of the screen contains up to 3 level items. Each level item is a saved_item object instance which I will talk about in details shortly.
The footer contains info about how many levels in total there are, how much space on local drive they all take and a button to return to main menu.
You need to add at least 5 objects right now - btn_previous and btn_next buttons in the header, tPage dynamic text field in the header, tInfo dynamic text field in the footer and a btn_back button in the footer.
As I said before, each item level is an instance of a saved_item object. Create a new MovieClip with class path saved_item and add the following objects: a rectangular MovieClip with id levelPreview; 3 dynamic text fields: tTitle, tSubtitle, tSubtitle2; 12 dynamic text fields with ids tShape1, tShape2, ... , tShape12; buttons btn_play and btn_edit.
The 3 dynamic text fields will be used to display level name, its statistics and number of solutions. The levelPreview object will be used to display the level grid. The 12 tShape text fields will be used to display how many of each shape is available. The two buttons do exactly what the name suggests - play the level and edit the level.
Add 3 of saved_item object instances to the screen.
Now create a new class saved_levels.as.
Right now we will just add functionality to the Back button and display the SharedObject data. Were storing an array called "levels" in a SharedObject and read its length to see how many levels there are. If the array is null, then there are 0 levels. We can use the size property to see how many bytes the object currently takes.
Thats all for today.
Thanks for reading! The results so far:
Read more »
The Saved Levels screen is basically a browser for levels that are stored in the users local Shared Object.
Go to the main menu screen and add a new button with an id "btn_saved". Go to main_menu.as script file and add a click event handler for this button, which directs the user to the fourth frame:
package
{
import flash.display.MovieClip;
import flash.events.MouseEvent;

/**
 * Open-source pentomino game engine
 * @author Kirill Poletaev
 */

public class main_menu extends MovieClip
{

public function main_menu()
{
(root as MovieClip).stop();
btn_play.addEventListener(MouseEvent.CLICK, doPlay);
btn_editor.addEventListener(MouseEvent.CLICK, doEditor);
btn_saved.addEventListener(MouseEvent.CLICK, doSaved);
}

private function doPlay(evt:MouseEvent):void {
(root as MovieClip).gotoAndStop(2);
}

private function doEditor(evt:MouseEvent):void {
(root as MovieClip).gotoAndStop(3);
}

private function doSaved(evt:MouseEvent):void {
(root as MovieClip).gotoAndStop(4);
}
}

}
Go to the 4th frame on the main timeline in Flash and create a new MovieClip there. Give the new MC a class path saved_levels.
The saved levels screen consists of 3 parts - header, body and footer:
The header contains info about current page of the level browser and buttons to navigate through the pages.
The body of the screen contains up to 3 level items. Each level item is a saved_item object instance which I will talk about in details shortly.
The footer contains info about how many levels in total there are, how much space on local drive they all take and a button to return to main menu.
You need to add at least 5 objects right now - btn_previous and btn_next buttons in the header, tPage dynamic text field in the header, tInfo dynamic text field in the footer and a btn_back button in the footer.
As I said before, each item level is an instance of a saved_item object. Create a new MovieClip with class path saved_item and add the following objects: a rectangular MovieClip with id levelPreview; 3 dynamic text fields: tTitle, tSubtitle, tSubtitle2; 12 dynamic text fields with ids tShape1, tShape2, ... , tShape12; buttons btn_play and btn_edit.
The 3 dynamic text fields will be used to display level name, its statistics and number of solutions. The levelPreview object will be used to display the level grid. The 12 tShape text fields will be used to display how many of each shape is available. The two buttons do exactly what the name suggests - play the level and edit the level.
Add 3 of saved_item object instances to the screen.
Now create a new class saved_levels.as.
Right now we will just add functionality to the Back button and display the SharedObject data. Were storing an array called "levels" in a SharedObject and read its length to see how many levels there are. If the array is null, then there are 0 levels. We can use the size property to see how many bytes the object currently takes.
package
{
import flash.display.MovieClip;
import flash.events.MouseEvent;
import flash.net.SharedObject;

/**
 * Open-source pentomino game engine
 * @author Kirill Poletaev
 */

public class saved_levels extends MovieClip
{
private var savedLevels:SharedObject;

public function saved_levels()
{
savedLevels = SharedObject.getLocal("myLevels");
btn_back.addEventListener(MouseEvent.CLICK, doBack);
tInfo.text = ((savedLevels.data.levels == null)?("0"):(savedLevels.data.levels.length)) + " levels (" + savedLevels.size + "B)";
}

private function doBack(evt:MouseEvent):void {
(root as MovieClip).gotoAndStop(1);
}
}

}
Thats all for today.
Thanks for reading! The results so far:
Thursday, January 29, 2015
Creating a Pentomino game using AS3 Part 1
Today well start making a game based on pentomino.
Basically, I have a school project to do on Pentomino, and Im going to create a game based on the principle. I also want to share the code with other programmers, so Im writing a step-by-step tutorial series and then releasing the game as an open-source project.
The game is made using Flash and FlashDevelop, although you dont need to follow my example strictly and as long as you understand the code, you can use any IDE you like.
I am going to use Flash for animations and graphics mostly, and have all my code written in FlashDevelop (because I like it a lot better than the built in actions editor in Flash).
If you want to do this the same way as me, create a new AS3 project and add a new empty MovieClip to stage. Make sure its coordinates are 0,0. Set its class path to "pentomino_game".
Now open FlashDevelop, Project > New Project. Choose Flash IDE project and select the folder your Flash file is in. When the project is created, add a new .as class to the directory and edit it using FlashDevelop. Import two classes for now - MovieClip and Sprite. Make the pentomino_game class extend MovieClip.
Declare five private variables - mapGrid, gridShape, gridStartX, gridStartY and gridCellWidth and set their values as shown below:
Now, in the constructor, were going to add a temporary value for mapGrid. Why temporary? Because in the future, all the maps will be stored somewhere and not hardcoded in the constructor function. Right now, make it a 10x6 grid with values "1" and "0".
Basically, "1" means a tile and "0" means a hole. Using this method youll be able to create more complex grids than just boring rectangles.
Note that the map I created is not a valid one. It will not work for a pentomino puzzle. The reason for that is the number of tiles cant be divided by 5 and remain a round number. But just for the sake of this tutorial and debugging, were going to leave these 4 holes there.
Now we add the gridShape Sprite to stage and set its coordinates:
Then we call a function drawGrid() that draws the map.
The map is drawn by first clearing gridShapes graphics, then looping through all mapGrid items and drawing a cell where it is needed:
You can see that we use the drawing API to draw the tiles.
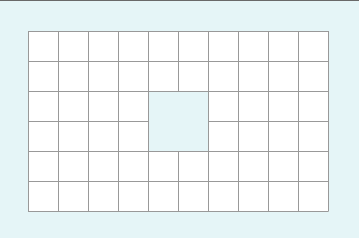
Now we have a working tile map system. You can create maps and change their appearance. The results may vary, but it should look something like this:
Full code so far:
Thanks for reading!
Read more »
Basically, I have a school project to do on Pentomino, and Im going to create a game based on the principle. I also want to share the code with other programmers, so Im writing a step-by-step tutorial series and then releasing the game as an open-source project.
The game is made using Flash and FlashDevelop, although you dont need to follow my example strictly and as long as you understand the code, you can use any IDE you like.
I am going to use Flash for animations and graphics mostly, and have all my code written in FlashDevelop (because I like it a lot better than the built in actions editor in Flash).
If you want to do this the same way as me, create a new AS3 project and add a new empty MovieClip to stage. Make sure its coordinates are 0,0. Set its class path to "pentomino_game".
Now open FlashDevelop, Project > New Project. Choose Flash IDE project and select the folder your Flash file is in. When the project is created, add a new .as class to the directory and edit it using FlashDevelop. Import two classes for now - MovieClip and Sprite. Make the pentomino_game class extend MovieClip.
Declare five private variables - mapGrid, gridShape, gridStartX, gridStartY and gridCellWidth and set their values as shown below:
package
{
import flash.display.MovieClip;
import flash.display.Sprite;

/**
 * Open-source pentomino game engine
 * @author Kirill Poletaev
 */

public class pentomino_game extends MovieClip
{
private var mapGrid:Array = [];

private var gridShape:Sprite = new Sprite();
private var gridStartX:int = 30;
private var gridStartY:int = 30;
private var gridCellWidth:int = 30;

public function pentomino_game() {}

}

}
Now, in the constructor, were going to add a temporary value for mapGrid. Why temporary? Because in the future, all the maps will be stored somewhere and not hardcoded in the constructor function. Right now, make it a 10x6 grid with values "1" and "0".
Basically, "1" means a tile and "0" means a hole. Using this method youll be able to create more complex grids than just boring rectangles.
// default map
mapGrid = [
[1, 1, 1, 1, 1, 1, 1, 1, 1, 1],
[1, 1, 1, 1, 1, 1, 1, 1, 1, 1],
[1, 1, 1, 1, 0, 0, 1, 1, 1, 1],
[1, 1, 1, 1, 0, 0, 1, 1, 1, 1],
[1, 1, 1, 1, 1, 1, 1, 1, 1, 1],
[1, 1, 1, 1, 1, 1, 1, 1, 1, 1]
];
Note that the map I created is not a valid one. It will not work for a pentomino puzzle. The reason for that is the number of tiles cant be divided by 5 and remain a round number. But just for the sake of this tutorial and debugging, were going to leave these 4 holes there.
Now we add the gridShape Sprite to stage and set its coordinates:
// grid settings
addChild(gridShape);
gridShape.x = gridStartX;
gridShape.y = gridStartY;
Then we call a function drawGrid() that draws the map.
public function pentomino_game()
{
// default map
mapGrid = [
[1, 1, 1, 1, 1, 1, 1, 1, 1, 1],
[1, 1, 1, 1, 1, 1, 1, 1, 1, 1],
[1, 1, 1, 1, 0, 0, 1, 1, 1, 1],
[1, 1, 1, 1, 0, 0, 1, 1, 1, 1],
[1, 1, 1, 1, 1, 1, 1, 1, 1, 1],
[1, 1, 1, 1, 1, 1, 1, 1, 1, 1]
];

// grid settings
addChild(gridShape);
gridShape.x = gridStartX;
gridShape.y = gridStartY;

// draw tiles
drawGrid();
}
The map is drawn by first clearing gridShapes graphics, then looping through all mapGrid items and drawing a cell where it is needed:
private function drawGrid():void {
gridShape.graphics.clear();
var width:int = mapGrid[0].length;
var height:int = mapGrid.length;

var i:int;
var u:int;

// draw background
for (i = 0; i < height; i++) {
for (u = 0; u < width; u++) {
if (mapGrid[i][u] == 1) drawCell(u, i, 0xffffff, 1, 0x999999);
}
}
}

private function drawCell(width:int, height:int, fill:uint, thick:Number, line:uint):void {
gridShape.graphics.beginFill(fill);
gridShape.graphics.lineStyle(thick, line);
gridShape.graphics.drawRect(width * gridCellWidth, height * gridCellWidth, gridCellWidth, gridCellWidth);
}
You can see that we use the drawing API to draw the tiles.
Now we have a working tile map system. You can create maps and change their appearance. The results may vary, but it should look something like this:
Full code so far:
package
{
import flash.display.MovieClip;
import flash.display.Sprite;

/**
 * Open-source pentomino game engine
 * @author Kirill Poletaev
 */

public class pentomino_game extends MovieClip
{
private var mapGrid:Array = [];

private var gridShape:Sprite = new Sprite();
private var gridStartX:int = 30;
private var gridStartY:int = 30;
private var gridCellWidth:int = 30;

public function pentomino_game()
{
// default map
mapGrid = [
[1, 1, 1, 1, 1, 1, 1, 1, 1, 1],
[1, 1, 1, 1, 1, 1, 1, 1, 1, 1],
[1, 1, 1, 1, 0, 0, 1, 1, 1, 1],
[1, 1, 1, 1, 0, 0, 1, 1, 1, 1],
[1, 1, 1, 1, 1, 1, 1, 1, 1, 1],
[1, 1, 1, 1, 1, 1, 1, 1, 1, 1]
];

// grid settings
addChild(gridShape);
gridShape.x = gridStartX;
gridShape.y = gridStartY;

// draw tiles
drawGrid();
}

private function drawGrid():void {
gridShape.graphics.clear();
var width:int = mapGrid[0].length;
var height:int = mapGrid.length;

var i:int;
var u:int;

// draw background
for (i = 0; i < height; i++) {
for (u = 0; u < width; u++) {
if (mapGrid[i][u] == 1) drawCell(u, i, 0xffffff, 1, 0x999999);
}
}
}

private function drawCell(width:int, height:int, fill:uint, thick:Number, line:uint):void {
gridShape.graphics.beginFill(fill);
gridShape.graphics.lineStyle(thick, line);
gridShape.graphics.drawRect(width * gridCellWidth, height * gridCellWidth, gridCellWidth, gridCellWidth);
}

}

}
Thanks for reading!
Tuesday, January 27, 2015
How to Change the Size of a Movie Clip Using ActionScript 3 Assigning AS3 instance names and modifying some AS3 movie clip properties
by Alberto Medalla
Lecturer, Ateneo de Manila University
In this lesson, Im going to discuss the concept of instance names and how they are needed in ActionScript in order to control display objects (objects that can be seen on the stage). Lets say that youve got a display object on the stage (such as an instance of a movie clip symbol that you created), how can you use ActionScript 3 in order to make that object change in size? By the end of this lesson, that is something that you should already be able to do.
Lets begin.
Ive mentioned that we can control display objects using ActionScript. Think of ActionScript as the language that we use so that we can "communicate" with these objects and tell them what to do (e.g. change color, change size, change location, become clickable, etc...). We refer to each individual display object on the stage as an instance - it can be a button, a movie clip or a text field. In order to be able to "communicate" with these instances, we must give them names.
When we communicate with real people, we address them by name - "Hey, John. Can you send me that document from our previous meeting?" In ActionScript, to communicate with these instances on the stage, we must address them by their names as well. These names are referred to as instance names.
NOTE: Instances of graphic symbols and static text fields cannot be used with ActionScript, because they cannot be given instance names. But instances of movie clips and buttons, as well as text fields that are of the dynamic, input and all TLF types can be given instance names.
In the following exercise, you will learn how to assign instance names to display objects.
HOW TO GIVE OBJECTS INSTANCE NAMES
1. Create a new Flash ActionScript 3 document.
2. Draw a circle on the stage.
3. Convert this circle into a movie clip symbol. You must convert the shape into a movie clip or button symbol in order to be able to give it an instance name.

NOTE: The symbol name (the one you type in the Convert to Symbol dialog box) is NOT the same as the instance name.
4. Make sure that the circle is selected, then go to the Properties Inspector.
NOTE: When selecting instances of symbols on the stage, do NOT double-click them. Double-clicking will open up symbol-editing mode. To select an instance, just click on it once using the selection tool (the black arrow).
5. Then in the properties inspector, you will see an input field for the instance name. Type circle1_mc inside the input field.

Youve now given the currently selected instance the name circle1_mc. The same step is followed if you wish to give buttons or text fields instance names as well.
6. Add another instance of the circle symbol by dragging it from the library down to the stage.

7. Make sure that this second instance is selected, then go to the Properties Inspector and give it the name circle2_mc.
You now have 2 movie clip instances on the stage, each one with a unique instance name.
And this concludes the first exercise of this lesson.
Instance names are author defined, meaning you decide what names to give them. But there are still some rules that you need to follow. Lets take a look at those rules.
RULES TO FOLLOW WHEN GIVING INSTANCE NAMES
Make sure you follow these rules to help avoid some errors.
MODIFYING PROPERTIES OF AN INSTANCE
Now that the instances have names, you will be able to target them using ActionScript. In this exercise, you will add some ActionScript code that will modify some of the properties of the instances on the stage. You will modify the size using the scaleX and scaleY ActionScript 3 properties. Youll also modify the opacity using the alpha property.
1. Create a new layer for the ActionScript code. You can name this one Actions, but its not required.

2. Make sure that frame 1 of the Actions layer is selected, then launch the Actions Panel by choosing Window > Actions from the main menu.

3. In the Script Pane of the Actions Panel, type in the following lines of code:
circle1_mc.scaleX = 2;
circle1_mc.scaleY = 2;
These lines of code will scale up the circle1_mc instance to 2 times its original size (or 200%). The scaleX property controls the horizontal scaling, while the scaleY property controls the vertical scaling.
4. Then add one more line below the first 2 lines of code:
circle2_mc.alpha = .5;
This reduces the alpha property value of circle2_mc to .5. The alpha property controls the opacity. A value of .5 brings the opacity down to 50%. You can assign a value from 0 to 1 for the alpha property. The object becomes less visible as the value approaches 0.
5. Test the movie by pressing ctrl + enter (pc) or cmd + return (mac) on your keyboard. You should see that the circle1_mc instance is now larger, and the circle2_mc instance is lighter.
What are properties?
In the exercise above, you modified some properties of movie clip instances. Think of properties as characteristics that describe instances (e.g. size, color, rotation).
Some properties of MovieClip instances are:
To access a property, add a dot to the end of the instance name followed by the property name. Then use the equals sign to assign a property value.
Syntax:
instanceName.property = value;
*This is referred to as dot syntax, because it uses dots.
Examples:
circle1_mc.x = 50;
circle1_mc.rotation = 45;
circle2_mc.scaleY = .5;
*Each statement is ended with a semi-colon.
In summation, instance names allow us to target the instances on our stage so that we can control them using ActionScript 3. Each instance name must be unique in order to differentiate the instances from each other, therefore allowing us to target each instance individually. Once an instance has a name, its properties can be accessed using dot syntax, and can be modified by assigning new values to these properties.
And that concludes this basic tutorial on how to assign instance names in order to control instances using ActionScript 3. I hope you learned something useful. To support this site and expand your knowledge further, please consider signing up for a lynda.com online training membership. Or you can start with a free 7-day trial so you can check out as much of the 1000+ training courses in their learning library.
Read more »
Lecturer, Ateneo de Manila University
In this lesson, Im going to discuss the concept of instance names and how they are needed in ActionScript in order to control display objects (objects that can be seen on the stage). Lets say that youve got a display object on the stage (such as an instance of a movie clip symbol that you created), how can you use ActionScript 3 in order to make that object change in size? By the end of this lesson, that is something that you should already be able to do.
Lets begin.
Ive mentioned that we can control display objects using ActionScript. Think of ActionScript as the language that we use so that we can "communicate" with these objects and tell them what to do (e.g. change color, change size, change location, become clickable, etc...). We refer to each individual display object on the stage as an instance - it can be a button, a movie clip or a text field. In order to be able to "communicate" with these instances, we must give them names.
When we communicate with real people, we address them by name - "Hey, John. Can you send me that document from our previous meeting?" In ActionScript, to communicate with these instances on the stage, we must address them by their names as well. These names are referred to as instance names.
NOTE: Instances of graphic symbols and static text fields cannot be used with ActionScript, because they cannot be given instance names. But instances of movie clips and buttons, as well as text fields that are of the dynamic, input and all TLF types can be given instance names.
In the following exercise, you will learn how to assign instance names to display objects.
HOW TO GIVE OBJECTS INSTANCE NAMES
1. Create a new Flash ActionScript 3 document.
2. Draw a circle on the stage.
3. Convert this circle into a movie clip symbol. You must convert the shape into a movie clip or button symbol in order to be able to give it an instance name.
NOTE: The symbol name (the one you type in the Convert to Symbol dialog box) is NOT the same as the instance name.
4. Make sure that the circle is selected, then go to the Properties Inspector.
NOTE: When selecting instances of symbols on the stage, do NOT double-click them. Double-clicking will open up symbol-editing mode. To select an instance, just click on it once using the selection tool (the black arrow).
5. Then in the properties inspector, you will see an input field for the instance name. Type circle1_mc inside the input field.
Youve now given the currently selected instance the name circle1_mc. The same step is followed if you wish to give buttons or text fields instance names as well.
6. Add another instance of the circle symbol by dragging it from the library down to the stage.
7. Make sure that this second instance is selected, then go to the Properties Inspector and give it the name circle2_mc.
You now have 2 movie clip instances on the stage, each one with a unique instance name.
And this concludes the first exercise of this lesson.
++++++
Instance names are author defined, meaning you decide what names to give them. But there are still some rules that you need to follow. Lets take a look at those rules.
RULES TO FOLLOW WHEN GIVING INSTANCE NAMES
- Instance names must be unique. No instances within the same scope should have the same name.
- The characters in an instance name can only be made up of: letters, numerical characters, underscores (_), and dollar signs ($). No other characters can be used.
- The first character in an instance name can only be: a letter, an underscore (_), or a dollar sign ($). You CANNOT start an instance name with a numerical character.
- Instance names are case-sensitive. John is different from john.
Make sure you follow these rules to help avoid some errors.
++++++
MODIFYING PROPERTIES OF AN INSTANCE
Now that the instances have names, you will be able to target them using ActionScript. In this exercise, you will add some ActionScript code that will modify some of the properties of the instances on the stage. You will modify the size using the scaleX and scaleY ActionScript 3 properties. Youll also modify the opacity using the alpha property.
1. Create a new layer for the ActionScript code. You can name this one Actions, but its not required.
2. Make sure that frame 1 of the Actions layer is selected, then launch the Actions Panel by choosing Window > Actions from the main menu.
3. In the Script Pane of the Actions Panel, type in the following lines of code:
circle1_mc.scaleX = 2;
circle1_mc.scaleY = 2;
These lines of code will scale up the circle1_mc instance to 2 times its original size (or 200%). The scaleX property controls the horizontal scaling, while the scaleY property controls the vertical scaling.
4. Then add one more line below the first 2 lines of code:
circle2_mc.alpha = .5;
This reduces the alpha property value of circle2_mc to .5. The alpha property controls the opacity. A value of .5 brings the opacity down to 50%. You can assign a value from 0 to 1 for the alpha property. The object becomes less visible as the value approaches 0.
5. Test the movie by pressing ctrl + enter (pc) or cmd + return (mac) on your keyboard. You should see that the circle1_mc instance is now larger, and the circle2_mc instance is lighter.
What are properties?
In the exercise above, you modified some properties of movie clip instances. Think of properties as characteristics that describe instances (e.g. size, color, rotation).
Some properties of MovieClip instances are:
- scaleX - scales the instance horizontally by a specified number
- scaleY - scales the instance vertically by a specified number
- x - controls the x coordinate of the instance
- y - controls the y coordinate of the instance
- rotation - rotates the instance to the angle specified
- width - adjusts the width of the instance
- height - adjusts the height of the instance
- alpha - adjusts the opacity level of the instance
To access a property, add a dot to the end of the instance name followed by the property name. Then use the equals sign to assign a property value.
Syntax:
instanceName.property = value;
*This is referred to as dot syntax, because it uses dots.
Examples:
circle1_mc.x = 50;
circle1_mc.rotation = 45;
circle2_mc.scaleY = .5;
*Each statement is ended with a semi-colon.
In summation, instance names allow us to target the instances on our stage so that we can control them using ActionScript 3. Each instance name must be unique in order to differentiate the instances from each other, therefore allowing us to target each instance individually. Once an instance has a name, its properties can be accessed using dot syntax, and can be modified by assigning new values to these properties.
And that concludes this basic tutorial on how to assign instance names in order to control instances using ActionScript 3. I hope you learned something useful. To support this site and expand your knowledge further, please consider signing up for a lynda.com online training membership. Or you can start with a free 7-day trial so you can check out as much of the 1000+ training courses in their learning library.
Friday, January 23, 2015
AdvAlert AS3 class Download and How To Use Part 6
Here you can find a couple of AdvAlert window skin examples that you can use in your games and applications.
Below are 4 skins I made that you can use in your AdvAlert powered alert windows. To implement them, use the the code below each example image.


Now you see what can be achieved with just a few lines of code and AdvAlert!
If you make any cool skins yourself and want to share them with others, post the code in the comments below!
Thanks for reading!
Read more »
Below are 4 skins I made that you can use in your AdvAlert powered alert windows. To implement them, use the the code below each example image.
var mySkin:AdvAlertSkin = new AdvAlertSkin();
mySkin.bgRect = new SolidColorRect(0xe2e2e2, [5, 5, 5, 5], 1);
mySkin.bgStroke = new SolidColorStroke(1, 0x000000, 0);
mySkin.headerHeight = 34;
mySkin.headerRect = new SolidColorRect(0x99ccff, [5, 5, 0, 0], 1);
mySkin.headerPadding = new TextPadding(0, 0, 0, 0);
mySkin.titleFormat = new TextFormat("Verdana", 22, 0xffffff);
mySkin.titleFilters = [new DropShadowFilter(1, 45, 0x000000, 0.7, 0, 0)];
mySkin.textFormat = new TextFormat("Verdana", 15, 0x111111);
mySkin.blurColor = 0x000000;
mySkin.buttonbarPadding.bottom = 0;

var myButtonSkin:AdvAlertButtonSkin = new AdvAlertButtonSkin();
myButtonSkin.bgRect = new SolidColorRect(0x99ccff, [5, 5, 0, 0], 1);
myButtonSkin.bgStroke = new SolidColorStroke(1, 0x000000, 0);
myButtonSkin.textFormat = new TextFormat("Verdana", 17, 0xffffff, null, null, null, null, null, "center" );
myButtonSkin.textFilters = [new DropShadowFilter(1, 45, 0x000000, 0.7, 0, 0)];
myButtonSkin.hover_bgRect = new SolidColorRect(0x7799bb, [5, 5, 0, 0], 1);
myButtonSkin.hover_bgStroke = new SolidColorStroke(1, 0x000000, 0);
myButtonSkin.hover_textFormat = new TextFormat("Verdana", 17, 0xffffff, null, null, null, null, null, "center" );
myButtonSkin.hover_textFilters = [new DropShadowFilter(1, 45, 0x000000, 0.7, 0, 0)];

AlertManager = new AdvAlertManager(this, stage, mySkin, myButtonSkin, null, true, 400);
var myAlert:AdvAlertWindow = AlertManager.alert("Lorem ipsum dolor sit amet, consectetur adipisicing elit, sed do eiusmod tempor incididunt ut labore et dolore magna aliqua. Ut enim ad minim veniam, quis nostrud exercitation ullamco laboris nisi ut aliquip ex ea commodo consequat.", "Title", [new AdvAlertButton("OK"), new AdvAlertButton("Cancel")]);
var mySkin:AdvAlertSkin = new AdvAlertSkin();
var bgMatrix:Matrix = new Matrix();
bgMatrix.createGradientBox(200, 200, 1.57, 100, 100);
mySkin.bgRect = new GradientColorRect(GradientType.LINEAR, [0x000000, 0x444444], [1, 1], [0, 255], bgMatrix, "pad", "rgb", 0, [0, 0, 0, 0]);
mySkin.bgStroke = new SolidColorStroke(2, 0xeeeeee);
mySkin.headerRect = new SolidColorRect(0x000000, null, 0);
mySkin.headerPadding = new TextPadding(5, 0, 0, 0);
mySkin.titleFormat.align = "center";
mySkin.titleFormat.size = 22;

var myButtonSkin:AdvAlertButtonSkin = new AdvAlertButtonSkin();
myButtonSkin.bgRect = new SolidColorRect(0xffffff, [0,0,0,0], 1);
myButtonSkin.bgStroke = new SolidColorStroke(0, 0, 0);
myButtonSkin.textFormat.bold = true;
myButtonSkin.textFormat.color = 0x000000;
myButtonSkin.hover_bgRect = new SolidColorRect(0x000000, [0,0,0,0], 1);
myButtonSkin.hover_bgStroke = new SolidColorStroke(0, 0, 0);
myButtonSkin.hover_textFormat.bold = true;
myButtonSkin.hover_textFormat.color = 0xf;


AlertManager = new AdvAlertManager(this, stage, mySkin, myButtonSkin, null, true, 400);
var myAlert:AdvAlertWindow = AlertManager.alert("Lorem ipsum dolor sit amet, consectetur adipisicing elit, sed do eiusmod tempor incididunt ut labore et dolore magna aliqua. Ut enim ad minim veniam, quis nostrud exercitation ullamco laboris nisi ut aliquip ex ea commodo consequat.", "Title", [new AdvAlertButton("OK"), new AdvAlertButton("Cancel")]);
var mySkin:AdvAlertSkin = new AdvAlertSkin();
var bgData:BitmapData = new BitmapData(400, 200, false, 0xffffffff);
bgData.perlinNoise(100, 100, 4, 218, true, true, 1, false);
mySkin.bgRect = new BitmapRect(bgData, null, true, false, [10, 10, 10, 10]);
mySkin.bgStroke = new SolidColorStroke(3, 0x440000, 1);
mySkin.headerRect = new SolidColorRect(0x000000, [10, 10, 10, 10], 0.5);
mySkin.headerHeight = 40;
mySkin.titleFormat.size = 30;
mySkin.titleFormat.align = "center";
mySkin.buttonbarAlign = "center";
mySkin.blurColor = 0x0;

var myButtonSkin:AdvAlertButtonSkin = new AdvAlertButtonSkin();
myButtonSkin.bgRect = new SolidColorRect(0x000000, [10, 10, 10, 10], 0.5);
myButtonSkin.bgStroke = new SolidColorStroke (1, 0x000000, 0);
myButtonSkin.w = 100;
myButtonSkin.hover_bgRect = new SolidColorRect(0xff0000, [10, 10, 10, 10], 0.5);
myButtonSkin.hover_bgStroke = new SolidColorStroke (1, 0x000000, 0);
myButtonSkin.hover_w = 100;

AlertManager = new AdvAlertManager(this, stage, mySkin, myButtonSkin, null, true, 400);
var myAlert:AdvAlertWindow = AlertManager.alert("Lorem ipsum dolor sit amet, consectetur adipisicing elit, sed do eiusmod tempor incididunt ut labore et dolore magna aliqua. Ut enim ad minim veniam, quis nostrud exercitation ullamco laboris nisi ut aliquip ex ea commodo consequat.", "Title", [new AdvAlertButton("OK"), new AdvAlertButton("Cancel")]);
var mySkin:AdvAlertSkin = new AdvAlertSkin();
mySkin.bgRect = new SolidColorRect(0xffffff, [0,0,0,0], 1);
mySkin.bgStroke = new SolidColorStroke(2, 0x000000, 1);
mySkin.headerRect = new SolidColorRect(0xaaffaa, [0, 0, 0, 0], 1);
mySkin.headerStroke =  new SolidColorStroke(1, 0x555555, 1);
mySkin.textFormat.size = 13;
mySkin.titleFormat.size = 20;
mySkin.textFormat.color = 0x111111;
mySkin.titleFormat.color = 0x333333;
mySkin.titleFilters = [new DropShadowFilter(3, 45, 0xffffff, 1, 0, 0)];
mySkin.titleFormat.align = "center";
mySkin.filters = [new DropShadowFilter(8, 45, 0, 1, 0, 0)];

var myButtonSkin:AdvAlertButtonSkin = new AdvAlertButtonSkin();
myButtonSkin.bgRect = new SolidColorRect(0xaaffaa, [0, 0, 0, 0], 1);
myButtonSkin.bgStroke =  new SolidColorStroke(1, 0x555555, 1);
myButtonSkin.w = 110;
myButtonSkin.textFormat.color = 0x000000;
myButtonSkin.textFilters = [new DropShadowFilter(3, 45, 0xffffff, 1, 0, 0)];
myButtonSkin.hover_bgRect = new SolidColorRect(0xffffff, [0, 0, 0, 0], 1);
myButtonSkin.hover_bgStroke =  new SolidColorStroke(1, 0x555555, 1);
myButtonSkin.hover_w = 110;
myButtonSkin.hover_textFormat.color = 0x000000;
myButtonSkin.hover_textFilters = [new DropShadowFilter(3, 45, 0xffffff, 1, 0, 0)];

AlertManager = new AdvAlertManager(this, stage, mySkin, myButtonSkin, null, true, 400);
var myAlert:AdvAlertWindow = AlertManager.alert("Lorem ipsum dolor sit amet, consectetur adipisicing elit, sed do eiusmod tempor incididunt ut labore et dolore magna aliqua. Ut enim ad minim veniam, quis nostrud exercitation ullamco laboris nisi ut aliquip ex ea commodo consequat.", "Title", [new AdvAlertButton("OK"), new AdvAlertButton("Cancel")]);
Now you see what can be achieved with just a few lines of code and AdvAlert!
If you make any cool skins yourself and want to share them with others, post the code in the comments below!
Thanks for reading!
Subscribe to:
Posts (Atom)