Wednesday, March 11, 2015
Create a custom CRM dashboard using Google Apps Script
Editors note: This is a guest post by Alex Steshenko. Alex is a core software engineer for Solve360, a highly-rated CRM in the Google Apps Marketplace which was recently chosen as a Staff Pick. Solve360 offers many points of useful integration with Google Apps. Today, in contrast to the conventional Data API integrations, Alex will showcase how he extended Solve360 using Google Apps Script. --- Ryan Boyd
Choosing Google Apps Script
Solve360 CRM integrates with Google services to provide a two-way contact & calendar sync, email sync and a comprehensive Gmail contextual gadget. We use the standard Google Data APIs. However, some of our use cases required us to use Google documents and spreadsheets. Enter Apps Script!. What brought our attention to Google Apps Script was that it allows you to run your application code right within the Google Apps platform itself, where documents can be manipulated using a wide range of native Google Apps Script functions, changing the perspective.
Our first experience with Google Apps Script was writing a "Contact Us" form. We decided to use the power and flexibility of Apps Script again to generate different kinds of reports.
Generating Solve360 Reports using Apps Script
Google Spreadsheets can produce rich reports leveraging features such as filters, pivot tables, built-in functions and charts. But where’s the data to report on? Using Google Apps Script, users can integrate Google Spreadsheets with a valuable source of data - the Solve360 CRM - completing the solution.
Solve360 Google Apps Reporting script lets users configure the reporting criteria while pulling reports into a Google Spreadsheet.

Heres a video demonstrating a real use case for Solve360 Reporting:
Designing Solve360 Reporting using Apps Script
User meet “Script”
For this script, we realized, simply providing spreadsheet functions would not be good enough. We needed a user interface to let users configure their account details and define what kind of data to fetch from the Solve360 CRM. Google Apps Script’s Ui Services came in handy. For instance, here is the function responsible for showing the “Solve360 account info” dialog:
/*
 * Creates new UI application and opens setting window
 */
function settingsUi() {
  var app = UiApp.createApplication();
  app.setTitle(Solve360 account info)
     .setWidth(260)
     .setHeight(205);

  var absolutePanel = app.createAbsolutePanel();

  absolutePanel.add(authenticationPanel_(app));

  app.add(absolutePanel);
  SpreadsheetApp.getActiveSpreadsheet().show(app);
}
Working with Solve360’s API
Solve360 CRM has an external API available so the system can be integrated with custom business applications and processes. Reporting script use case is a good example of what it can be used for.
One of the first tricks learned was creating our own Google Apps-like “service” to encapsulate all those functions responsible for interacting with Solve360 CRM’s API. What is the most interesting is that this service’s code isn’t a part of the distributed Google Apps script. Instead the library is loaded from within the script itself directly from our servers. Why? Let’s say we found a bug or added new functions - if we had many copies of the service we would need to update them all, somehow notifying our clients, and so on. With one source, there’s no such problem. You may think of it as a way to distribute a Google Apps Script solution, or, in our case, a part of the solution. The service is called Solve360Service and its usage looks like this:
var contact = Solve360Service.addContact(contactData);
There were two problems with getting such an external service to work: Google Apps Script permissions restrictions and actually including it in the script.
The issue with permissions is that the Google Apps Script environment can’t see which Google Apps Script services are used inside the external service - that’s why it doesn’t ask you to grant special permissions for them. To force the authorization request for those permissions we added this to the onInstall function (called once when script is added to the spreadsheet):
function onInstall() {
   // to get parseJS permissions
  Xml.parseJS([solve360, 1]);

   // to get base64Encode permissions
  Utilities.base64Encode(solve360);
// ...
}
Here is the solution we used to load our centralized code into the script:
eval(UrlFetchApp.fetch("https://secure.solve360.com/gadgets/resources/js/Solve360Service.js").getContentText()); The Solve360Service is loaded from a single source - no copy-paste. All the functions for accessing the Solve360 API aka “the plumbing” are abstracted and hidden in inside this service, while the essentials of the reports script itself can be modified and tweaked to a particular client’s case. Inside of Solve360Service we use UrlFetchApp:
/**
 * Request to the Solve360 API server
 * data should be an Array in Short Hand notation
 */
request : function(uri, restVerb, data) {
  if (this._credentials == null) {
    throw new Error(Solve360 credentials are not set);
  }

  if (typeof(data) != undefined) {
    if (restVerb.toLowerCase() == get) {
      var parameters = [];
      for each(var parameter in data) {
        parameters.push(encodeURIComponent(parameter[0]) + = + encodeURIComponent(parameter[1]));
      }
      uri += ? +  parameters.join(&);
      data = ;
    } else {
      data.unshift(request);
      data = Xml.parseJS(data).toXmlString();
    }
  } else {
    data = ;
  }

  var options = {
    "contentType" : "application/xml",
    "method" : restVerb.toLowerCase(),
    "payload" : data,
    "headers" : {"Authorization" : "Basic " + this._credentials}
  };
  return Xml.parse(UrlFetchApp.fetch(this._url + uri, options).getContentText()).getElement();
}
As the result is always XML, in order to remove any extra work we call Xml.parse() right inside the request function and always return a XmlElement so you can iterate through it, access nodes and attributes. Here is a simplified version of how we load some items when building a report:
/*
* Builds a search config from user preferences and loads a slice of data from Solve360
* To configure how many items should be loaded at a time, change ITEMS_LOAD_REQUEST_LIMIT constant
*/
function retrieveItems_(parameter, offset) {
  initSolve360Service_();
  // ...
  var searchParameters = [
    [layout, 1],
    [sortdir, ASC],
    [sortfield, name],
    [start,  + offset],
    [limit,  + ITEMS_LOAD_REQUEST_LIMIT],
    [filtermode, filtermode],
    [filtervalue, filtervalue],
    [searchmode, searchmode],
    [searchvalue, searchvalue],
    [special, special],
    [categories, 1]
  ];
  if (parameter.showAllFieldsCheckbox != true && fields.length > 0) {
    searchParameters.push([fieldslist, fields.join(,)]);
  }
  // ...
  var items = Solve360Service.searchProjectBlogs(searchParameters);
  // ...
  return items;
}
To simplify the usage of the service we added another function which initializes the service object, named Solve360Service:
/*
* Loads external Solve360Service
* For the service functions available refer to the source code here:
* https://secure.solve360.com/gadgets/resources/js/Solve360Service.js
*/
var Solve360Service = null;
function initSolve360Service_() {
  if (Solve360Service == null) {
    eval(UrlFetchApp.fetch("https://secure.solve360.com/gadgets/resources/js/Solve360Service.js").getContentText());
    var user = UserProperties.getProperty(USERPROPERTY_USER);
    var token = UserProperties.getProperty(USERPROPERTY_TOKEN);
    if (user == null || user.length == 0 || token == null || token.length == 0) {
      throw new Error(Use Solve360 spreadsheet menu to set email and token first);
    }
    Solve360Service.setCredentials(user, token);
  }
}
As you can see, it uses the email/token pair previously saved in the “Solve360 Account Info” dialog or signals an error if the credentials were not yet saved.
Conclusion
There are many use cases where you can apply the Google Apps Script. The fact that you can work and implement solutions right from “inside” one of the greatest and most universal web applications available is amazing.
You can integrate your own software with Google Docs or even learn from us and build a reporting script for any other system accessible online. Try to look at solving business tasks from a different perspective, from the Google Apps point of view. We encourage it!
The code of the new script is available for use and study here:
https://secure.solve360.com/docs/google-apps-reports.js.
 | Alex Steshenko profile | twitter | blog Alex Steshenko is a core software engineer for Solve360, a CRM application on the Google Apps Marketplace. |

Tuesday, March 10, 2015
From a need to a startup thanks to a Google hackathon
A few weeks ago, Clément and I started to take online courses (based on videos), mainly on Coursera, edX (the MIT-Harvard venture), and Udacity, the biggest online course providers.

Obviously, continuing to improve the app based on feedback is our top priority.
Thanks a lot to the Drive team who organized this hackathon to give our idea a try through their amazing tools! And this is just the beginning of the adventure, that started from a problem we faced, whose solution has been found at the Google hackathon, and which is just starting to reach its potential.
 | Arnaud Breton profile Arnaud Breton is passionate about the impact that technologies have on the world. He is the co-founder and CTO of UniShared / VideoNot.es. |
A First Attempt at Apps Script with Spreadsheets
The Apps Script team held a hackathon in Washington DC on March 7. Over 80 developers attended and we had some great demos at the end of the evening. One of the demos was from Rusty Mellinger, who explains his script in this blog post. If you missed the DC hackathon, sign up for our next one in Chicago on April 19. -Jan Kleinert
I was lucky enough to attend Google’s Apps Script Hackathon at their office in DC, recently, and got a chance to play with Apps Script. After a quick walk-through tutorial, Jan gave us a couple of hours to hack around with it.
Scripts in Apps Script are written in JavaScript and stored, edited, and run on Googles servers, interfacing with a big list of included services. You can call the scripts from spreadsheets, Google Sites, or from hits to a generated URL.
Roommate Payment Spreadsheet

My roommates and I keep a spreadsheet on Google Docs to track who owes what, but since we’re a house full of software engineers, it’s gotten pretty complicated. Each row records the details of a single transaction: who paid, the total, and what percentages of the payment are on behalf of which roommates. All these interpersonal debts are added up into the (J5:M8) matrix, cancelled out across the diagonal into (P5:S8) to get a single debt for each roommate pairing, and then those are totalled into the final "Shake Out", (F4:F7), which says whether you owe or are owed. Maybe Apps Script could make my life simpler here?
Automatic Emails
First, I’m currently owed a fair amount of money, so I set up automated reminder emails to the roommates who are behind:
// Send emails to everybody with their current status.
function emailDebtors() {
  var ss       = SpreadsheetApp.getActiveSpreadsheet();
  var results  = ss.getRange( "G4:G7" ).getValues();
  var emails   = ss.getRange( "O3:R3" ).getValues();
  var numUsers = 4;

  for(var i = 0; i != numUsers; i++) {
    var val = Math.round(results[i][0]);

    if (val > 0) {
      // This guy owes money in the shake-out.
      MailApp.sendEmail(
        emails[0][i], "Youre a deadbeat!",
        "You owe $" + val + ". Please pay it!");
    }
  }
}
This just pulls the current totals from the (G4:G7) "Shake Out", as well as their respective email addresses from (O3:R3). When this function is called, if any of them owe more than $0, they get a friendly reminder!
Custom Menus

I could set that up to trigger daily or weekly, but it only really needs to happen when somebody needs to collect what they’re owed, so I’ve added it as an option to the sheet’s menu on start-up.
function onOpen() {
  var ss = SpreadsheetApp.getActiveSpreadsheet();
  var menuEntries = [ { name: "Email debtors",
                        functionName: "emailDebtors"}];
  ss.addMenu( "SkyCastle", menuEntries );
}
Easy! Now when somebody wants to collect, they just click the “SkyCastle -> Email debtors” option and the appropriate reminder emails are sent out, from their own Gmail address.
Historical Charting

I still had a couple of hours, and wanted to play with the UI and Google Charts services, so I decided to chart the “Shake Out” values over the history of the spreadsheet. The existing cells are hard-coded to operate on the total sums from the full sheet, so I had to re-implement the math to track it line-by-line. (This isn’t all bad, because I can use it to double check the existing arithmetic, which was sorely needed.)
The basic sketch is as follows:
var data = Charts.newDataTable()
                 .addColumn(Charts.ColumnType.NUMBER, "Row");
for (var i = 0; i != 4; i++) {
  data.addColumn(Charts.ColumnType.NUMBER, names[i]);
}

for (var i = 0; i != NUMROWS; i++) {
  var row = Array(5);
  // …
  // Process the current line here, and compute the shake-out.
  // …
  data.addRow(row);
}
data.build();
I’ve omitted the actual calculation, because it’s just a bunch of hacks specific to our spreadsheet formulas. Each row contains the row number, and the accumulated shake-out thus far, and gets added to the `data` table. I break out of the loop once I go off the end of my data and start hitting `NaNs`.
To create the line chart and add it to a new UI window:
var chart = Charts.newLineChart()
      .setDataTable(data)
      .setDimensions(700, 400)
      .setTitle("Debt History")
      .build();

var uiApp = UiApp.createApplication()
                 .setWidth(700)
                 .setHeight(400)
                 .setTitle("Payment History");
uiApp.add(chart);
ss.show(uiApp);
return uiApp;
After adding this function as another option in our custom `SkyCastle` menu and clicking it, we see a nice graph. (I’m almost always on the bottom, but that’s because I make the actual rent and utility payments.) The final entries are equal to the original "Shake Out" cells, so our old arithmetic seems correct, too.
Lessons Learned
The built-in debugger isn’t bad; use the `Select function` dropdown and click the bug icon. I also used Logger.log() liberally while trying to get things working right. (Go to `View -> Logs` in the Script Editor to view that output.)
Apps Script seems to work well, overall, and hooks into a nice and expanding array of Google products and data sources. The GWT-backed UI service is a clever idea, though I barely had a chance to touch it.
Thanks again to Jan and Google for hosting this Hackathon; I can’t wait for the next one!
 | Rusty Mellinger Rusty Mellinger co-founded Illogic Inc, making heavy use of Google Apps and GWT. |
Wednesday, March 4, 2015
Effective Teaching with PowerPoint A Learning Theory Approach
"This presentation examines teaching and learning from an information-processing perspective, using the events of instruction developed by Robert Gagne. It shows you how to apply these ideas to developing PowerPoint presentations that effectively support instruction. It also presents many example slides highlighting important instructional capabilities of this technology."
Gagnes Nine Events of Instruction:
- Gaining Attention - Reception. Use abrupt stimulus change.
- Informing Learner of the Objective - Expectancy. Tell learners what they will be able to do after learning.
- Stimulating Recall of Prior Learning - Retrieval to Working Memory. Ask for recall of previously learned knowledge or skills.
- Presenting the Stimulus - Selective Perception. Display the content with distinctive features
- Providing Learning Guidance - Semantic Encoding. Suggest a meaningful organization.
- Eliciting Performance - Responding. Ask learner to perform.
- Providing Feedback - Reinforcement. Give informative feedback.
- Assessing Performance - Retrieval and Reinforcement. Require additional learner performance with feedback.
- Enhancing Retention and Transfer - Retrieval and Generalization. Provide spaced reviews and varied practice.
you master these nine events of instruction in your PowerPoint (Breeze) presentations you have basically mastered the Instructional Design component . Though, you still need some creativity to really gain the learners attention.
Tuesday, March 3, 2015
How to Superimpose Text on a Image

Thank you so much for visiting my blog each week and voting!

First things first, download Gimpshop so you can practice along with the following directions! Gimpshop is the same program we used to give a picture a transparent background and blur out faces/names in a picture, so you may have already downloaded it. If not, be sure to download it for free!
Now... lets put that text in place!



Thank you for visiting this Technology Tuesday Post! Be sure to vote for what I should blog about next Tuesday!
Monday, March 2, 2015
IMU LS 03 How to Become a Rapid E Learning Pro Tom Kuhlmann

Date : 8th February, 2012
Venue : Online (WizIQ)
Time : 10.00 AM (Kuala Lumpur Time)
Description:
Speaker:
Seven Sensibilities of Learning in a Virtual World Dr Tony O’Driscoll
- Link to video
- Reference - Why Second Life is important to learning (Bryan Chapman)
 WHAT?
WHAT?
If you are interested in using Second Life, or other Virtual World technologies for learning purposes, Dr. Tony O’Driscolls 10-minute presentation will give you an excellent crash course discussing the “Seven Sensibilities of Learning in a Virtual World,” which are:
- The Sense of Self
- The Death of Distance
- The Power of Presence
- The Sense of Space
- The Capability to Co-Create
- The Pervasiveness of Practice
- The Enrichment of Experience
VIDEO?
Welcome to the Matrix of learning:
If you are planning to construct your own little Virtual World learning space, I suppose this is a great crash course (on the learning possibilities), or framework to get you started. Virtual worlds are certainly here to stay, but lets hope that we dont forget to spend quality time with our family, friends, colleagues, etc. in the traditional world, although it might not be that exciting. Sometimes we have no choice (e.g. distance), but sometimes we do. Think... :)
Friday, February 27, 2015
How to Easily Add a Border to Your Pictures!
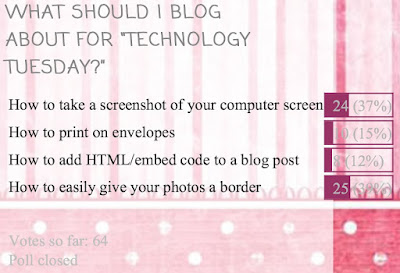
This was the closest poll ever I think! It literally couldnt have been any closer!
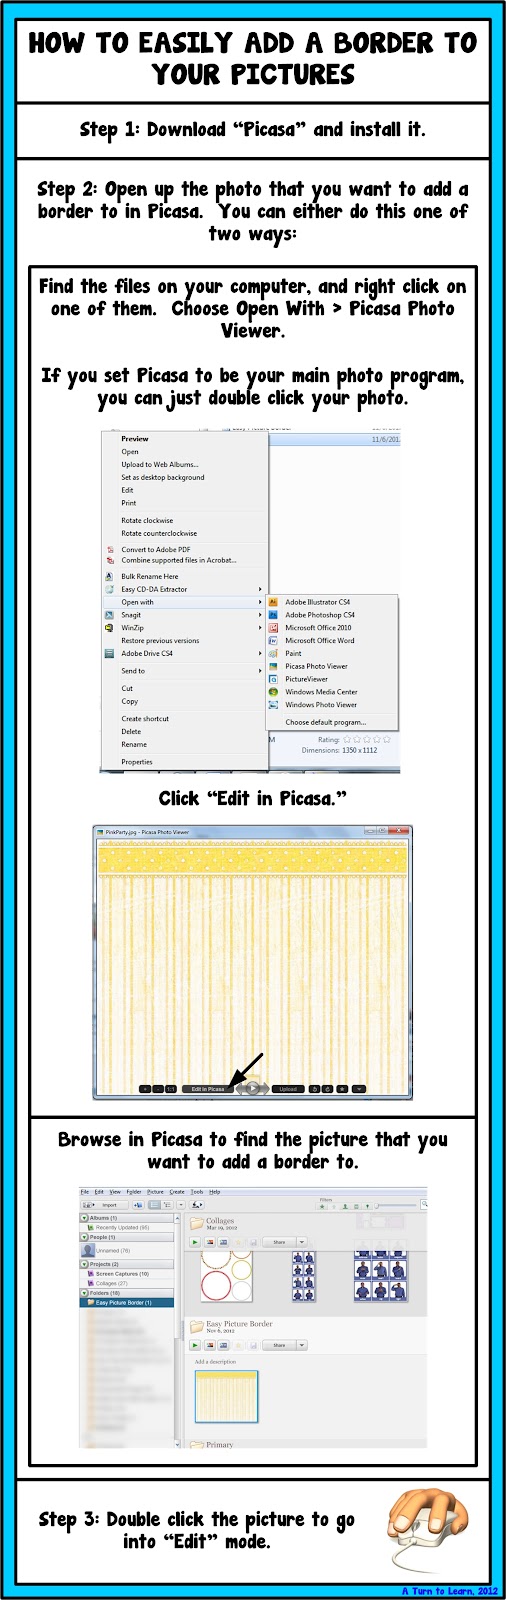
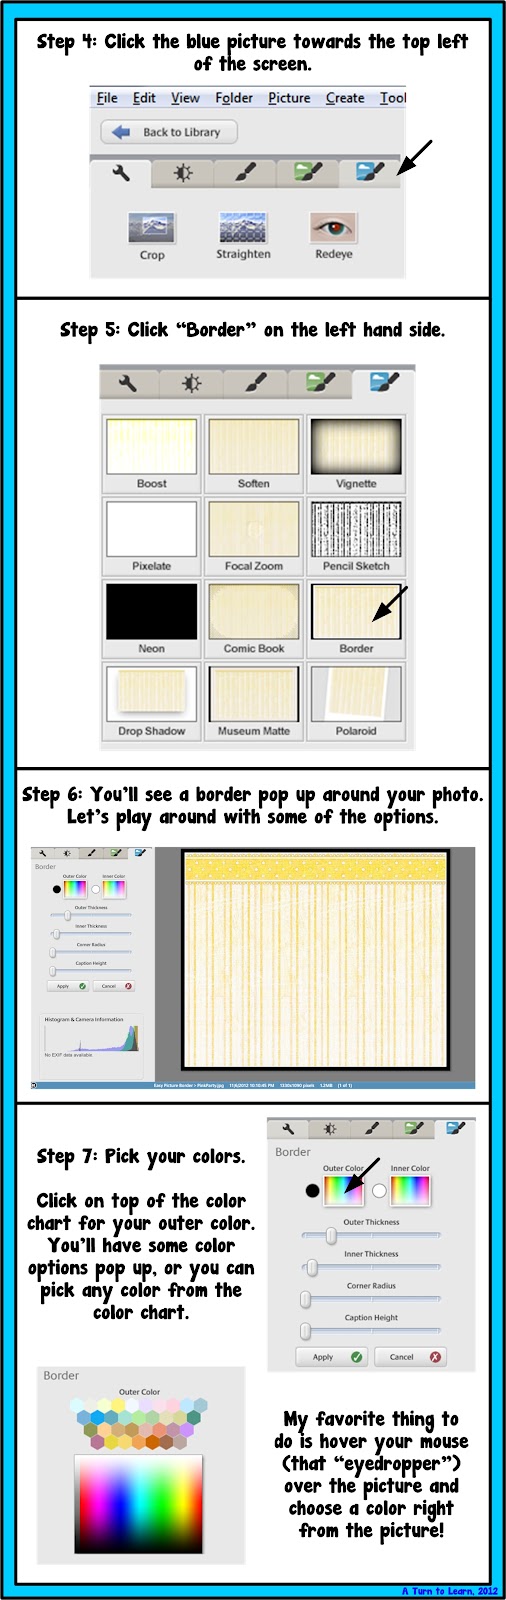
This tutorial uses the program Picasa, which is a free program offered by Google (and I just love it!). You can download it here.
If you already have Picasa installed, click "Help > Check for Updates" and update your version. Its not entirely necessary, but it may give you some neat new features!
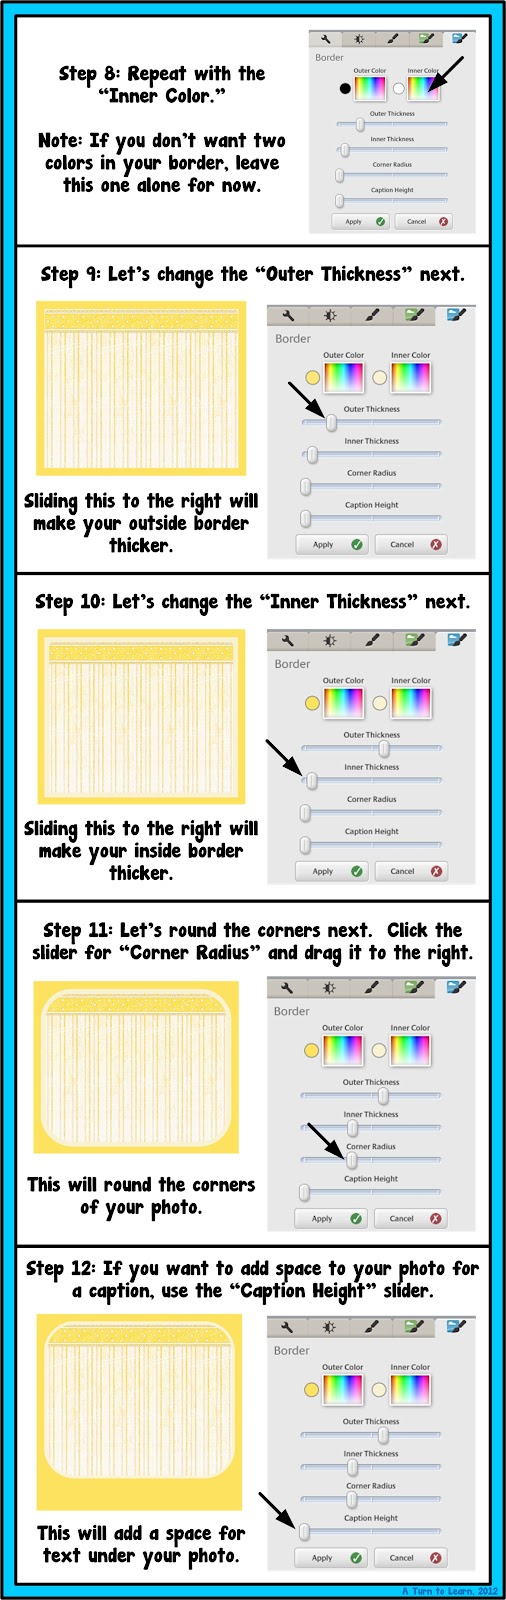
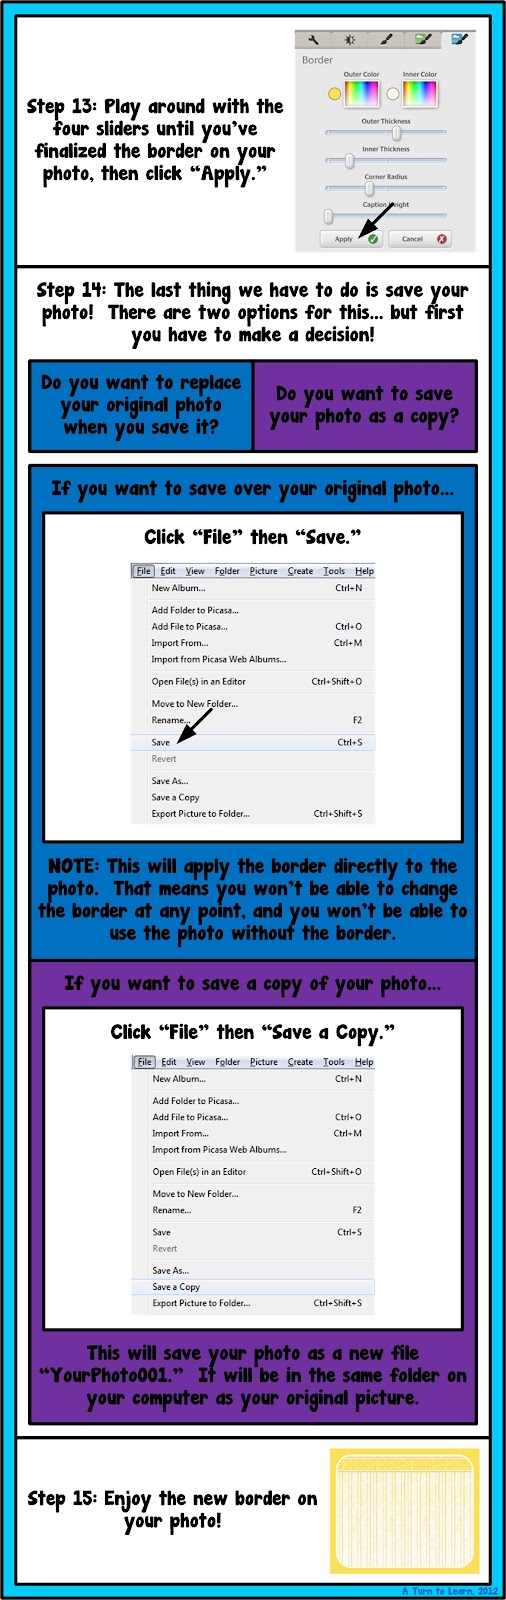
For next week, Ill add an option thats been requested by a few people: how to make an editable powerpoint that locks down clipart and other images! For example, this freebie (which reminds students to write their name on their paper) locks down the border so you cant move it around or copy it to another program.

Wednesday, February 18, 2015
C program to find sum of elements above and below the main digonal of a matrix

#include<iostream.h>
#include<conio.h>
void main()
{
clrscr();
int arr[5][5],a=0,b=0,i,j,n;
cout<<"Enter size of array(max 5):";
cin>>n;
cout<<"Enter the array:";
for(i=0;i<n;++i)
for(j=0;j<n;++j)
cin>>arr[i][j];
for(i=0;i<n;++i)
for(j=0;j<n;++j)
if(j>i)
a+=arr[i][j];
else
if(i>j)
b+=arr[i][j];
cout<<"
Sum of elements above the digonal:"<<a;
cout<<"
Sum of elements below the digonal:"<<b;
getch();
}
Monday, February 16, 2015
Cover.jpg)
Saturday, February 14, 2015
Creating a Subset of Raster Data with Python gdal
First importing the libraries and setting working directory:
   >>> import gdal
   >>> from gdalconst import *
   >>> import os
   >>> os.chdir(C:UsersmaxDocumentsPythonProjects)
   >>> filename = ERS1PRI_19920430o04133tr481fr1989_AppOrb_Calib_Spk_SarsimTC_LinDB.tif
   >>> dataset = gdal.Open(filename, GA_ReadOnly)
ReadAsArray with the offset in x and y direction and the x dimensions and y dimensions of the subset:>>> band = dataset.GetRasterBand(1)
>>> subset = band.ReadAsArray(3500, 3500, 50, 50)
>>> subset
  array([[-11.49956703, -10.51208401,  -9.58573532, ..., -11.87286568,
        -12.77604961, -15.28282642],
       [-13.6348238 , -14.13398838, -13.61361694, ..., -13.09877014,
        -13.3733263 , -15.26138687],
       [-14.01767826, -12.75454712, -12.39109707, ..., -13.30418301,
        -14.24573517, -15.0796051 ],
       ...,
       [ -9.57748413, -11.63577938, -14.19717503, ...,   3.46974254,
          0.29983696,   0.51451778],
       [-11.11393261, -12.06205177, -13.13371372, ...,   2.4157486 ,
          3.08015943,   0.57344818],
       [-11.68845177, -11.69376755, -11.36115456, ...,   1.95159626,
          1.82419062,   3.39742208]], dtype=float32)
>>> driver = gdal.GetDriverByName(ENVI)
  >>> driver.Register()
  >>> outDataset = driver.Create(ERS1PRI_19920430_ENVI_subset, 50, 50, 1, gdal.GDT_Float32)
   >>> outBand = outDataset.GetRasterBand(1)
   >>> outBand.WriteArray(subset, 0, 0)
   >>> band = None
>>> dataset = None >>> outDataset = None
>>> subset = None[I seem to have problems with WriteArray not always writing the file correctly -- unsure yet when and why, the one above works]
Friday, February 13, 2015
C C Program to Create a Digital Stopwatch
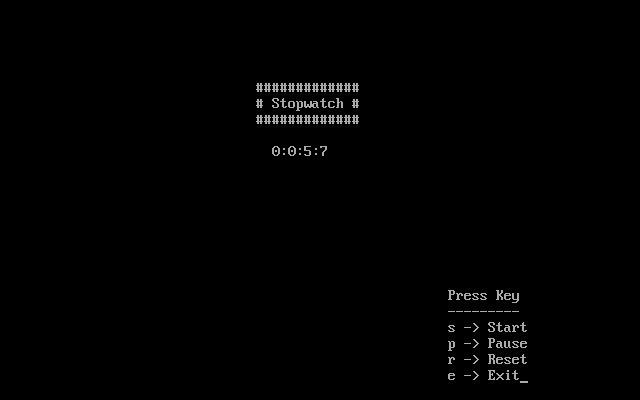
Hello friends, this is a simple program to create a digital stopwatch. I am sure that even a beginner can understand it very easily. I have written this in c++, so to use it c just change all cout statements with corresponding printf statements. I hope you understand what i want to say. If you have any kind of problem in doing this then let me know by commenting below, i will try my best to help you. So just try this and share your experience with me.
Also Read: C++ Program to create an Analog Clock
Also Read: C++ Hotel Management Project
#include<conio.h>
#include<process.h>
#include<iostream.h>
#include<dos.h>
int h=0,m=0,s=0,ms=0;
char ch=p;
void main()
{
void watch();
watch();
while(1)
{
if(kbhit())
ch=getch();
if(ch==s||ch==S)
break;
if(ch==e||ch==E)
exit(0);
}
while(1)
{
watch();
delay(10);
if(kbhit())
ch=getch();
if(ch==r||ch==R)
{
h=m=s=ms=0;
watch();
while(1)
{
if(kbhit())
ch=getch();
if(ch==s||ch==S)
break;
if(ch==e||ch==E)
exit(0);
}
}
else
if(ch==p||ch==P)
while(1)
{
if(kbhit())
ch=getch();
if(ch==s||ch==S)
break;
if(ch==e||ch==E)
exit(0);
if(ch==r||ch==R)
{
ch=c;
h=m=s=ms=0;
watch();
}
}
else
if(ch==e||ch==E)
exit(0);
if(ms!=99)
ms++;
else
{
ms=0;
if(s!=59)
s++;
else
{
s=0;
if(m!=59)
m++;
else
{
m=0;
h++;
}
}
}
}
}
void watch()
{
clrscr();
cout<<"
#############";
cout<<"
# Stopwatch #";
cout<<"
#############";
cout<<"
"<<h<<":"<<m<<":"<<s<<":"<<ms;
cout<<"
Press Key";
cout<<"
---------";
cout<<"
s -> Start";
cout<<"
p -> Pause";
cout<<"
r -> Reset";
cout<<"
e -> Exit";
}
C Program to print a triangle or square of s according to user choice
#include<iostream.h>
#include<conio.h>
void main()
{
clrscr();
int i,j,k,n,ch;
cout<<"What you want to Print
"<<"1.Triangle
"<<"2.Square
"<<"Enter your choice: ";
cin>>ch;
cout<<"
How much long....?(ex:8): ";
cin>>n;
switch(ch)
{
case 1:for(i=1;i<=n;++i)
{
for(j=n-1;j>=i;--j)
cout<<" ";
for(k=1;k<=(i*2-1);++k)
{
if(i==n)
cout<<"*";
else
{ if(k==1||k==(i*2-1))
cout<<"*";
else
cout<<" ";
}
}
cout<<"
";
}
break;
case 2: for(i=1;i<=n;++i)
{
for(j=1;j<=n;++j)
{
if(i==1||i==n)
cout<<"*";
else
{ if(j==1||j==n)
cout<<"*";
else
cout<<" ";
}
}
cout<<"
";
}
break;
}
getch();
}
Wednesday, February 11, 2015
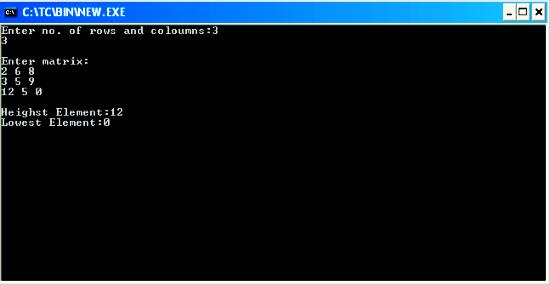
C Program to find highest and lowest element of a Matrix
#include<iostream.h>
#include<conio.h>
void main()
{
clrscr();
int m,n,a[10][10],i,j,high,low;
cout<<"Enter no. of rows and coloumns:";
cin>>m>>n;
cout<<"
Enter matrix:
";
for(i=0;i<m;++i)
{
for(j=0;j<n;++j)
cin>>a[i][j];
}
for(i=0;i<m;++i)
{
high=a[0][0];
low=a[0][0];
for(j=0;j<n;++j)
{
if(a[i][j]>high)
high=a[i][j];
else
if(a[i][j]<low)
low=a[i][j];
}
}
cout<<"
Heighst Element:"<<high<<"
Lowest Element:"<<low<<"
";
getch();
}
C Program to Find ASCII value of a character
#include<iostream.h>
#include<conio.h>
void main()
{
clrscr();
char ch,c;
int cha;
cout<<"Enter a character:";
cin>>ch;
cha=ch;
cout<<"
ASCII value of "<<ch<<" is "<<cha;
c=ch+1; cha=c;
cout<<"
Adding one to the character:"<<"
ASCII value of "<<c<<" is "<<cha;
getch();
}
Thursday, February 5, 2015
Creating a Pentomino game using AS3 Part 3
By saying "first" I mean that only one type of shape is going to be available, and all it is going to do is follow the mouse and scale itself to have cell sizes of the ones in the grid.
Start by creating a new movie clip in your Flash project. Draw a 5x1vertical tiled shape inside of it, make sure each cells dimensions are exactly 100x100 pixels and the center of the movieclip is exactly in the center of the middle square:
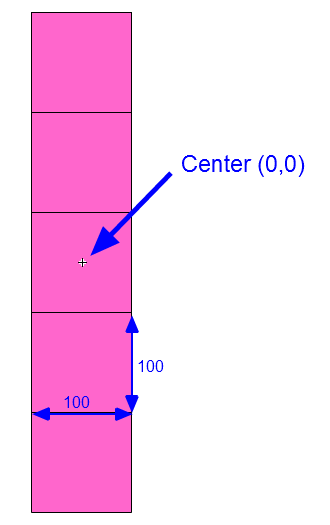
Later on, well be able to add more shapes to this movieclip in other frames. One frame holds one shape, basically. The reason were doing this like that is because this way it is very easy to use nicely drawn game assets instead of simple squares drawn by Flash API. The example above is simply a placeholder.
Now, give this movie clip a class name of "game_shape". Then remove this movie clip from the scene, keeping it only in the library.
Go to pentomino_game.as file. Declare a new "cursor" MovieClip:
private var cursor:MovieClip;
In the constructor, set this cursor to a new game_shape instance and add it to the stage. Disable its mouseEnabled, mouseChildren and visible properties, add a MOUSE_MOVE event listener.
// cursor
cursor = new game_shape();
addChild(cursor);
cursor.mouseEnabled = false;
cursor.mouseChildren = false;
cursor.visible = false;
addEventListener(MouseEvent.MOUSE_MOVE, mouseMove);
Then we also call startDragShape(1). This is temporary line, were only leaving it in the constructor for now:
// temporary shape
startDragShape(1);
The mouseMove() function simply makes the cursor follow the mouse:
private function mouseMove(evt:MouseEvent):void {
cursor.x = mouseX;
cursor.y = mouseY;
}
Now create the startDragShape() function. The "1" that we passed in the parameter is a variable called shapeType, it represents the frame in game_shape MovieClip that holds the wanted graphic.
Because we set the width and height of each single cell in the shape to 100 pixels, we can now easily find the scale multiplier to properly size the shape. Update the cursors size, alpha, visibility and make it go to the shapeType frame.
private function startDragShape(shapeType:int):void {
cursor.scaleX = gridCellWidth / 100;
cursor.scaleY = gridCellWidth / 100;
cursor.alpha = 0.75;
cursor.visible = true;
cursor.gotoAndStop(shapeType);
}
Full code:
package
{
import flash.display.MovieClip;
import flash.display.Sprite;
import flash.events.MouseEvent;

/**
 * Open-source pentomino game engine
 * @author Kirill Poletaev
 */

public class pentomino_game extends MovieClip
{
private var mapGrid:Array = [];

private var gridShape:Sprite = new Sprite();
private var gridStartX:int;
private var gridStartY:int;
private var gridCellWidth:int;

private var cursor:MovieClip;

public function pentomino_game()
{
// default map
mapGrid = [
[1, 1, 1, 1, 1, 1, 1, 1, 1, 1],
[1, 1, 1, 1, 1, 1, 1, 1, 1, 1],
[1, 1, 1, 1, 0, 0, 1, 1, 1, 1],
[1, 1, 1, 1, 0, 0, 1, 1, 1, 1],
[1, 1, 1, 1, 1, 1, 1, 1, 1, 1],
[1, 1, 1, 1, 1, 1, 1, 1, 1, 1]
];

// grid settings
calculateGrid();
addChild(gridShape);
gridShape.x = gridStartX;
gridShape.y = gridStartY;

// draw tiles
drawGrid();

// cursor
cursor = new game_shape();
addChild(cursor);
cursor.mouseEnabled = false;
cursor.mouseChildren = false;
cursor.visible = false;
addEventListener(MouseEvent.MOUSE_MOVE, mouseMove);

// temporary shape
startDragShape(1);
}

private function calculateGrid():void {
var columns:int = mapGrid[0].length;
var rows:int = mapGrid.length;

// free size: 520x460
// fit in: 510x450

// calculate width of a cell:
gridCellWidth = Math.round(510 / columns);

var width:int = columns * gridCellWidth;
var height:int = rows * gridCellWidth;

// calculate side margin
gridStartX = (520 - width) / 2;

if (height < 450) {
gridStartY = (450 - height) / 2;
}
if (height >= 450) {
gridCellWidth = Math.round(450 / rows);
height = rows * gridCellWidth;
width = columns * gridCellWidth;
gridStartY = (460 - height) / 2;
gridStartX = (520 - width) / 2;
}
}

private function drawGrid():void {
gridShape.graphics.clear();
var width:int = mapGrid[0].length;
var height:int = mapGrid.length;

var i:int;
var u:int;

// draw background
for (i = 0; i < height; i++) {
for (u = 0; u < width; u++) {
if (mapGrid[i][u] == 1) drawCell(u, i, 0xffffff, 1, 0x999999);
}
}
}

private function drawCell(width:int, height:int, fill:uint, thick:Number, line:uint):void {
gridShape.graphics.beginFill(fill);
gridShape.graphics.lineStyle(thick, line);
gridShape.graphics.drawRect(width * gridCellWidth, height * gridCellWidth, gridCellWidth, gridCellWidth);
}

private function mouseMove(evt:MouseEvent):void {
cursor.x = mouseX;
cursor.y = mouseY;
}

private function startDragShape(shapeType:int):void {
cursor.scaleX = gridCellWidth / 100;
cursor.scaleY = gridCellWidth / 100;
cursor.alpha = 0.75;
cursor.visible = true;
cursor.gotoAndStop(shapeType);
}

}

}
Thanks for reading!
The results:
Wednesday, February 4, 2015
Creating a Flex AIR Screenshot app Part 15
Before we do that, lets first add smoothing to our exported pictures. Set the last parameter in the draw() method of the bitmap data object to true. This line is located in the doExport() function:
function doExport():void {
bd = new BitmapData(tempHTML.width, tempHTML.height, false);
bd.draw(tempHTML, null, null, null, null, true);
byteArray = encoder.encode(bd);
fileName = pref_destination + File.separator + folderName + File.separator + tempHTML.width + "x" + tempHTML.height + "." + pref_format;
file = new File(fileName);
fileStream = new FileStream();
fileStream.open(file, FileMode.WRITE);
fileStream.writeBytes(byteArray);
fileStream.close();
}
Now, lets create this export screen state. Add a new NavigatorContent with id of "export" (if you didnt have that one already), add a Label object with stylename of descriptionText and text value bound to a variable called exportText:
<s:NavigatorContent id="export">
<s:VGroup width="100%" horizontalAlign="center" paddingTop="20">
<s:Label styleName="descriptionText" text="{exportText}" />
</s:VGroup>
</s:NavigatorContent>
Now lets create this exportText variable, make it bindable:
[Bindable]
private var exportText:String;
If you didnt have the export navigator content before, you need to add a new object to the headerTitles array collection:
<fx:Declarations>
<mx:ArrayCollection id="headerTitles">
<fx:Object step="Step one:" description="load a web page." />
<fx:Object step="Loading..." description="please wait." />
<fx:Object step="Step two:" description="set your export preferences." />
<fx:Object step="Step two:" description="select the area you wish to crop." />
<fx:Object step="Step three:" description="set your export preferences for the cropped image." />
<fx:Object step="Exporting:" description="please wait." />
</mx:ArrayCollection>
</fx:Declarations>
Now go to the exportScreen() function. Add a new internal function called updateExportText with 4 parameters, and it should look like this:
function updateExportText(w:int, h:int, current:int, total:int):void {
exportText = "Exporting " + w + "x" + h + "." + pref_format + " (" + current + "/" + total + ")";
}
The function takes the values from the parameters and composes a message out of them. This message is then passed to the text field, since the value is boudn to that field.
Call this function after the sizes for the first screen are applied (or not applied, depending on the conditional results.
if(screensToExport[0].h <= 4096 && screensToExport[0].w <= 4096){
tempHTML.height = screensToExport[0].h;
tempHTML.width = screensToExport[0].w;
}
updateExportText(screensToExport[0].w, screensToExport[0].h, 1, screensToExport.length);
And in the onTimer() internal function too:
function onTimer(evt:TimerEvent):void {
// do export for the current size
if(screensToExport[timer.currentCount-1].h <= 4096 && screensToExport[timer.currentCount-1].w <= 4096){
timer.stop();
doExport();
timer.start();
}else {
Alert.show("Cannot export " + screensToExport[timer.currentCount-1].w + "x" + screensToExport[timer.currentCount-1].h + " - dimensions of a screenshot cannot extend 4096.","Sorry");
}
// change the size if this was not the last size in the array
if (timer.currentCount != screensToExport.length) {
tempHTML.horizontalScrollPolicy = "auto";
tempHTML.verticalScrollPolicy = "auto";
if(screensToExport[timer.currentCount].h <= 4096 && screensToExport[timer.currentCount].w <= 4096){
tempHTML.height = screensToExport[timer.currentCount].h;
tempHTML.width = screensToExport[timer.currentCount].w;
}
updateExportText(screensToExport[timer.currentCount].w, screensToExport[timer.currentCount].h, timer.currentCount+1, screensToExport.length);
}else {
// if it was the last size in the array, return to first page
timer.stop();
removeElement(tempHTML);
stack.selectedChild = loadpage;
}
}
And thats all for today! When the user is saving the images, the export progress is displayed, and after saving is done, it goes back to the first page.
Full code:
<?xml version="1.0" encoding="utf-8"?>
<s:WindowedApplication xmlns:fx="http://ns.adobe.com/mxml/2009"
                       xmlns:s="library://ns.adobe.com/flex/spark"
   xmlns:custom="*"
                       xmlns:mx="library://ns.adobe.com/flex/mx" showStatusBar="false"
   width="550" height="600" creationComplete="init();">


<fx:Declarations>
<mx:ArrayCollection id="headerTitles">
<fx:Object step="Step one:" description="load a web page." />
<fx:Object step="Loading..." description="please wait." />
<fx:Object step="Step two:" description="set your export preferences." />
<fx:Object step="Step two:" description="select the area you wish to crop." />
<fx:Object step="Step three:" description="set your export preferences for the cropped image." />
<fx:Object step="Exporting:" description="please wait." />
</mx:ArrayCollection>
</fx:Declarations>

<fx:Style>
@namespace s "library://ns.adobe.com/flex/spark";
@namespace mx "library://ns.adobe.com/flex/mx";

.descriptionText{
fontSize: 24;
color: #fff;
}

.descriptionText2{
fontSize: 16;
color: #fff;
}

.settingText{
fontSize: 16;
color: #fff;
}

#headStep{
fontSize: 30;
fontWeight: bold;
color: #ffffbb;
}

#headDesc{
fontSize: 30;
color: #ffffff;
}
</fx:Style>

<fx:Script>
<![CDATA[
import flash.display.Bitmap;
import flash.display.BitmapData;
import flash.events.Event;
import flash.events.MouseEvent;
import flash.events.TimerEvent;
import flash.filesystem.File;
import flash.filesystem.FileStream;
import flash.geom.Rectangle;
import flash.net.URLRequest;
import flash.utils.ByteArray;
import flash.utils.Timer;
import mx.controls.HTML;
import mx.core.FlexHTMLLoader;
import mx.events.FlexNativeWindowBoundsEvent;
import mx.controls.Alert;
import mx.events.ResizeEvent;
import mx.graphics.codec.IImageEncoder;
import mx.graphics.codec.JPEGEncoder;
import mx.graphics.codec.PNGEncoder;
import mx.graphics.ImageSnapshot;
import spark.primitives.BitmapImage;
import flash.filesystem.FileMode;
import mx.managers.PopUpManager;

[Bindable]
private var urlString:String;
[Bindable]
private var canSelect:Boolean = true;
private var tempHTML:HTML = new HTML();

private var preferences:SharedObject = SharedObject.getLocal("kirshotPreferences");
[Bindable]
private var pref_screensizes:Array;
[Bindable]
private var pref_format:String;
[Bindable]
private var pref_quality:int;
[Bindable]
private var pref_folder:Boolean;
[Bindable]
private var pref_destination:String;
[Bindable]
private var exportText:String;

private var screenSettings:Array;

private function init():void {
//preferences.data.firsttime = null;

// Set preferences if loaded for the first time
if (preferences.data.firsttime == null) {
preferences.data.firsttime = true;
preferences.data.screensizes = [
{ checked:true },
{ checked:true, w:1280, h:1024 },
{ checked:true, w:1280, h:800 },
{ checked:true, w:1024, h:768 },
{ checked:false, w:"", h:"" },
{ checked:false, w:"", h:"" },
{ checked:false, w:"", h:"" } ];
preferences.data.format = "JPEG";
preferences.data.quality = 100;
preferences.data.folder = true;
preferences.data.destination = File.documentsDirectory.nativePath;
preferences.flush();
}

// Set preferences loaded from local storage
pref_screensizes = preferences.data.screensizes;
pref_format = preferences.data.format;
pref_quality = preferences.data.quality;
pref_folder = preferences.data.folder;
pref_destination = preferences.data.destination;

addEventListener(FlexNativeWindowBoundsEvent.WINDOW_RESIZE, onResize);

addElement(tempHTML);
removeElement(tempHTML);
}

private function doBrowse():void{
var file:File = new File();
file.addEventListener(Event.SELECT, browseSelect);
file.browseForOpen("Load a webpage");

function browseSelect(evt:Event):void {
urlInput.text = file.nativePath;
}
}

private function goCrop():void {
stack.selectedChild = crop;
urlString = urlInput.text;
}

private function goScreenshot():void {
stack.selectedChild = screenshotloading;
urlString = urlInput.text;

addElement(tempHTML);
tempHTML.htmlLoader.useCache = false;
tempHTML.horizontalScrollPolicy = "off";
tempHTML.verticalScrollPolicy = "off";
tempHTML.visible = false;
tempHTML.addEventListener(Event.COMPLETE, onTempLoad);
tempHTML.htmlLoader.load(new URLRequest(urlString));
}

private function onTempLoad(evt:Event):void {
stack.selectedChild = screenshotsettings;
}

private function cancelLoading():void {
tempHTML.cancelLoad();
stack.selectedChild = loadpage;
removeElement(tempHTML);
}

private function screenshotBack():void {
saveScreenshotSettings();
stack.selectedChild = loadpage;
removeElement(tempHTML);
}

private function changeState():void {
if (stack.selectedChild == loadpage) {
contentBox.setStyle("horizontalAlign", "center");
urlInput.text = urlString;
tempHTML.width = 1;
tempHTML.height = 1;
tempHTML.removeEventListener(Event.COMPLETE, onTempLoad);
tempHTML.htmlLoader.loadString("<html></html>");
}
if (stack.selectedChild == crop) {
maximize();
canSelect = true;
contentBox.setStyle("horizontalAlign", "left");
cropHTML.htmlLoader.load(new URLRequest(urlString));
cropHTML.width = contentBox.width;
cropHTML.height = contentBox.height - 24;
cropStatus.text = "Loading";
cropStatus.setStyle("color", "#ffff00");
cropHTML.addEventListener(Event.COMPLETE, onCropLoad);
}
if (stack.selectedChild == screenshotsettings) {
screenSettings = [set2, set3, set4, set5, set6, set7];
contSize.text = "Full size (" + tempHTML.contentWidth + "x" + tempHTML.contentHeight + ")";
loadScreenshotSettings();
}
}

private function loadScreenshotSettings():void {
set1checkbox.selected = pref_screensizes[0].checked;

for (var i:int = 0; i < screenSettings.length; i++) {
screenSettings[i].checked = pref_screensizes[i + 1].checked;
screenSettings[i].w = pref_screensizes[i + 1].w;
screenSettings[i].h = pref_screensizes[i + 1].h;
}

if (pref_format == "JPEG") {
screenRadioJPEG.selected = true;
} else {
screenRadioPNG.selected = true;
}
}

private function saveScreenshotSettings():void {
pref_screensizes[0].checked = set1checkbox.selected;

for (var i:int = 0; i < screenSettings.length; i++) {
pref_screensizes[i + 1].checked = screenSettings[i].checked;
pref_screensizes[i + 1].w = screenSettings[i].w;
pref_screensizes[i + 1].h = screenSettings[i].h;
}

if (screenRadioJPEG.selected == true) {
pref_format == "JPEG";
} else {
pref_format == "PNG";
}

preferences.data.screensizes = pref_screensizes;
preferences.data.format = pref_format;
preferences.data.quality = pref_quality;
preferences.data.folder = pref_folder;
preferences.data.destination = pref_destination;
preferences.flush();
}

private function formatChange(newformat:String):void {
pref_format = newformat;
}

private function startExportScreenshot():void {
var canExport:Boolean = true;

for (var i:int = 0; i < screenSettings.length; i++) {
if (screenSettings[i].checked && ((screenSettings[i].w == "" || screenSettings[i].w == 0) || (screenSettings[i].h == "" || screenSettings[i].h == 0))) {
canExport = false;
}
}

if (canExport) {
if ((pref_folder && folderField.text != "") || !pref_folder) {
saveScreenshotSettings();
exportScreen();
}else {
Alert.show("Folder name should not be blank!", "Oops...");
}
}else {
Alert.show("One or more selected screen sizes are not entered or are invalid!", "Oops...");
}
}

private function screenshotDestination():void {
var newDestination:File = new File(pref_destination);
newDestination.browseForDirectory("Select directory");
newDestination.addEventListener(Event.SELECT, destinationSelect);

function destinationSelect(evt:Event):void {
pref_destination = newDestination.nativePath;
}
}

private function exportScreen():void {
var encoder:IImageEncoder;
var bd:BitmapData;
var byteArray:ByteArray;
var folderName:String = (pref_folder)?(folderField.text):("");
var fileName:String;
var file:File;
var fileStream:FileStream;
var screensToExport:Array = [];
stack.selectedChild = export;

if (pref_format == "JPEG") {
encoder = new JPEGEncoder(pref_quality);
}
if (pref_format == "PNG") {
encoder = new PNGEncoder();
}

// add full-size screen to array if checked
if (pref_screensizes[0].checked) {
screensToExport = [ { w:tempHTML.contentWidth, h: tempHTML.contentHeight, full:true} ];
}

// add the rest screens to array if checked
for (var i:int = 0; i < screenSettings.length; i++) {
if (pref_screensizes[i + 1].checked) {
screensToExport.push( { w: pref_screensizes[i + 1].w, h:pref_screensizes[i + 1].h } );
}
}

// if nothing is checked, go to first page and stop code
if (screensToExport.length == 0) {
removeElement(tempHTML);
stack.selectedChild = loadpage;
return;
}

// create a timer that repeats itself as many times as many items there are in the array
var timer:Timer = new Timer(2000, screensToExport.length);
timer.addEventListener(TimerEvent.TIMER, onTimer);
// set sizes to the first size of the array
if (screensToExport[0].full) {
tempHTML.horizontalScrollPolicy = "off";
tempHTML.verticalScrollPolicy = "off";
}else {
tempHTML.horizontalScrollPolicy = "auto";
tempHTML.verticalScrollPolicy = "auto";
}
if(screensToExport[0].h <= 4096 && screensToExport[0].w <= 4096){
tempHTML.height = screensToExport[0].h;
tempHTML.width = screensToExport[0].w;
}
updateExportText(screensToExport[0].w, screensToExport[0].h, 1, screensToExport.length);
timer.start();

function onTimer(evt:TimerEvent):void {
// do export for the current size
if(screensToExport[timer.currentCount-1].h <= 4096 && screensToExport[timer.currentCount-1].w <= 4096){
timer.stop();
doExport();
timer.start();
}else {
Alert.show("Cannot export " + screensToExport[timer.currentCount-1].w + "x" + screensToExport[timer.currentCount-1].h + " - dimensions of a screenshot cannot extend 4096.","Sorry");
}
// change the size if this was not the last size in the array
if (timer.currentCount != screensToExport.length) {
tempHTML.horizontalScrollPolicy = "auto";
tempHTML.verticalScrollPolicy = "auto";
if(screensToExport[timer.currentCount].h <= 4096 && screensToExport[timer.currentCount].w <= 4096){
tempHTML.height = screensToExport[timer.currentCount].h;
tempHTML.width = screensToExport[timer.currentCount].w;
}
updateExportText(screensToExport[timer.currentCount].w, screensToExport[timer.currentCount].h, timer.currentCount+1, screensToExport.length);
}else {
// if it was the last size in the array, return to first page
timer.stop();
removeElement(tempHTML);
stack.selectedChild = loadpage;
}
}

function doExport():void {
bd = new BitmapData(tempHTML.width, tempHTML.height, false);
bd.draw(tempHTML, null, null, null, null, true);
byteArray = encoder.encode(bd);
fileName = pref_destination + File.separator + folderName + File.separator + tempHTML.width + "x" + tempHTML.height + "." + pref_format;
file = new File(fileName);
fileStream = new FileStream();
fileStream.open(file, FileMode.WRITE);
fileStream.writeBytes(byteArray);
fileStream.close();
}

function updateExportText(w:int, h:int, current:int, total:int):void {
exportText = "Exporting " + w + "x" + h + "." + pref_format + " (" + current + "/" + total + ")";
}
}

private function onCropLoad(evt:Event):void {
cropStatus.text = "Loaded";
cropStatus.setStyle("color", "#ffffff");
}

private function onResize(evt:Event):void {
if (stack.selectedChild == crop) {
cropHTML.width = contentBox.width;
cropHTML.height = contentBox.height - 24;
}
}
]]>
</fx:Script>

<s:VGroup width="100%" height="100%" gap="0">
<mx:HBox backgroundColor="#333333" height="46" width="100%" paddingTop="10" paddingLeft="10">
<s:Label id="headStep" text="{headerTitles.getItemAt(stack.selectedIndex).step}" />
<s:Label id="headDesc" text="{headerTitles.getItemAt(stack.selectedIndex).description}" />
</mx:HBox>
<mx:Box backgroundColor="#666666" width="100%" height="100%" id="contentBox" horizontalAlign="center">
<mx:ViewStack id="stack" change="changeState();">
<s:NavigatorContent id="loadpage">
<s:VGroup width="100%" horizontalAlign="center" paddingTop="20">
<s:Label styleName="descriptionText">Enter the link to the page:</s:Label>
<s:HGroup>
<s:TextInput width="250" id="urlInput" text="http://" /><s:Button label="Browse local..." click="doBrowse();" />
</s:HGroup>
<s:HGroup>
<custom:ImageButton img="@Embed(../lib/b_screenshot.png)" over="@Embed(../lib/b_screenshot_over.png)" toolTip="Take screenshots" click="goScreenshot();" buttonMode="true" enabled="{urlInput.text!=}" />
<custom:ImageButton img="@Embed(../lib/b_cut.png)" over="@Embed(../lib/b_cut_over.png)" toolTip="Crop area" click="goCrop();" buttonMode="true" enabled="{urlInput.text!=}" />
</s:HGroup>
</s:VGroup>
</s:NavigatorContent>

<s:NavigatorContent id="screenshotloading">
<s:VGroup width="100%" horizontalAlign="center" paddingTop="20">
<s:Label styleName="descriptionText">The page is being loaded...</s:Label>
<s:Button label="Cancel" click="cancelLoading();" />
</s:VGroup>
</s:NavigatorContent>

<s:NavigatorContent id="screenshotsettings">
<s:VGroup width="100%" horizontalAlign="center" paddingTop="20">
<s:Label styleName="descriptionText2">Select screenshot screen sizes:</s:Label>
<s:SkinnableContainer backgroundColor="#999999" width="310" height="18" >
<s:CheckBox toolTip="Use this screen size" x="4" id="set1checkbox" />
<s:Label id="contSize" styleName="settingText" x="22" y="3" />
</s:SkinnableContainer>
<custom:ScreenSetting id="set2" />
<custom:ScreenSetting id="set3" />
<custom:ScreenSetting id="set4" />
<custom:ScreenSetting id="set5" />
<custom:ScreenSetting id="set6" />
<custom:ScreenSetting id="set7" />

<s:Label/>

<s:Label styleName="descriptionText2">Export as:</s:Label>
<s:HGroup>
<s:RadioButton id="screenRadioJPEG" label="JPEG" groupName="screenshotFormat" change="formatChange(JPEG);" styleName="descriptionText2" />
<s:RadioButton id="screenRadioPNG" label="PNG" groupName="screenshotFormat" change="formatChange(PNG);" styleName="descriptionText2" />
</s:HGroup>
<s:Label styleName="descriptionText2">Quality:</s:Label>
<s:HSlider id="screenQualitySlider" width="310" minimum="1" maximum="100" liveDragging="true" enabled="{pref_format==JPEG}" value="@{pref_quality}" />

<s:Label/>

<s:Label styleName="descriptionText2">Export destination:</s:Label>
<s:HGroup width="310">
<s:TextInput editable="false" width="100%" toolTip="Destination" text="{pref_destination}" />
<s:Button label="Browse" click="screenshotDestination();" />
</s:HGroup>
<s:CheckBox id="folderCheckbox" label="Create new folder with exported images" styleName="descriptionText2" selected="@{pref_folder}" />
<s:TextInput id="folderField" width="100%" toolTip="Folder name" maxChars="200" enabled="{folderCheckbox.selected}" restrict="a-zA-Z0-9._-=+" />
<s:HGroup>
<s:Button label="Back" click="screenshotBack();" />
<s:Button label="Export" click="startExportScreenshot();" />
</s:HGroup>
</s:VGroup>
</s:NavigatorContent>

<s:NavigatorContent id="crop">
<s:VGroup width="100%" height="100%" gap="0">
<mx:HBox backgroundColor="#999999" width="100%" height="24" verticalScrollPolicy="off" verticalAlign="middle" paddingLeft="2">
<s:Button label="Back" click="{cropHTML.htmlLoader.loadString(); stack.selectedChild = loadpage;}" />
<s:Button label="Export selection" enabled="false" />
<s:Label id="cropStatus" />
<s:Label text="{urlString}" />
</mx:HBox>
<mx:HTML id="cropHTML" horizontalScrollPolicy="on" verticalScrollPolicy="on" />
</s:VGroup>
</s:NavigatorContent>

<s:NavigatorContent id="cropsettings">

</s:NavigatorContent>

<s:NavigatorContent id="export">
<s:VGroup width="100%" horizontalAlign="center" paddingTop="20">
<s:Label styleName="descriptionText" text="{exportText}" />
</s:VGroup>
</s:NavigatorContent>
</mx:ViewStack>
</mx:Box>
</s:VGroup>

</s:WindowedApplication>
Thanks for reading!