Wednesday, March 11, 2015
Create a custom CRM dashboard using Google Apps Script
Editors note: This is a guest post by Alex Steshenko. Alex is a core software engineer for Solve360, a highly-rated CRM in the Google Apps Marketplace which was recently chosen as a Staff Pick. Solve360 offers many points of useful integration with Google Apps. Today, in contrast to the conventional Data API integrations, Alex will showcase how he extended Solve360 using Google Apps Script. --- Ryan Boyd
Choosing Google Apps Script
Solve360 CRM integrates with Google services to provide a two-way contact & calendar sync, email sync and a comprehensive Gmail contextual gadget. We use the standard Google Data APIs. However, some of our use cases required us to use Google documents and spreadsheets. Enter Apps Script!. What brought our attention to Google Apps Script was that it allows you to run your application code right within the Google Apps platform itself, where documents can be manipulated using a wide range of native Google Apps Script functions, changing the perspective.
Our first experience with Google Apps Script was writing a "Contact Us" form. We decided to use the power and flexibility of Apps Script again to generate different kinds of reports.
Generating Solve360 Reports using Apps Script
Google Spreadsheets can produce rich reports leveraging features such as filters, pivot tables, built-in functions and charts. But where’s the data to report on? Using Google Apps Script, users can integrate Google Spreadsheets with a valuable source of data - the Solve360 CRM - completing the solution.
Solve360 Google Apps Reporting script lets users configure the reporting criteria while pulling reports into a Google Spreadsheet.

Heres a video demonstrating a real use case for Solve360 Reporting:
Designing Solve360 Reporting using Apps Script
User meet “Script”
For this script, we realized, simply providing spreadsheet functions would not be good enough. We needed a user interface to let users configure their account details and define what kind of data to fetch from the Solve360 CRM. Google Apps Script’s Ui Services came in handy. For instance, here is the function responsible for showing the “Solve360 account info” dialog:
/*
 * Creates new UI application and opens setting window
 */
function settingsUi() {
  var app = UiApp.createApplication();
  app.setTitle(Solve360 account info)
     .setWidth(260)
     .setHeight(205);

  var absolutePanel = app.createAbsolutePanel();

  absolutePanel.add(authenticationPanel_(app));

  app.add(absolutePanel);
  SpreadsheetApp.getActiveSpreadsheet().show(app);
}
Working with Solve360’s API
Solve360 CRM has an external API available so the system can be integrated with custom business applications and processes. Reporting script use case is a good example of what it can be used for.
One of the first tricks learned was creating our own Google Apps-like “service” to encapsulate all those functions responsible for interacting with Solve360 CRM’s API. What is the most interesting is that this service’s code isn’t a part of the distributed Google Apps script. Instead the library is loaded from within the script itself directly from our servers. Why? Let’s say we found a bug or added new functions - if we had many copies of the service we would need to update them all, somehow notifying our clients, and so on. With one source, there’s no such problem. You may think of it as a way to distribute a Google Apps Script solution, or, in our case, a part of the solution. The service is called Solve360Service and its usage looks like this:
var contact = Solve360Service.addContact(contactData);
There were two problems with getting such an external service to work: Google Apps Script permissions restrictions and actually including it in the script.
The issue with permissions is that the Google Apps Script environment can’t see which Google Apps Script services are used inside the external service - that’s why it doesn’t ask you to grant special permissions for them. To force the authorization request for those permissions we added this to the onInstall function (called once when script is added to the spreadsheet):
function onInstall() {
   // to get parseJS permissions
  Xml.parseJS([solve360, 1]);

   // to get base64Encode permissions
  Utilities.base64Encode(solve360);
// ...
}
Here is the solution we used to load our centralized code into the script:
eval(UrlFetchApp.fetch("https://secure.solve360.com/gadgets/resources/js/Solve360Service.js").getContentText()); The Solve360Service is loaded from a single source - no copy-paste. All the functions for accessing the Solve360 API aka “the plumbing” are abstracted and hidden in inside this service, while the essentials of the reports script itself can be modified and tweaked to a particular client’s case. Inside of Solve360Service we use UrlFetchApp:
/**
 * Request to the Solve360 API server
 * data should be an Array in Short Hand notation
 */
request : function(uri, restVerb, data) {
  if (this._credentials == null) {
    throw new Error(Solve360 credentials are not set);
  }

  if (typeof(data) != undefined) {
    if (restVerb.toLowerCase() == get) {
      var parameters = [];
      for each(var parameter in data) {
        parameters.push(encodeURIComponent(parameter[0]) + = + encodeURIComponent(parameter[1]));
      }
      uri += ? +  parameters.join(&);
      data = ;
    } else {
      data.unshift(request);
      data = Xml.parseJS(data).toXmlString();
    }
  } else {
    data = ;
  }

  var options = {
    "contentType" : "application/xml",
    "method" : restVerb.toLowerCase(),
    "payload" : data,
    "headers" : {"Authorization" : "Basic " + this._credentials}
  };
  return Xml.parse(UrlFetchApp.fetch(this._url + uri, options).getContentText()).getElement();
}
As the result is always XML, in order to remove any extra work we call Xml.parse() right inside the request function and always return a XmlElement so you can iterate through it, access nodes and attributes. Here is a simplified version of how we load some items when building a report:
/*
* Builds a search config from user preferences and loads a slice of data from Solve360
* To configure how many items should be loaded at a time, change ITEMS_LOAD_REQUEST_LIMIT constant
*/
function retrieveItems_(parameter, offset) {
  initSolve360Service_();
  // ...
  var searchParameters = [
    [layout, 1],
    [sortdir, ASC],
    [sortfield, name],
    [start,  + offset],
    [limit,  + ITEMS_LOAD_REQUEST_LIMIT],
    [filtermode, filtermode],
    [filtervalue, filtervalue],
    [searchmode, searchmode],
    [searchvalue, searchvalue],
    [special, special],
    [categories, 1]
  ];
  if (parameter.showAllFieldsCheckbox != true && fields.length > 0) {
    searchParameters.push([fieldslist, fields.join(,)]);
  }
  // ...
  var items = Solve360Service.searchProjectBlogs(searchParameters);
  // ...
  return items;
}
To simplify the usage of the service we added another function which initializes the service object, named Solve360Service:
/*
* Loads external Solve360Service
* For the service functions available refer to the source code here:
* https://secure.solve360.com/gadgets/resources/js/Solve360Service.js
*/
var Solve360Service = null;
function initSolve360Service_() {
  if (Solve360Service == null) {
    eval(UrlFetchApp.fetch("https://secure.solve360.com/gadgets/resources/js/Solve360Service.js").getContentText());
    var user = UserProperties.getProperty(USERPROPERTY_USER);
    var token = UserProperties.getProperty(USERPROPERTY_TOKEN);
    if (user == null || user.length == 0 || token == null || token.length == 0) {
      throw new Error(Use Solve360 spreadsheet menu to set email and token first);
    }
    Solve360Service.setCredentials(user, token);
  }
}
As you can see, it uses the email/token pair previously saved in the “Solve360 Account Info” dialog or signals an error if the credentials were not yet saved.
Conclusion
There are many use cases where you can apply the Google Apps Script. The fact that you can work and implement solutions right from “inside” one of the greatest and most universal web applications available is amazing.
You can integrate your own software with Google Docs or even learn from us and build a reporting script for any other system accessible online. Try to look at solving business tasks from a different perspective, from the Google Apps point of view. We encourage it!
The code of the new script is available for use and study here:
https://secure.solve360.com/docs/google-apps-reports.js.
 | Alex Steshenko profile | twitter | blog Alex Steshenko is a core software engineer for Solve360, a CRM application on the Google Apps Marketplace. |

Friday, February 13, 2015
C C Program to Create a Digital Stopwatch
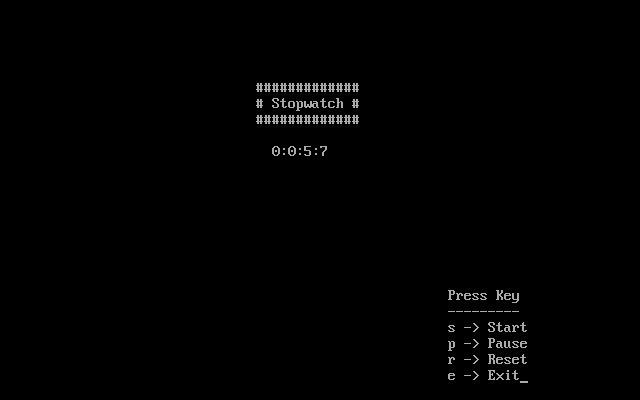
Hello friends, this is a simple program to create a digital stopwatch. I am sure that even a beginner can understand it very easily. I have written this in c++, so to use it c just change all cout statements with corresponding printf statements. I hope you understand what i want to say. If you have any kind of problem in doing this then let me know by commenting below, i will try my best to help you. So just try this and share your experience with me.
Also Read: C++ Program to create an Analog Clock
Also Read: C++ Hotel Management Project
#include<conio.h>
#include<process.h>
#include<iostream.h>
#include<dos.h>
int h=0,m=0,s=0,ms=0;
char ch=p;
void main()
{
void watch();
watch();
while(1)
{
if(kbhit())
ch=getch();
if(ch==s||ch==S)
break;
if(ch==e||ch==E)
exit(0);
}
while(1)
{
watch();
delay(10);
if(kbhit())
ch=getch();
if(ch==r||ch==R)
{
h=m=s=ms=0;
watch();
while(1)
{
if(kbhit())
ch=getch();
if(ch==s||ch==S)
break;
if(ch==e||ch==E)
exit(0);
}
}
else
if(ch==p||ch==P)
while(1)
{
if(kbhit())
ch=getch();
if(ch==s||ch==S)
break;
if(ch==e||ch==E)
exit(0);
if(ch==r||ch==R)
{
ch=c;
h=m=s=ms=0;
watch();
}
}
else
if(ch==e||ch==E)
exit(0);
if(ms!=99)
ms++;
else
{
ms=0;
if(s!=59)
s++;
else
{
s=0;
if(m!=59)
m++;
else
{
m=0;
h++;
}
}
}
}
}
void watch()
{
clrscr();
cout<<"
#############";
cout<<"
# Stopwatch #";
cout<<"
#############";
cout<<"
"<<h<<":"<<m<<":"<<s<<":"<<ms;
cout<<"
Press Key";
cout<<"
---------";
cout<<"
s -> Start";
cout<<"
p -> Pause";
cout<<"
r -> Reset";
cout<<"
e -> Exit";
}
Monday, February 2, 2015
How to Create a Quiz in Flash ActionScript 3 Tutorial PART 2
In the first part of this lesson, we added the functionality that will allow the user to take the quiz - we added the questions and the correct answers, and we enabled the user to submit his or her own answers by using the input field and clicking on the submit button. All of that happens in frame 1 of our simple Flash quiz.
In this part of the How to Create a Quiz in Flash using ActionScript 3 tutorial, we will be working on the following:
- Displaying the users answers alongside the correct answers
- Checking the users answers and computing the score
- Displaying the users score
TextFields for the USERs answers - userAnswer0_txt, userAnswer1_txt, userAnswer2_txt, userAnswer3_txt
TextFields for the CORRECT answers - correctAnswer0_txt, correctAnswer1_txt, correctAnswer2_txt, correctAnswer3_txt
TextField for the SCORE - score_txt
The TextField names for the answers have numbers in them so that they will match the index values of the answers in the arrays (aUserAnswers and aCorrectAnswers). userAnswer0_txt will be for aUserAnswers[0], userAnswer1_text will be for aUserAnswers[1], and so on...
So now lets go ahead and add the code. Make sure you select frame 2 of Actions layer and then go to the Actions Panel. Lets first create a number variable:
var nScore:Number = 0;This variable is going to be used to store the users score. Im initializing it to 0 just in case the user does not get any answer correctly. If that happens then the score will just stay at 0. Ok, so well go back to that variable later. For now, lets work on the code that will display the answers in their respective text fields. We will get the data from the arrays using array access notation, and assign each piece of data to its corresponding text field using the text property of the TextField class. We can do it this way:
userAnswer0_txt.text = aUserAnswers[0];If you add in this code and then test the movie, you should see all the answers displayed in the text fields after you answer all the questions. So at this point, we can actually move on to the next part of the code that will check whether the answers the user gave are correct. But before we do that, Id like to show you another way of displaying the answers in the TextFields. Instead of manually assigning each item to its corresponding text field one by one, well use a for loop instead. So go ahead and remove or comment out the code above, and well try this other method of displaying the answers.
userAnswer1_txt.text = aUserAnswers[1];
userAnswer2_txt.text = aUserAnswers[2];
userAnswer3_txt.text = aUserAnswers[3];
correctAnswer0_txt.text = aCorrectAnswers[0];
correctAnswer1_txt.text = aCorrectAnswers[1];
correctAnswer2_txt.text = aCorrectAnswers[2];
correctAnswer3_txt.text = aCorrectAnswers[3];
Ok, so in the first method, we displayed the answers this way:
textField.text = array[index];
ex.
correctAnswer0_txt.text = aCorrectAnswers[0];
For this other method that were doing, we need to learn another way of targeting our TextField. For example, instead of typing in correctAnswer0_txt.text, we can replace correctAnswer0_txt with this["correctAnswer0_txt"] instead. So this is what well have:
this["correctAnswer0_txt"].text = aCorrectAnswers[0];
This is but another way of targeting our display objects (like Buttons, MovieClips and TextFields). Lets take a look at the example again:
this["correctAnswer0_txt"]
Here, since our code is placed in the main timeline, then the this keyword in this instance would refer to the main timeline. And then inside the square brackets, we place the name of the child object that we want to target (the name must be specified as a string, so it should be in quotation marks). So what were doing here is we are telling Flash to target the correctAnswer0_txt TextField which can be found inside this (which in this example would be the main timeline).
So what is the benefit of writing it this way instead?
In this other method of targeting display objects, we are specifying the name of the instances as strings. Because were doing it this way, we can replace the numbers in the names with variables instead. That way, we can just have that variable be incremented inside a for loop so that we dont have to hard code in the numbers for each text field (here you see why its important that we numbered our text fields within their respective names). If this sounds a bit confusing, lets take a look at how the new text assignment statement will look inside of the for loop:
this["correctAnswer" + i + "_txt"].text = aCorrectAnswers[i];
Here, the numbers are replaced with the variable i. For the text fields name, the join operator (+) is used to combine the variable with the rest of the name. Then as the for loop updates, so does i, therefore allowing us to iterate through the text fields and the items in the arrays. Note that i is a number, and it is being combined with strings. In this example, there is no need to convert i into a string. Because the number data is being combined with strings, Flash will automatically convert that number data into a string. So now lets go ahead and write our for loop. Well start with the variable i being equal to 0, and then as long as i is less then aQuestions.length, well keep the for loop running (you can also use aCorrectAnswers.length or aUserAnswers.length since they all have the same lengths anyway). So our for loop will look like this:
for(var i:Number = 0; i < aQuestions.length; i++)
{
     this["userAnswer" + i + "_txt"].text = aUserAnswers[i];
     this["correctAnswer" + i + "_txt"].text = aCorrectAnswers[i];
}Go ahead and test your movie and you should see that this will yield the same results as with the previous method that we used. This second method would be more efficient to use since we wont have to type in the text assignment statements one by one. Imagine if our quiz had 100 questions!
Ok, so now we can move on to the part that checks whether the users answers are correct. So how do we write the code that will determine whether each answer is correct or not? If the answer that the user submitted is the same as the corresponding item in the aCorrectAnswers array, then it means that the user got the correct answer. We know that the users answers are stored in the aUserAnswers array so we could just compare if the items in aUserAnswers match their partners (the ones with the same index value) in the aCorrectAnswers array. Well use an if statement for that. For each match that is detected, we will give the user a point by incrementing nScore by 1 (nScore is that variable that we created earlier, which was initialized to 0). We will place that if statement in the for loop as well, since we want to go through each item in both of the arrays. So our updated for loop is now:
for(var i:Number = 0; i < aQuestions.length; i++)
{
     this["userAnswer" + i + "_txt"].text = aUserAnswers[i];
     this["correctAnswer" + i + "_txt"].text = aCorrectAnswers[i];
     if(aUserAnswers[i] == aCorrectAnswers[i])
     {
          nScore++;
          trace(nScore);
     }
}for(var i:Number = 0; i < aQuestions.length; i++)
{
this["userAnswer" + i + "_txt"].text = aUserAnswers[i];
this["correctAnswer" + i + "_txt"].text = aCorrectAnswers[i];
if(aUserAnswers[i].toUpperCase() == aCorrectAnswers[i].toUpperCase())
{
nScore++;
trace(nScore);
}
}So now, if you test the movie and try out the quiz again, you should see nScore update in the output window (provided that you get at least one answer right, if you dont get any answers right, then nScore never gets updated and wont get traced).
Lastly, wed like to display the final score in the score_txt text field. Well display the score once the for loop has finished checking all the answers. To check whether the for loop is finished, we can check whether i is equal to aQuestions.length - 1. If i is equal to the array length minus one, then it means that the for loop is already at the last item (we subtract the length by 1 because the index values start at 0, where as the length count starts at 1). So well use another if statement inside the for loop to check for that. If i is equal to aQuestions.length - 1, then we assign nScore to score_txt using the text property of the TextField class (be sure to convert nScore to a string using the toString() method). So lets go ahead and update the code:
for(var i:Number = 0; i < aQuestions.length; i++)
{
     this["userAnswer" + i + "_txt"].text = aUserAnswers[i];
     this["correctAnswer" + i + "_txt"].text = aCorrectAnswers[i];
     if(aUserAnswers[i].toUpperCase() == aCorrectAnswers[i].toUpperCase())
     {
          nScore++;
     }
     if(i == aQuestions.length - 1)
     {
          score_txt.text = nScore.toString();
     }
}Here is the code in full:
FRAME 1
stop();

var nQNumber:Number = 0;
var aQuestions:Array = new Array();
var aCorrectAnswers:Array = new Array("Jupiter", "Mars", "war", "Titan");
var aUserAnswers:Array = new Array();

aQuestions[0] = "What is the biggest planet in our solar system?";
aQuestions[1] = "Which planet in our solar system is the 4th planet from the sun?";
aQuestions[2] = "Mars is named after the Roman god of ___.";
aQuestions[3] = "What is the name of Saturns largest moon?";

questions_txt.text = aQuestions[nQNumber];

submit_btn.addEventListener(MouseEvent.CLICK, quiz);

function quiz(e:MouseEvent):void
{
     aUserAnswers.push(answers_txt.text);
     answers_txt.text = "";
     nQNumber++;
     if(nQNumber < aQuestions.length)
     {
          questions_txt.text = aQuestions[nQNumber];
     }
     else
     {
          nextFrame();
     }
}var nScore:Number = 0;
for(var i:Number = 0; i < aQuestions.length; i++)
{
this["userAnswer" + i + "_txt"].text = aUserAnswers[i];
this["correctAnswer" + i + "_txt"].text = aCorrectAnswers[i];
if(aUserAnswers[i].toUpperCase() == aCorrectAnswers[i].toUpperCase())
{
nScore++;
}
if(i == aQuestions.length - 1)
{
score_txt.text = nScore.toString();
}
}