Saturday, January 31, 2015
VOYO V909 2013 5 27 Tablet firmware
VOYO V909 2013 5.27 Tablet firmware
Firmware Description:
Firmware version 5.20
download TF card ready prelude
DOWNLOAD OFFICIAL FIRMWARE
Now pay for private uploads on SlideShare
SlideShare, worlds largest presentation sharing platform which adopted fermium model with the launch of premium pro plans couple of months back has been experimenting different things to monetize SlideShare. Latest in the list is private upload and sharing. Now one has to go pro in order to share presentations privately. Private sharing was launched by SlideShare in 2007 declaring it absolutely free. In past SlideShare experimented with Job broad as well.

To pitch Pro accounts, SlideShare now has two different upload buttons for private and public uploads.

authorSTREAM, SlideShares competitor still offers 50 private uploads to free members.
To pitch Pro accounts, SlideShare now has two different upload buttons for private and public uploads.
authorSTREAM, SlideShares competitor still offers 50 private uploads to free members.
iJoy Neon 7inch AMLOGIC Tablet Android Firmware
i-Joy Neon 7 inch Amlogic Tablet Android Support , Firmware & Installation
Tablet Specifications:
LCD | 7" Capacitive Touch Screen 5 Points |
Screen Resolution | 800x480 |
Processor | 1.2 Ghz Amlogics 2726 GPU Mali 400 Dual Core |
Chipset / Boxchip | AMLOGICS |
RAM | 1 GB DDR3 |
Built in Memory | 8 GB |
External Memory | Support Micro Card (MAX. 32GB) |
Wifi | 802.11 b/g/n supported |
Blue tooth | N/A |
3G | Support USB 3G Dongle, EVDO/WCDMA |
Camera | 0.3 MP Front |
HDMI | 1.4 + Micro Usb |
Speaker | N/A |
Weight | 300g |
Android Version | 4.1 |
Battery | 3.7V (5Hrs) |
Technical Support .
The following firmware / ROM file will be used when your tablets facing various problems . In case of
1. Forgotten Pattern Lock ,
2.Too many pattern attempt / Reset user lock
3. Tablets stuck on Gmail account
4. Tablet Android stuck on Android logo
5.Android Tablet hang on startup
you can use this Tablet firmware , Android Software to make your Android China tablet working again .
Flashing stock firmware should be last option.
Additional Downloads :
Flashing Tools are added in Download file.
Download Android Software
Rockchip Android Tool solution Pattern lock Password Gmail account
Rockchip CPU Solution Pattern Lock/user lock / Gmail account bypass without Flashing Tablet Pc firmware.
(Method tested by myself on many Tablets, work 100% perfect).
Computer will recognize Tablets and install usb driver .


Drivers for Rockchip
Download Rockchip Drivers if you dont have Drivers for ROCKCHIP
Go to MY Computer properties and look out for Rochip Device connected in Device Manager.
Download Rockchip Android Tool.
Rockchip Android Tool
Extract software with winrar
Run Software ,Uncheck all boxes if checked

Check only Option 3

Click on Box

A pop up window will appear , Select misc (as i have mentioned)

Select img file and Run software

Wait for few seconds . Android tablet will be restart and you are done . This is tested method . I have personally use this software with many Rockchip Tablets based on RK3066,Rk2928 and it was successful,and works like charm . I highly recommended using this software before flashing the complete firmware on the basis of my Knowledge.
Author -
Ahtisham Zaheer
you may also like to read
Firmware update tutorial for Rockchip with RKBatch Tool
Firmware update tutorial for Rockchip with RKBatch Tool
Android beginner tutorial Part 50 Options menu icons Action bar
In this tutorial we will learn how to add icons and use Action bar.
As I mentioned before, an Action bar is something Google invented and plants to replace the old Options menu with. Still the menu remains as long as there is a Menu button on the device. In this part I will show you how to add icons to menu items that are displayed in the old Icon Menu that appears in the bottom of the screen, or in the Action Bar on devices running newer versions of Android. The icons are not displayed in the List-like menu though.
The MainActivity.java class remains like this the whole time today:
We will be working in activity_main.xml, which is located in res/menu/ directory.
Add 3 items here, give them unique ids and titles. Set their icons using the "icon" attribute. Im using the two snowflake pictures I have in my drawable-hdpi folder. Icons can also be added with code using setIcon() method, but right now Im doing it using XML.
The showAsAction attribute can be set to multiple values and to some combination of the available values. The values are "never", "ifRoom", "withText", "always", "collaspeActionView". You can use more than one of the keyboards like this: "ifRoom|withText".
The "ifRoom" keyboard indicates that the button will be displayed only if theres space available. The "withText" keyboard tells android to display the text of the button if available (if there is room for that). The "collapseActionView" keyword adds a button that displays a drop-down menu with all the rest of the buttons that are not displayed.
Lets add "withText" to all 3 buttons, "always" to the first button and "ifRoom" to the second and third one.
On an Android device I have that runs Android 2.3, all the icons are displayed in the classic Options menu in the bottom part of the screen.
This is how the application looks on Android 4 phone:

And this is the same application on a tablet:

As you can see, the phone could only fit 2 icons without text, while the tablet is wide enough to display all 3 icon with their text labels.
Lets try putting "collapseActionView" for the second and third items:
The tablet now displays a button like this, which spawns a dropdown menu when it is touched:
 IMG HERE
The phone, however, does not display such a thing. But the dropdown menu can be called out by pressing the Menu item on the device.
This way, we made sure all the buttons are displayed on all devices, even though in different ways.
Thanks for reading!
Read more »
As I mentioned before, an Action bar is something Google invented and plants to replace the old Options menu with. Still the menu remains as long as there is a Menu button on the device. In this part I will show you how to add icons to menu items that are displayed in the old Icon Menu that appears in the bottom of the screen, or in the Action Bar on devices running newer versions of Android. The icons are not displayed in the List-like menu though.
The MainActivity.java class remains like this the whole time today:
package com.kircode.codeforfood_test;

import android.app.Activity;
import android.os.Bundle;
import android.view.Menu;

public class MainActivity extends Activity{

@Override
protected void onCreate(Bundle savedInstanceState) {
super.onCreate(savedInstanceState);
setContentView(R.layout.activity_main);
}

@Override
public boolean onCreateOptionsMenu(Menu menu) {
// Inflate the menu; this adds items to the action bar if it is present.
getMenuInflater().inflate(R.menu.activity_main, menu);
return true;
}

}
We will be working in activity_main.xml, which is located in res/menu/ directory.
Add 3 items here, give them unique ids and titles. Set their icons using the "icon" attribute. Im using the two snowflake pictures I have in my drawable-hdpi folder. Icons can also be added with code using setIcon() method, but right now Im doing it using XML.
The showAsAction attribute can be set to multiple values and to some combination of the available values. The values are "never", "ifRoom", "withText", "always", "collaspeActionView". You can use more than one of the keyboards like this: "ifRoom|withText".
The "ifRoom" keyboard indicates that the button will be displayed only if theres space available. The "withText" keyboard tells android to display the text of the button if available (if there is room for that). The "collapseActionView" keyword adds a button that displays a drop-down menu with all the rest of the buttons that are not displayed.
Lets add "withText" to all 3 buttons, "always" to the first button and "ifRoom" to the second and third one.
<menu xmlns:android="http://schemas.android.com/apk/res/android" >

    <item
        android:id="@+id/menu_one"
        android:orderInCategory="1"
        android:showAsAction="always|withText"
        android:icon="@drawable/snowflake"
        android:title="Button one"/>

    <item
        android:id="@+id/menu_two"
        android:orderInCategory="2"
        android:showAsAction="ifRoom|withText"
        android:icon="@drawable/snowflake2"
        android:title="Button two"/>

    <item
        android:id="@+id/menu_three"
        android:orderInCategory="3"
        android:showAsAction="ifRoom|withText"
        android:icon="@drawable/snowflake"
        android:title="Button three"/>

</menu>
On an Android device I have that runs Android 2.3, all the icons are displayed in the classic Options menu in the bottom part of the screen.
This is how the application looks on Android 4 phone:
And this is the same application on a tablet:
As you can see, the phone could only fit 2 icons without text, while the tablet is wide enough to display all 3 icon with their text labels.
Lets try putting "collapseActionView" for the second and third items:
<menu xmlns:android="http://schemas.android.com/apk/res/android" >

    <item
        android:id="@+id/menu_one"
        android:orderInCategory="1"
        android:showAsAction="always|withText"
        android:icon="@drawable/snowflake"
        android:title="Button one"/>

    <item
        android:id="@+id/menu_two"
        android:orderInCategory="2"
        android:showAsAction="collapseActionView"
        android:icon="@drawable/snowflake2"
        android:title="Button two"/>

    <item
        android:id="@+id/menu_three"
        android:orderInCategory="3"
        android:showAsAction="collapseActionView"
        android:icon="@drawable/snowflake"
        android:title="Button three"/>

</menu>
The tablet now displays a button like this, which spawns a dropdown menu when it is touched:
The phone, however, does not display such a thing. But the dropdown menu can be called out by pressing the Menu item on the device.
This way, we made sure all the buttons are displayed on all devices, even though in different ways.
Thanks for reading!
XLR to USB converter for Mac
Im looking for an XLR to USB converter for Mac. So far, these are the few options Im looking at:
If anyone has any experience using any of these, share your thoughts in the comments.
UPDATE: Found this one also: the Zoom ZH4N Handy Portable Digital Recorder . Its an audio recorder that also works as an audio USB interface. It has its own mic, plus a few ports (including XLR ones) for external mics. Im just not sure if, when used as a USB interface, you can only record from the primary mic, or if it lets you record from any external mic directly to your Mac.
Read more »
- Shure X2U XLR-to-USB Signal Adapter
- Blue Microphones Icicle XLR to USB Mic Converter/Mic Preamp
If anyone has any experience using any of these, share your thoughts in the comments.
UPDATE: Found this one also: the Zoom ZH4N Handy Portable Digital Recorder
Friday, January 30, 2015
Flash AS3 Brush Drawing application source code

Highly customizable and very smooth AS3 Brush Drawing application source code. Now available for just $8.
Visit Activeden for more info and a live example!
Have fun!
Hard Reset xTab 7 inch Dual Camera Sim Android Tablet Pc
Hard Reset xTab 7 inch Dual Camera , Sim supported Android Tablet Pc
.jpg "xtab 7inch") |
| xtab 2g dual cam tablet pc |
What is Hard Reset ?
A hard reset is also called Factory reset. When you restore your Android device to state when it left the factory or first time the Smartphones or Tablets turns on . Hard Reset erase all user setting,contents (i.e games,contacts,messages,apps preference setting ,bookmarks,third party apps as well .) So if youre enough lucky then you can make backup of all your data before hard reset .In most cases user data lost. Different Android Devices have different method for Hard Reset.
When Hard Reset is Necessary for Smartphones or Tablets ?
1. Forgotten Pattern Lock on Android Tablets or Smartphones.
2.Too many pattern attempts / Reset user lock.
3. Tablets PC,Smartphones stuck on Gmail account.
4. Android Tablet PC stuck / freeze on Android logo.
5. Tablet Android or Smartphones hang on start-up / Multiple errors generating by OS.
6. Android market having problems or generating errors.
7.Upgrading to new Android version.
Make sure to charge battery upto 60%.
How to Hard Reset Xtab 7inch 2G Sim Android tablet pc ?
.jpg) |
| Hard Reset xtab 2g dual cam tablet pc |
- Turn off xtab tablet pc completely.
- Press and hold volume up and volume down button together (as mention in image) .
- Press power button for 10 second.
- Android logo will appear with yellow Triangular mark .
- Leave all the buttons.
- Now Press volume down button for once .
- Wait for Recovery mode to appeared .
- With the help of Volume buttons go to Factory reset/Wipe data.
- Press power button to select factory reset.
- Select Reboot .
you are done.
.jpg) |
| hard reset XTAB 2g dual Cam |
Related Posts.
How to hard reset Scroll Basic Plus tablets.
How to hard reset Vox Mid V91 Tablets
Hard Reset Mediacom Smartpad 715i Tablets.
Hard Reset Coby Kyros Mid 7010 WC Tablets
Hard Reset Samsung Galaxy Tab 2 P5100 Tablets
Hard Reset Acer Iconia A500 Tablets
Hard Reset Symphony w20 Tablets
Hard Reset Archos 101 Titanium Tablets
Creating a Pentomino game using AS3 Part 39
In this tutorial well improve our solution finding algorithm by fixing some bugs and adding a more advanced pre-check.
Go to tryRemainingShapes() function and before the if..statement that calls hasSpace() function add another if..statement that checks if the cell with provided coordinates has value of 1. This is basically what we have in hasSpace() right now, but well be completely rewriting that function and checking for different things in it.
We need to label the while... loop by writing "outerLoop: " before the loop. This will allow us to break this loop from inside another loop. We break outerLoop if hasSpace() returns false.
Another change here is that we declare a new passedShapes Array that we can use to later remove the first element from and pass it to the next tryRemaininShapes() cycle. Simply passing a clone of innerTempShapes with .splice() does not work - it returns the element instead of the array.
Go to onFrame() and add the hasSpace() check there as well:
The hasSpace() function checks if the area on the grid that the cell is located in has more than 5 cells in it. Well call these cells neighbours. However, the cell itself counts as a neighbour too.
Declare a variable called "neighbours" and set its value to 1. Clone the grid data and set the current cells value in the grid to "n". All cells that are connected to this cell will have value "n".
Then add a line that adds returned value of getNeighbours() function to neighbours. Check if the number is greater than or equals 5, return true. Otherwise, return false.
The getNeighbours() function is a recursive function that loops through neighbours and checks their neighbours as well, and goes on before it meets a wall.
Our solving algorithm is now more efficient (uses considerably less attempts => computes faster) and more accurate in finding solutions. Still, it is not fast enough to solve medium or bigger sized puzzles.
Full code so far:
Thanks for reading!
Read more »
Go to tryRemainingShapes() function and before the if..statement that calls hasSpace() function add another if..statement that checks if the cell with provided coordinates has value of 1. This is basically what we have in hasSpace() right now, but well be completely rewriting that function and checking for different things in it.
We need to label the while... loop by writing "outerLoop: " before the loop. This will allow us to break this loop from inside another loop. We break outerLoop if hasSpace() returns false.
Another change here is that we declare a new passedShapes Array that we can use to later remove the first element from and pass it to the next tryRemaininShapes() cycle. Simply passing a clone of innerTempShapes with .splice() does not work - it returns the element instead of the array.
private function tryRemainingShapes(tShapes:Array, tGrid:Array):void {
var innerTempShapes:Array = clone(tShapes);
var innerTempGrid:Array = clone(tGrid);
var e:int;
var t:int;
var passedShapes:Array;
// ...take each remaining shape...
outerLoop: while (innerTempShapes.length > 0) {
var currentShapeValues:Array = clone(shapeValues[innerTempShapes[0]]);
// ...try putting it in each cell...
for (e = 0; e < allCells.length; e++) {
// ...rotate the shape...
if (innerTempGrid[allCells[e].y][allCells[e].x] == 1) {
if (hasSpace(innerTempGrid, allCells[e].x, allCells[e].y)) {
for (t = 0; t < 8; t++) {
// ...check if it can be put...
if (canPut(currentShapeValues, allCells[e].x, allCells[e].y, innerTempGrid, t)) {
// ...on success, put this shape and try all remaining shapes...
putHere(currentShapeValues, allCells[e].x, allCells[e].y, innerTempGrid, t, innerTempShapes[0] + 2);
passedShapes = innerTempShapes.concat();
passedShapes.splice(0, 1);
tryRemainingShapes(passedShapes, innerTempGrid);
// ...if no empty cells remaining, then the puzzle is solved.
if (checkWin(innerTempGrid)) doWin(clone(innerTempGrid));
// ...step backwards...
removeHere(currentShapeValues, allCells[e].x, allCells[e].y, innerTempGrid, t);
}
}
}else {
break outerLoop;
}
}
}
// ...get rid of the shape and continue...
innerTempShapes.shift();
}
}
Go to onFrame() and add the hasSpace() check there as well:
private function onFrame(evt:Event):void {
// set temporary values
tempGrid = clone(givenGrid);
tempShapes = clone(givenShapes);
// perform a new cycle
var i:int;
var u:int;
var currentShapeValues:Array;
// Take the first shape in this cycle...
currentShapeValues = clone(shapeValues[tempShapes[cycleNum]]);
// ...remove current shape from shapes array (so that it isnt used twice)...
var shapeType:int = tempShapes[cycleNum] + 2;
tempShapes.splice(cycleNum, 1);
// ...try putting it in each available cell...
for (i = 0; i < allCells.length; i++) {
// ...try putting the shape in all 8 possible positions...
if(hasSpace(tempGrid, allCells[i].x, allCells[i].y)){
for (u = 0; u < 8; u++) {
// ...if successful, continue placing other cells...
if (canPut(currentShapeValues, allCells[i].x, allCells[i].y, tempGrid, u)) {
// ...first put the first shape on the grid...
putHere(currentShapeValues, allCells[i].x, allCells[i].y, tempGrid, u, shapeType);
// ...try all remaining shapes...
tryRemainingShapes(tempShapes, tempGrid);
removeHere(currentShapeValues, allCells[i].x, allCells[i].y, tempGrid, u);
}
}
}
}
// display info
tInfo.text = Solving level " + levelName + "
Attempts:  + attempts + "
Solutions: " + solutions.length;
// next cycle
nextCycle();
}
The hasSpace() function checks if the area on the grid that the cell is located in has more than 5 cells in it. Well call these cells neighbours. However, the cell itself counts as a neighbour too.
Declare a variable called "neighbours" and set its value to 1. Clone the grid data and set the current cells value in the grid to "n". All cells that are connected to this cell will have value "n".
Then add a line that adds returned value of getNeighbours() function to neighbours. Check if the number is greater than or equals 5, return true. Otherwise, return false.
private function hasSpace(mapGrid:Array, cX:int, cY:int):Boolean {
var neighbours:int = 1; // count self as neighbour
var nGrid:Array = clone(mapGrid);
nGrid[cY][cX] = "n"; // set to "n" if together
neighbours += getNeighbours(cX, cY, nGrid);
if (neighbours >= 5) return true;
return false;
}
The getNeighbours() function is a recursive function that loops through neighbours and checks their neighbours as well, and goes on before it meets a wall.
private function getNeighbours(cX:int, cY:int, grid:Array):int {
var n:int = 0;
if (cY != 0 && grid[cY - 1][cX] == 1) {
n++;
grid[cY - 1][cX] = "n";
n += getNeighbours(cX, cY - 1, grid);
}
if (cY != grid.length - 1 && grid[cY + 1][cX] == 1) {
n++;
grid[cY + 1][cX] = "n";
n += getNeighbours(cX, cY + 1, grid);
}
if (cX != 0 && grid[cY][cX - 1] == 1) {
n++;
grid[cY][cX - 1] = "n";
n += getNeighbours(cX - 1, cY, grid);
}
if (cX != grid[0].length - 1 && grid[cY][cX + 1] == 1) {
n++;
grid[cY][cX + 1] = "n";
n += getNeighbours(cX + 1, cY, grid);
}
return n;
}
Our solving algorithm is now more efficient (uses considerably less attempts => computes faster) and more accurate in finding solutions. Still, it is not fast enough to solve medium or bigger sized puzzles.
Full code so far:
package
{
import fl.controls.TextInput;
import flash.display.MovieClip;
import flash.display.Shape;
import flash.events.Event;
import flash.events.MouseEvent;
import flash.geom.Point;
import flash.net.SharedObject;
import flash.text.TextField;
import flash.utils.ByteArray;

/**
 * Open-source pentomino game engine
 * @author Kirill Poletaev
 */

public class level_solver extends MovieClip
{

private var allCells:Array;
private var tempGrid:Array;
private var tempShapes:Array;
private var givenGrid:Array;
private var givenShapes:Array;
private var cycleNum:int;
private var attempts:int;
private var solutions:Array;
private var levelName:String;
private var shapeValues:Array;
private var currentSol:int = 0;

public function level_solver()
{
}

public function solve(levelItem:Object):void {
drawPreview(levelPreview, levelItem.grid);
tInfo.text = Solving level " + levelItem.name + ";
var shapes:Array = levelItem.shapes;
var i:int
var u:int;
givenShapes = [];
for (i = 1; i <= 12; i++) {
this["tShape" + i].text = shapes[i - 1];
for (u = 0; u < shapes[i - 1]; u++) {
givenShapes.push(i - 1);
}
}
allCells = [];
for (i = 0; i < levelItem.grid.length; i++) {
for (u = 0; u < levelItem.grid.length; u++) {
if (levelItem.grid[i][u] == 1) {
allCells.push(new Point(u, i));
}
}
}
givenGrid = levelItem.grid;
tempGrid = [];
tempShapes = [];
solutions = [];
levelName = levelItem.name;
attempts = 0;
cycleNum = 0;
shapeValues = [
[[0, 0], [0, 1], [0, 2], [0, -1], [0, -2]],
[[0, 0], [0, -1], [0, 1], [1, 0], [1, -1]],
[[0, 0], [0, 1], [0, 2], [0, -1], [ -1, -1]],
[[0, 0], [0, 1], [0, -1], [ -1, 0], [1, -1]],
[[0, 0], [ -1, 0], [ -2, 0], [0, -1], [1, -1]],
[[0, 0], [0, 1], [0, -1], [1, -1], [ -1, -1]],
[[0, 0], [1, 0], [ -1, 0], [1, -1], [ -1, -1]],
[[0, 0], [ -1, 0], [ -2, 0], [0, -1], [0, -2]],
[[0, 0], [0, 1], [ -1, 1], [1, 0], [1, -1]],
[[0, 0], [0, 1], [0, -1], [1, 0], [ -1, 0]],
[[0, 0], [ -1, 0], [ -2, 0], [1, 0], [0, -1]],
[[0, 0], [0, 1], [1, 1], [0, -1], [-1, -1]]
];
addEventListener(Event.ENTER_FRAME, onFrame);
btn_prev.addEventListener(MouseEvent.CLICK, goPrev);
btn_next.addEventListener(MouseEvent.CLICK, goNext);
}

private function onFrame(evt:Event):void {
// set temporary values
tempGrid = clone(givenGrid);
tempShapes = clone(givenShapes);
// perform a new cycle
var i:int;
var u:int;
var currentShapeValues:Array;
// Take the first shape in this cycle...
currentShapeValues = clone(shapeValues[tempShapes[cycleNum]]);
// ...remove current shape from shapes array (so that it isnt used twice)...
var shapeType:int = tempShapes[cycleNum] + 2;
tempShapes.splice(cycleNum, 1);
// ...try putting it in each available cell...
for (i = 0; i < allCells.length; i++) {
// ...try putting the shape in all 8 possible positions...
if(hasSpace(tempGrid, allCells[i].x, allCells[i].y)){
for (u = 0; u < 8; u++) {
// ...if successful, continue placing other cells...
if (canPut(currentShapeValues, allCells[i].x, allCells[i].y, tempGrid, u)) {
// ...first put the first shape on the grid...
putHere(currentShapeValues, allCells[i].x, allCells[i].y, tempGrid, u, shapeType);
// ...try all remaining shapes...
tryRemainingShapes(tempShapes, tempGrid);
removeHere(currentShapeValues, allCells[i].x, allCells[i].y, tempGrid, u);
}
}
}
}
// display info
tInfo.text = Solving level " + levelName + "
Attempts:  + attempts + "
Solutions: " + solutions.length;
// next cycle
nextCycle();
}

private function tryRemainingShapes(tShapes:Array, tGrid:Array):void {
var innerTempShapes:Array = clone(tShapes);
var innerTempGrid:Array = clone(tGrid);
var e:int;
var t:int;
var passedShapes:Array;
// ...take each remaining shape...
outerLoop: while (innerTempShapes.length > 0) {
var currentShapeValues:Array = clone(shapeValues[innerTempShapes[0]]);
// ...try putting it in each cell...
for (e = 0; e < allCells.length; e++) {
// ...rotate the shape...
if (innerTempGrid[allCells[e].y][allCells[e].x] == 1) {
if (hasSpace(innerTempGrid, allCells[e].x, allCells[e].y)) {
for (t = 0; t < 8; t++) {
// ...check if it can be put...
if (canPut(currentShapeValues, allCells[e].x, allCells[e].y, innerTempGrid, t)) {
// ...on success, put this shape and try all remaining shapes...
putHere(currentShapeValues, allCells[e].x, allCells[e].y, innerTempGrid, t, innerTempShapes[0] + 2);
passedShapes = innerTempShapes.concat();
passedShapes.splice(0, 1);
tryRemainingShapes(passedShapes, innerTempGrid);
// ...if no empty cells remaining, then the puzzle is solved.
if (checkWin(innerTempGrid)) doWin(clone(innerTempGrid));
// ...step backwards...
removeHere(currentShapeValues, allCells[e].x, allCells[e].y, innerTempGrid, t);
}
}
}else {
break outerLoop;
}
}
}
// ...get rid of the shape and continue...
innerTempShapes.shift();
}
}

private function hasSpace(mapGrid:Array, cX:int, cY:int):Boolean {
var neighbours:int = 1; // count self as neighbour
var nGrid:Array = clone(mapGrid);
nGrid[cY][cX] = "n"; // set to "n" if together
neighbours += getNeighbours(cX, cY, nGrid);
if (neighbours >= 5) return true;
return false;
}

private function getNeighbours(cX:int, cY:int, grid:Array):int {
var n:int = 0;
if (cY != 0 && grid[cY - 1][cX] == 1) {
n++;
grid[cY - 1][cX] = "n";
n += getNeighbours(cX, cY - 1, grid);
}
if (cY != grid.length - 1 && grid[cY + 1][cX] == 1) {
n++;
grid[cY + 1][cX] = "n";
n += getNeighbours(cX, cY + 1, grid);
}
if (cX != 0 && grid[cY][cX - 1] == 1) {
n++;
grid[cY][cX - 1] = "n";
n += getNeighbours(cX - 1, cY, grid);
}
if (cX != grid[0].length - 1 && grid[cY][cX + 1] == 1) {
n++;
grid[cY][cX + 1] = "n";
n += getNeighbours(cX + 1, cY, grid);
}
return n;
}

private function checkWin(mapGrid:Array):Boolean {
var i:int;
var u:int;
var didWin:Boolean = true;
var width:int = mapGrid[0].length;
var height:int = mapGrid.length;

for (i = 0; i < height; i++) {
for (u = 0; u < width; u++) {
if (mapGrid[i][u] == 1) {didWin = false;}
}
}

return didWin;
}

private function doWin(grid:Array):void {
var exists:Boolean = false;
for (var i:int = 0; i < solutions.length; i++) {
if (compare(solutions[i], grid)) {
exists = true;
break;
}
}
if (!exists) solutions.push(grid);
}

private function compare(arr1:Array, arr2:Array):Boolean {
for (var i:int = 0; i < arr1.length; i++) {
for (var u:int = 0; u < arr1[i].length; u++){
if (arr1[i][u] != arr2[i][u]) {
return false;
break;
}
}
}
return true;
}

private function goPrev(evt:MouseEvent):void {
currentSol--;
updateCurrentInfo();
}

private function goNext(evt:MouseEvent):void {
currentSol++;
updateCurrentInfo();
}

private function updateCurrentInfo():void {
var sol:int = (solutions.length > 0)?(currentSol + 1):(0);
tSol.text = sol + "/" + solutions.length;
if (sol <= 1) {
btn_prev.alpha = 0.5;
btn_prev.mouseEnabled = false;
}else {
btn_prev.alpha = 1;
btn_prev.mouseEnabled = true;
}
if (sol == solutions.length) {
btn_next.alpha = 0.5;
btn_next.mouseEnabled = false;
}else {
btn_next.alpha = 1;
btn_next.mouseEnabled = true;
}
if (solutions.length > 0) drawPreview(levelPreview, solutions[currentSol]);
}

private function nextCycle():void {
cycleNum++;
updateCurrentInfo();
if (cycleNum == givenShapes.length) {
removeEventListener(Event.ENTER_FRAME, onFrame);
// display info
tInfo.text = Finished solving " + levelName + "
Attempts:  + attempts + "
Solutions: " + solutions.length;
}
}

private function canPut(cValues:Array, cellX:int, cellY:int, mapGrid:Array, rotation:int):Boolean {
attempts++;
var canPutHere:Boolean = true;
var currentValues:Array = clone(cValues);
updateCurrentValues(currentValues, rotation);
for (var i:int = 0; i < currentValues.length; i++) {
var cX:int = currentValues[i][0] + cellX;
var cY:int = currentValues[i][1] + cellY;
if (cX < 0 || cY < 0 || cX >= mapGrid[0].length || cY >= mapGrid.length || mapGrid[cY][cX]!=1) {
canPutHere = false;
}
}
return canPutHere;
}

private function putHere(currentValues:Array, cellX:int, cellY:int, mapGrid:Array, rotation:int, shape:int):void {
currentValues = clone(currentValues);
updateCurrentValues(currentValues, rotation);
for (var i:int = 0; i < currentValues.length; i++) {
var cX:int = currentValues[i][0] + cellX;
var cY:int = currentValues[i][1] + cellY;
mapGrid[cY][cX] = shape;
}
}

private function removeHere(currentValues:Array, cellX:int, cellY:int, mapGrid:Array, rotation:int):void {
currentValues = clone(currentValues);
updateCurrentValues(currentValues, rotation);
for (var i:int = 0; i < currentValues.length; i++) {
var cX:int = currentValues[i][0] + cellX;
var cY:int = currentValues[i][1] + cellY;
mapGrid[cY][cX] = 1;
}
}

private function updateCurrentValues(currentValues:Array, rot:int):void{
for (var i:int = 0; i < 5; i++) {
// do nothing if rot == 0
if (rot == 1) {
currentValues[i].reverse();
currentValues[i][0] *= -1;
}
if (rot == 2) {
currentValues[i][0] *= -1;
currentValues[i][1] *= -1;
}
if (rot == 3) {
currentValues[i].reverse();
currentValues[i][1] *= -1;
}
if (rot == 4) {
currentValues[i][0] *= -1;
}
if (rot == 5) {
currentValues[i].reverse();
}
if (rot == 6) {
currentValues[i][1] *= -1;
}
if (rot == 7) {
currentValues[i].reverse();
currentValues[i][1] *= -1;
currentValues[i][0] *= -1;
}
}
}

private function clone(source:Object):*{
var myBA:ByteArray = new ByteArray();
myBA.writeObject(source);
myBA.position = 0;
return(myBA.readObject());
}

private function drawPreview(levelPreview:MovieClip, mapGrid:Array):void {
var columns:int = mapGrid[0].length;
var rows:int = mapGrid.length;
var frameWidth:int = levelPreview.width;
var frameHeight:int = levelPreview.height;
var padding:int = 5;
var fitWidth:int = levelPreview.width - (padding * 2);
var fitHeight:int = levelPreview.height - (padding * 2);
var gridStartX:int;
var gridStartY:int;

// calculate width of a cell:
var gridCellWidth:int = Math.round(fitWidth / columns);

var width:int = columns * gridCellWidth;
var height:int = rows * gridCellWidth;

// calculate side margin
gridStartX = (frameWidth - width) / 2;

if (height < fitHeight) {
gridStartY = (fitHeight - height) / 2;
}
if (height >= fitHeight) {
gridCellWidth = Math.round(fitHeight / rows);
height = rows * gridCellWidth;
width = columns * gridCellWidth;
gridStartY = (frameHeight - height) / 2;
gridStartX = (frameWidth - width) / 2;
}

// draw map
levelPreview.shape.x = gridStartX;
levelPreview.shape.y = gridStartY;
levelPreview.shape.graphics.clear();
var i:int;
var u:int;

for (i = 0; i < rows; i++) {
for (u = 0; u < columns; u++) {
if (mapGrid[i][u] == 1) drawCell(u, i, 0xffffff, 1, 0x999999, gridCellWidth, levelPreview.shape);
if (mapGrid[i][u] == 2) drawCell(u, i, 0xff66cc, 1, 0x000000, gridCellWidth, levelPreview.shape);
if (mapGrid[i][u] == 3) drawCell(u, i, 0x00FF66, 1, 0x000000, gridCellWidth, levelPreview.shape);
if (mapGrid[i][u] == 4) drawCell(u, i, 0x99ff00, 1, 0x000000, gridCellWidth, levelPreview.shape);
if (mapGrid[i][u] == 5) drawCell(u, i, 0x00ccff, 1, 0x000000, gridCellWidth, levelPreview.shape);
if (mapGrid[i][u] == 6) drawCell(u, i, 0xffcc66, 1, 0x000000, gridCellWidth, levelPreview.shape);
if (mapGrid[i][u] == 7) drawCell(u, i, 0x66cc33, 1, 0x000000, gridCellWidth, levelPreview.shape);
if (mapGrid[i][u] == 8) drawCell(u, i, 0x9900ff, 1, 0x000000, gridCellWidth, levelPreview.shape);
if (mapGrid[i][u] == 9) drawCell(u, i, 0xff5858, 1, 0x000000, gridCellWidth, levelPreview.shape);
if (mapGrid[i][u] == 10) drawCell(u, i, 0xff6600, 1, 0x000000, gridCellWidth, levelPreview.shape);
if (mapGrid[i][u] == 11) drawCell(u, i, 0x00ffff, 1, 0x000000, gridCellWidth, levelPreview.shape);
if (mapGrid[i][u] == 12) drawCell(u, i, 0xff6b20, 1, 0x000000, gridCellWidth, levelPreview.shape);
if (mapGrid[i][u] == 13) drawCell(u, i, 0xffff66, 1, 0x000000, gridCellWidth, levelPreview.shape);
}
}
}

private function drawCell(width:int, height:int, fill:uint, thick:Number, line:uint, gridCellWidth:int, gridShape:MovieClip):void {
gridShape.graphics.beginFill(fill);
gridShape.graphics.lineStyle(thick, line);
gridShape.graphics.drawRect(width * gridCellWidth, height * gridCellWidth, gridCellWidth, gridCellWidth);
}
}

}
Thanks for reading!
Bmorn X1 Tablet Firmware
Bmorn X1
Allwinner A13
Android Tablet Firmware,Software & Tutorials.
Bmorn X1 is 7 inch Allwinner A13 CPU based Android tablet ,with built in 8gb and 512MB Ram this tablet has all the stunning features.
How to flash Bmorn Tablets ?
As above stated Bmorn X1 is Allwinner A13 CPU based china android tablet . If your tablet generating multiple errors ,stuck on gmail, hang on android logo or boot loop you must hard reset or flash your android tablet. Allwinner Tablets flash with Livesuit Flashing Tools . Download firmware from below for tablet and follow the tutorials.
before start flashing Basic steps for flashing tablet firmware for newbies.
Livesuit Flashing Tutorials .
- LiveSuit Tutorial : how to flash tablet with LiveSuit
- Phoenixcard Tool:Firmware update instruction with microSD card
You can also use : Android Multi Tools
DOWNLOAD Tablet FIRMWARE.
Cherry Mobile Sapphire 2 0 Remove Pattern Lock Hard Reset Google Account TMPA
Did you forgot your google account or you cannot enable the data connection so that you can enter your google account to your phone to recover your phone.
In this tutorial we will remove the pattern lock of your phone (Sapphire). Just follow the instructions carefully so that you can fully restore your phone into its normal state.
*** Note: I am not responsible for bricking your phone, files uploaded are proven tested to support Sapphire 2.0 and 1.0..
"For Windows OS 64bit users I am not sure if this tutorial will work, because there is an issue with Research Downloa. But I can guarantee that this will work in 32bit Windows OS"
"TO ALL SAPPHIRE 2.0 USERS, DO NOT PROCEED IF YOU DO NOT WANT TO RISK BRICKING YOUR PHONE. NO AVAILABLE ROM FOR 2.0 AS OF THE MOMENT. THIS IS ONLY THE ALTERNATIVE WAY TO REMOVE FORGOTTEN PATTERN LOCK, PASSWORD OR GMAIL ACCOUNT. BUT AS IVE SAID I HAVE TRIED AND TESTED THIS FILE IN VERSION 2.0"
Lets proceed. Download First the 3 files.
Research Download ----> Here
UserBlock ------> Here
Spreadtrum Driver -------> Here
Spreadtrum Driver for Windows 7 ---> Here
After downloading the files. Extract it in one folder.
After downloading the files. Extract it in one folder.
1. Open Research Download
2. Load Packet, it is the first button in Research Download, look for CM Sapphire userdata(firmwares2you.blogspot.com).pac file...
3. Check the following below: ONLY THE THREE
✓FDL1
✓FDL2
✓UserData
4. Click in Calibration Page or Back up page (newest version) in Research Download. And UnCHECK ALL
5. Press OK, and Press Play Button.
Check Picture for you reference


To Connect your phone.
1. Press the Play button in Research Download. You notice that it is waiting for your phone to establish a connection.
2. Insert USB Cable while holding Volume UP or Down
3. If you correctly installed the driver for spreadtrum chip, it should detect your phone and continue flashing/resetting your phone.
I hope this tutorial helps. If you have any questions just drop a comment. Stay stuned for more tutorials.
If you find this post useful. A simple thank you in the comment box will suffice. ;)
If you find this post useful. A simple thank you in the comment box will suffice. ;)
Creating a Pentomino game using AS3 Part 23
In this tutorial well start working on the Saved Levels screen.
The Saved Levels screen is basically a browser for levels that are stored in the users local Shared Object.
Go to the main menu screen and add a new button with an id "btn_saved". Go to main_menu.as script file and add a click event handler for this button, which directs the user to the fourth frame:
Go to the 4th frame on the main timeline in Flash and create a new MovieClip there. Give the new MC a class path saved_levels.
The saved levels screen consists of 3 parts - header, body and footer:
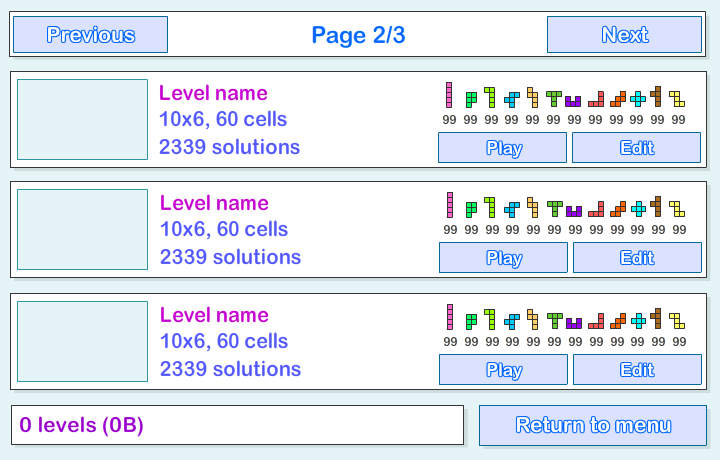
The header contains info about current page of the level browser and buttons to navigate through the pages.
The body of the screen contains up to 3 level items. Each level item is a saved_item object instance which I will talk about in details shortly.
The footer contains info about how many levels in total there are, how much space on local drive they all take and a button to return to main menu.
You need to add at least 5 objects right now - btn_previous and btn_next buttons in the header, tPage dynamic text field in the header, tInfo dynamic text field in the footer and a btn_back button in the footer.
As I said before, each item level is an instance of a saved_item object. Create a new MovieClip with class path saved_item and add the following objects: a rectangular MovieClip with id levelPreview; 3 dynamic text fields: tTitle, tSubtitle, tSubtitle2; 12 dynamic text fields with ids tShape1, tShape2, ... , tShape12; buttons btn_play and btn_edit.
The 3 dynamic text fields will be used to display level name, its statistics and number of solutions. The levelPreview object will be used to display the level grid. The 12 tShape text fields will be used to display how many of each shape is available. The two buttons do exactly what the name suggests - play the level and edit the level.
Add 3 of saved_item object instances to the screen.
Now create a new class saved_levels.as.
Right now we will just add functionality to the Back button and display the SharedObject data. Were storing an array called "levels" in a SharedObject and read its length to see how many levels there are. If the array is null, then there are 0 levels. We can use the size property to see how many bytes the object currently takes.
Thats all for today.
Thanks for reading! The results so far:
Read more »
The Saved Levels screen is basically a browser for levels that are stored in the users local Shared Object.
Go to the main menu screen and add a new button with an id "btn_saved". Go to main_menu.as script file and add a click event handler for this button, which directs the user to the fourth frame:
package
{
import flash.display.MovieClip;
import flash.events.MouseEvent;

/**
 * Open-source pentomino game engine
 * @author Kirill Poletaev
 */

public class main_menu extends MovieClip
{

public function main_menu()
{
(root as MovieClip).stop();
btn_play.addEventListener(MouseEvent.CLICK, doPlay);
btn_editor.addEventListener(MouseEvent.CLICK, doEditor);
btn_saved.addEventListener(MouseEvent.CLICK, doSaved);
}

private function doPlay(evt:MouseEvent):void {
(root as MovieClip).gotoAndStop(2);
}

private function doEditor(evt:MouseEvent):void {
(root as MovieClip).gotoAndStop(3);
}

private function doSaved(evt:MouseEvent):void {
(root as MovieClip).gotoAndStop(4);
}
}

}
Go to the 4th frame on the main timeline in Flash and create a new MovieClip there. Give the new MC a class path saved_levels.
The saved levels screen consists of 3 parts - header, body and footer:
The header contains info about current page of the level browser and buttons to navigate through the pages.
The body of the screen contains up to 3 level items. Each level item is a saved_item object instance which I will talk about in details shortly.
The footer contains info about how many levels in total there are, how much space on local drive they all take and a button to return to main menu.
You need to add at least 5 objects right now - btn_previous and btn_next buttons in the header, tPage dynamic text field in the header, tInfo dynamic text field in the footer and a btn_back button in the footer.
As I said before, each item level is an instance of a saved_item object. Create a new MovieClip with class path saved_item and add the following objects: a rectangular MovieClip with id levelPreview; 3 dynamic text fields: tTitle, tSubtitle, tSubtitle2; 12 dynamic text fields with ids tShape1, tShape2, ... , tShape12; buttons btn_play and btn_edit.
The 3 dynamic text fields will be used to display level name, its statistics and number of solutions. The levelPreview object will be used to display the level grid. The 12 tShape text fields will be used to display how many of each shape is available. The two buttons do exactly what the name suggests - play the level and edit the level.
Add 3 of saved_item object instances to the screen.
Now create a new class saved_levels.as.
Right now we will just add functionality to the Back button and display the SharedObject data. Were storing an array called "levels" in a SharedObject and read its length to see how many levels there are. If the array is null, then there are 0 levels. We can use the size property to see how many bytes the object currently takes.
package
{
import flash.display.MovieClip;
import flash.events.MouseEvent;
import flash.net.SharedObject;

/**
 * Open-source pentomino game engine
 * @author Kirill Poletaev
 */

public class saved_levels extends MovieClip
{
private var savedLevels:SharedObject;

public function saved_levels()
{
savedLevels = SharedObject.getLocal("myLevels");
btn_back.addEventListener(MouseEvent.CLICK, doBack);
tInfo.text = ((savedLevels.data.levels == null)?("0"):(savedLevels.data.levels.length)) + " levels (" + savedLevels.size + "B)";
}

private function doBack(evt:MouseEvent):void {
(root as MovieClip).gotoAndStop(1);
}
}

}
Thats all for today.
Thanks for reading! The results so far:
Thursday, January 29, 2015
MaPan F10B Cortex A8 Tablet Firmware
MaPan F10B (Cortex A8 Flytouch 6 and Flytouch 8)
DOWNLOAD OFFICIAL FIRMWARE
CUBE U10GT Rockchip RK2918 Tablet Firmware
CUBE U10GT Stock Rom .
Rockchip RK2918 based CPU
4.0 2012 4. 16 Firmware
| Rockchip Logo is property of Respective Owners. |
Cube U10GT Rockchip based tablet.
Read article about Rockchip CPU on Wikipedia
If you are new them you must read the following posts.
What board ID , Tablet CPU Chip ,Firmware Number does my Tablet have ?
Read article about Rockchip CPU on Wikipedia
If you are new them you must read the following posts.
What board ID , Tablet CPU Chip ,Firmware Number does my Tablet have ?
Frequently Asked Question about Android Tablets
When I need to Restore or Reset my Android Tablet Pc?
1. Forgotten Pattern Lock .
2.Too many pattern attempts / Reset user lock.
3. Tablets PC stuck on Gmail account.
4. Android Tablets PC stuck on Android logo.
5. Tablet Android hang on start up / Multiple errors generating by OS.
6. Android Market having problems or generating errors.
7.Upgrading to new Android OS.
Instructions:
6. Android Market having problems or generating errors.
7.Upgrading to new Android OS.
Instructions:
you can use this Android Tablet firmware, Stock ROM to restore your Android China tablets to generic firmwares or upgrades . Make sure to charge battery . Power failure during flashing may result dead or broken tablets.
.
.
Note : Flashing generic tablet firmware should be last option.
Flashing Tutorials :
Read Before : Flashing Tutorial for Rockchip
Download Flashing Instructions : PDF
SD Card Flashing Too : Tutorial and Tool
Drivers for Rockchip:
Download Drivers for Rockchip tablets
Flashing Tools:
Download: RKbatch Tool
Recommended Tools:
you can also use:Android Tools for Rockchip TabletsDownloads:
firmware + flasher tool + USB Driver +video Manual Too Get and Enjoy More on the way !!!!
How to Install IOS apps on Android
How to Install iOS Apps on Android
 |
Right now CIDER is not quite compatible with iOS Apps. Some of hardware are not accessible for iOS on Android OS like GPS and its working quite slow . Official said " Cider is an impressively Alternative solution to app cross compatibility. But it need bit more development and tweaking to work like charm, it could be very well serve as a viable replacement for an iOS device in future." This would be the biggest success after the the Cider will be updated and bug fixed.
All the logos are property of their respected owner.
Subscribe to:
Posts (Atom)