Showing posts with label beginner. Show all posts
Showing posts with label beginner. Show all posts
Thursday, February 5, 2015
Android beginner tutorial Part 54 Activities and processes
Today we will learn about Activities and processes in Android.
So far weve only included one Activity in all our previous examples. In reality, applications usually have multiple Activities. There are a few things we should know before proceeding to actually creating and working with multiple Activities.
Even though an application can have multiple Activities running at the same time, one of them is marked as "main". It is the one that is the first to load once the application is started.
It should also be noted that an application is capable of invoking not only the activities whithin that application, but also activities that belong to other applications.
When at least 1 component in an application is needed, the Android system launches a process that contains a single thread for running the code. By default, theres just one main thread for the process. It is, however, possible to add new threads, which we did in some of the previous tutorials (for example, when handling progress bars). It is recommended to keep processes that might freeze the application in separate threads. These are processes like downloading, calculating, uploading, etc. The Android system might want to stop a thread process if its taking too much memory and that memory is needed for other more important processes.
Android chooses which processes to destroy based on their priorities. There are 5 different process priorities, from most important to least important - Foreground Process, Visible Process, Service Process, Background Process and Empty Process.
A process is considered a Foreground Process if: user is currently interacting with the activity thats hosted by the process or the service thats related to that activity, or if the process hosts a Service object that is running in the foreground (startForeground() has been called) or it is executing one of its lifecycle callbacks (will talk about these callbacks later), or if the process hosts a BroadcastReceiver object that is executing its onReceive() method.
There may be more than one foreground processes running at the same time and they are killed only in critical situations, when memory is so low that these processes are unable to continue to run.
A Visible Process is the one that has a component, which the user can still interact with, even though it is not focused, but still visible. This can happen if theres an Activity that partly covers another Activity (a dialog box, for example). This process is considered an important one and wont be destroyed as long as there are processes with lower priorities running.
The next process is a Service Process, it executes a Service and doesnt belong to any of the previously mentioned process types. Services are usually not attached to an interface and their purpose is to execute actions that the user needs to run in the background. An example of this is a music player that plays music in the background while the user does something else.
A Background Process is the one that is not visible to the user and does not impact their experience at all. There are usually many of these running at the same time, but they are stored in a list and ordered by the last time the user used the application. This way, the most recently used app will be killed last out of all the background processes.
An Empty Process is the one that doesnt hold any active application components and is just kept alive for caching purposes (in order to improve the startup time of some components) and has the lowest priority out of all processes.
Now lets talk about Activity states.
There are 3 possible states: active (running), paused and stopped. An active Activity is the one that the user is currently interacting with. A paused one is the one that has lost its focus, but is still visible to the user. It is considered stopped if it is completely covered by another activity. It can be killed by the system if theres memory needed for more important processes.
Earlier in this tutorial I mentioned lifecycle callbacks. They are protected methods that are called when the application changes its state. There is a nice scheme on the official Android dev site which I really like and am going to shamelessly present here:

As you can see, there are 7 callback functions in total. Out of them all, only one is necessary in each Activity - onCreate() mehod, which we frequently used in the previous tutorials.
If you carefully examine the scheme, youll see all the 3 states Ive mentioned - running (labeled Resumed in the scheme), paused and stopped. All the callback functions are called during the transition from one state to another and are quite useful. We will focus on them more in the future tutorials.
Thats all for today.
Thanks for reading!
Read more »
So far weve only included one Activity in all our previous examples. In reality, applications usually have multiple Activities. There are a few things we should know before proceeding to actually creating and working with multiple Activities.
Even though an application can have multiple Activities running at the same time, one of them is marked as "main". It is the one that is the first to load once the application is started.
It should also be noted that an application is capable of invoking not only the activities whithin that application, but also activities that belong to other applications.
When at least 1 component in an application is needed, the Android system launches a process that contains a single thread for running the code. By default, theres just one main thread for the process. It is, however, possible to add new threads, which we did in some of the previous tutorials (for example, when handling progress bars). It is recommended to keep processes that might freeze the application in separate threads. These are processes like downloading, calculating, uploading, etc. The Android system might want to stop a thread process if its taking too much memory and that memory is needed for other more important processes.
Android chooses which processes to destroy based on their priorities. There are 5 different process priorities, from most important to least important - Foreground Process, Visible Process, Service Process, Background Process and Empty Process.
A process is considered a Foreground Process if: user is currently interacting with the activity thats hosted by the process or the service thats related to that activity, or if the process hosts a Service object that is running in the foreground (startForeground() has been called) or it is executing one of its lifecycle callbacks (will talk about these callbacks later), or if the process hosts a BroadcastReceiver object that is executing its onReceive() method.
There may be more than one foreground processes running at the same time and they are killed only in critical situations, when memory is so low that these processes are unable to continue to run.
A Visible Process is the one that has a component, which the user can still interact with, even though it is not focused, but still visible. This can happen if theres an Activity that partly covers another Activity (a dialog box, for example). This process is considered an important one and wont be destroyed as long as there are processes with lower priorities running.
The next process is a Service Process, it executes a Service and doesnt belong to any of the previously mentioned process types. Services are usually not attached to an interface and their purpose is to execute actions that the user needs to run in the background. An example of this is a music player that plays music in the background while the user does something else.
A Background Process is the one that is not visible to the user and does not impact their experience at all. There are usually many of these running at the same time, but they are stored in a list and ordered by the last time the user used the application. This way, the most recently used app will be killed last out of all the background processes.
An Empty Process is the one that doesnt hold any active application components and is just kept alive for caching purposes (in order to improve the startup time of some components) and has the lowest priority out of all processes.
Now lets talk about Activity states.
There are 3 possible states: active (running), paused and stopped. An active Activity is the one that the user is currently interacting with. A paused one is the one that has lost its focus, but is still visible to the user. It is considered stopped if it is completely covered by another activity. It can be killed by the system if theres memory needed for more important processes.
Earlier in this tutorial I mentioned lifecycle callbacks. They are protected methods that are called when the application changes its state. There is a nice scheme on the official Android dev site which I really like and am going to shamelessly present here:
As you can see, there are 7 callback functions in total. Out of them all, only one is necessary in each Activity - onCreate() mehod, which we frequently used in the previous tutorials.
If you carefully examine the scheme, youll see all the 3 states Ive mentioned - running (labeled Resumed in the scheme), paused and stopped. All the callback functions are called during the transition from one state to another and are quite useful. We will focus on them more in the future tutorials.
Thats all for today.
Thanks for reading!

Saturday, January 31, 2015
Android beginner tutorial Part 50 Options menu icons Action bar
In this tutorial we will learn how to add icons and use Action bar.
As I mentioned before, an Action bar is something Google invented and plants to replace the old Options menu with. Still the menu remains as long as there is a Menu button on the device. In this part I will show you how to add icons to menu items that are displayed in the old Icon Menu that appears in the bottom of the screen, or in the Action Bar on devices running newer versions of Android. The icons are not displayed in the List-like menu though.
The MainActivity.java class remains like this the whole time today:
We will be working in activity_main.xml, which is located in res/menu/ directory.
Add 3 items here, give them unique ids and titles. Set their icons using the "icon" attribute. Im using the two snowflake pictures I have in my drawable-hdpi folder. Icons can also be added with code using setIcon() method, but right now Im doing it using XML.
The showAsAction attribute can be set to multiple values and to some combination of the available values. The values are "never", "ifRoom", "withText", "always", "collaspeActionView". You can use more than one of the keyboards like this: "ifRoom|withText".
The "ifRoom" keyboard indicates that the button will be displayed only if theres space available. The "withText" keyboard tells android to display the text of the button if available (if there is room for that). The "collapseActionView" keyword adds a button that displays a drop-down menu with all the rest of the buttons that are not displayed.
Lets add "withText" to all 3 buttons, "always" to the first button and "ifRoom" to the second and third one.
On an Android device I have that runs Android 2.3, all the icons are displayed in the classic Options menu in the bottom part of the screen.
This is how the application looks on Android 4 phone:

And this is the same application on a tablet:

As you can see, the phone could only fit 2 icons without text, while the tablet is wide enough to display all 3 icon with their text labels.
Lets try putting "collapseActionView" for the second and third items:
The tablet now displays a button like this, which spawns a dropdown menu when it is touched:
 IMG HERE
The phone, however, does not display such a thing. But the dropdown menu can be called out by pressing the Menu item on the device.
This way, we made sure all the buttons are displayed on all devices, even though in different ways.
Thanks for reading!
Read more »
As I mentioned before, an Action bar is something Google invented and plants to replace the old Options menu with. Still the menu remains as long as there is a Menu button on the device. In this part I will show you how to add icons to menu items that are displayed in the old Icon Menu that appears in the bottom of the screen, or in the Action Bar on devices running newer versions of Android. The icons are not displayed in the List-like menu though.
The MainActivity.java class remains like this the whole time today:
package com.kircode.codeforfood_test;

import android.app.Activity;
import android.os.Bundle;
import android.view.Menu;

public class MainActivity extends Activity{

@Override
protected void onCreate(Bundle savedInstanceState) {
super.onCreate(savedInstanceState);
setContentView(R.layout.activity_main);
}

@Override
public boolean onCreateOptionsMenu(Menu menu) {
// Inflate the menu; this adds items to the action bar if it is present.
getMenuInflater().inflate(R.menu.activity_main, menu);
return true;
}

}
We will be working in activity_main.xml, which is located in res/menu/ directory.
Add 3 items here, give them unique ids and titles. Set their icons using the "icon" attribute. Im using the two snowflake pictures I have in my drawable-hdpi folder. Icons can also be added with code using setIcon() method, but right now Im doing it using XML.
The showAsAction attribute can be set to multiple values and to some combination of the available values. The values are "never", "ifRoom", "withText", "always", "collaspeActionView". You can use more than one of the keyboards like this: "ifRoom|withText".
The "ifRoom" keyboard indicates that the button will be displayed only if theres space available. The "withText" keyboard tells android to display the text of the button if available (if there is room for that). The "collapseActionView" keyword adds a button that displays a drop-down menu with all the rest of the buttons that are not displayed.
Lets add "withText" to all 3 buttons, "always" to the first button and "ifRoom" to the second and third one.
<menu xmlns:android="http://schemas.android.com/apk/res/android" >

    <item
        android:id="@+id/menu_one"
        android:orderInCategory="1"
        android:showAsAction="always|withText"
        android:icon="@drawable/snowflake"
        android:title="Button one"/>

    <item
        android:id="@+id/menu_two"
        android:orderInCategory="2"
        android:showAsAction="ifRoom|withText"
        android:icon="@drawable/snowflake2"
        android:title="Button two"/>

    <item
        android:id="@+id/menu_three"
        android:orderInCategory="3"
        android:showAsAction="ifRoom|withText"
        android:icon="@drawable/snowflake"
        android:title="Button three"/>

</menu>
On an Android device I have that runs Android 2.3, all the icons are displayed in the classic Options menu in the bottom part of the screen.
This is how the application looks on Android 4 phone:
And this is the same application on a tablet:
As you can see, the phone could only fit 2 icons without text, while the tablet is wide enough to display all 3 icon with their text labels.
Lets try putting "collapseActionView" for the second and third items:
<menu xmlns:android="http://schemas.android.com/apk/res/android" >

    <item
        android:id="@+id/menu_one"
        android:orderInCategory="1"
        android:showAsAction="always|withText"
        android:icon="@drawable/snowflake"
        android:title="Button one"/>

    <item
        android:id="@+id/menu_two"
        android:orderInCategory="2"
        android:showAsAction="collapseActionView"
        android:icon="@drawable/snowflake2"
        android:title="Button two"/>

    <item
        android:id="@+id/menu_three"
        android:orderInCategory="3"
        android:showAsAction="collapseActionView"
        android:icon="@drawable/snowflake"
        android:title="Button three"/>

</menu>
The tablet now displays a button like this, which spawns a dropdown menu when it is touched:
The phone, however, does not display such a thing. But the dropdown menu can be called out by pressing the Menu item on the device.
This way, we made sure all the buttons are displayed on all devices, even though in different ways.
Thanks for reading!
Wednesday, January 28, 2015
Android beginner tutorial Part 44 ProgressDialog with spinner
In this tutorial well learn about ProgressDialogs with spinners.
A ProgressDialog is a Dialog that indicates a process - loading, downloading, etc. There are two ways of ProgressDialog appearances - one displays a spinner, the other one displays a progress bar. Today well learn about the first one.
Firstly we add a Button to our activity_main.xml layout:
In MainActivity.java class, the first thing we need to do is disable screen rotation. When the screen orientation changes, the Activity gets redrawn completely. All Dialogs that are open get closed too. However, all the Threads that are running dont stop. We are going to create a Thread when the button is clicked, which runs for 3 seconds and then closes the ProgressDialog. So, if the device is rotated and the screen changes orientation, the ProgressDialog gets closed but the Thread keeps running. When it stops, it will crash the application because it will try to close a ProgressDialog that doesnt exist.
There are a few way to prevent this, in this case I do it by just preventing screen rotation.
Then I add a click event listener to display the dialog and create a Thread that sleeps for 3000 milliseconds and closes the dialog. Create the dialog using ProgressDialog.show() method, provide it with context and 2 text messages. You can close the dialog using dismiss() method. Dont forget to start() the Thread you create:
Full code:
Results:
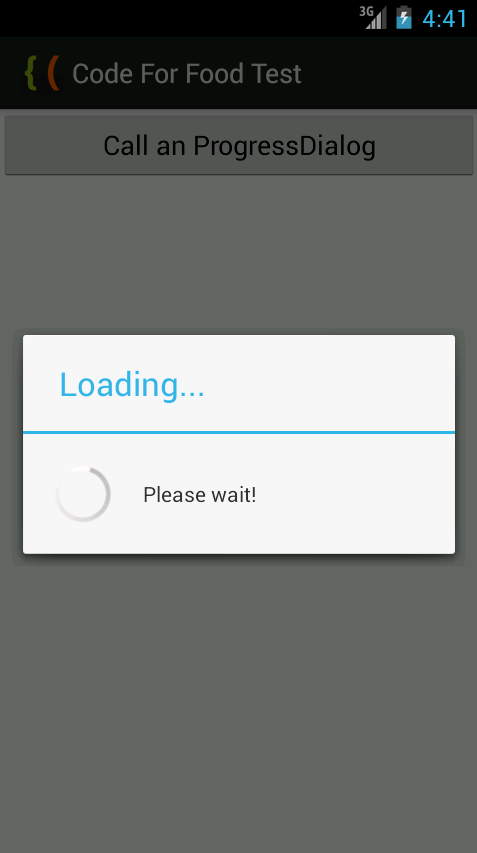
Thanks for reading!
Read more »
A ProgressDialog is a Dialog that indicates a process - loading, downloading, etc. There are two ways of ProgressDialog appearances - one displays a spinner, the other one displays a progress bar. Today well learn about the first one.
Firstly we add a Button to our activity_main.xml layout:
<LinearLayout xmlns:android="http://schemas.android.com/apk/res/android"
    xmlns:tools="http://schemas.android.com/tools"
    android:layout_width="match_parent"
    android:layout_height="match_parent"
    android:orientation="vertical"
    tools:context=".MainActivity" >

<Button
    android:id="@+id/testButton"
    android:layout_width="fill_parent"
    android:layout_height="wrap_content"
    android:text="Call an ProgressDialog"
    />

</LinearLayout>
In MainActivity.java class, the first thing we need to do is disable screen rotation. When the screen orientation changes, the Activity gets redrawn completely. All Dialogs that are open get closed too. However, all the Threads that are running dont stop. We are going to create a Thread when the button is clicked, which runs for 3 seconds and then closes the ProgressDialog. So, if the device is rotated and the screen changes orientation, the ProgressDialog gets closed but the Thread keeps running. When it stops, it will crash the application because it will try to close a ProgressDialog that doesnt exist.
There are a few way to prevent this, in this case I do it by just preventing screen rotation.
setRequestedOrientation(ActivityInfo.SCREEN_ORIENTATION_PORTRAIT);
Then I add a click event listener to display the dialog and create a Thread that sleeps for 3000 milliseconds and closes the dialog. Create the dialog using ProgressDialog.show() method, provide it with context and 2 text messages. You can close the dialog using dismiss() method. Dont forget to start() the Thread you create:
Button button = (Button)findViewById(R.id.testButton);

button.setOnClickListener(new View.OnClickListener() {

@Override
public void onClick(View v) {
final ProgressDialog myDialog = ProgressDialog.show(MainActivity.this, "Loading...", "Please wait!");
new Thread(new Runnable(){
@Override
public void run(){
try{
Thread.sleep(3000);
}catch(Exception e){}
myDialog.dismiss();
}
}).start();
}
});
Full code:
package com.kircode.codeforfood_test;

import android.app.Activity;
import android.app.ProgressDialog;
import android.content.pm.ActivityInfo;
import android.os.Bundle;
import android.view.Menu;
import android.view.View;
import android.widget.Button;

public class MainActivity extends Activity{

@Override
protected void onCreate(Bundle savedInstanceState) {
super.onCreate(savedInstanceState);
setRequestedOrientation(ActivityInfo.SCREEN_ORIENTATION_PORTRAIT);
setContentView(R.layout.activity_main);

Button button = (Button)findViewById(R.id.testButton);

button.setOnClickListener(new View.OnClickListener() {

@Override
public void onClick(View v) {
final ProgressDialog myDialog = ProgressDialog.show(MainActivity.this, "Loading...", "Please wait!");
new Thread(new Runnable(){
@Override
public void run(){
try{
Thread.sleep(3000);
}catch(Exception e){}
myDialog.dismiss();
}
}).start();
}
});
}

@Override
public boolean onCreateOptionsMenu(Menu menu) {
// Inflate the menu; this adds items to the action bar if it is present.
getMenuInflater().inflate(R.menu.activity_main, menu);
return true;
}

}
Results:
Thanks for reading!
Android beginner tutorial Part 42 AlertDialog persistent lists
Today we will learn how to use persistent lists in AlertDialogs.
As I said in the previous tutorial, there are 2 types of persistent lists to display - a single choice and a multiple choice ones. The single choice list displays a number of radio buttons, while the multiple choice list displays a column of checkboxes and their labels.
First lets create an AlertDialog with a single choice list. The initial code remains from the previous tutorial, all we have to do is edit it now.
Declare a variable selectedItem:
This will hold the selected value. It changes when the user clicks on the radio buttons, but it is only displayed after the OK button was pressed.
When building the AlertDialog in onCreate(), use setSingleChoiceItems() method to create a single choice list. It has 3 parameters - data array, selected index by default and an OnClickListener. In the onClick() event handler, update the value of selectedItem variable to whatever was clicked. Set selectedItem to the first item in the list by default.
Then we add an OK button and make it display the selected choice when clicked:
Full code:
Results:
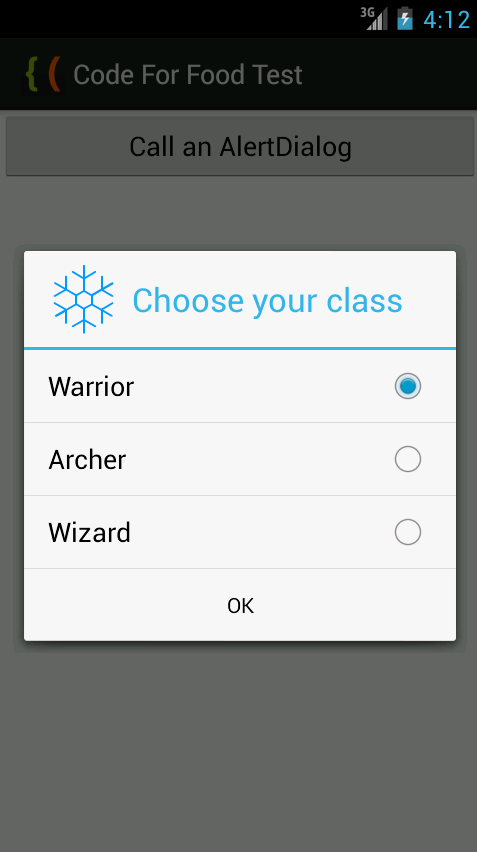
Next, well create a multiple choice list.
Instead of a String selectedItem, declare an ArrayList of Integers called selectedItems.
Use setMultiChoiceItems() method to add a multi-choice list. Provide data array, array of booleans of what items are selected by default (set to null if none) and a OnMultiChoiceClickListener.
In the onClick() function of that listener add the clicked item to the array if it became checked, and remove it if it is unchecked.
In the onClick() function of the OK buttons click handler loop through all selectedItems elements using a for loop. Display each item in a Toast:
Full code:
Results:
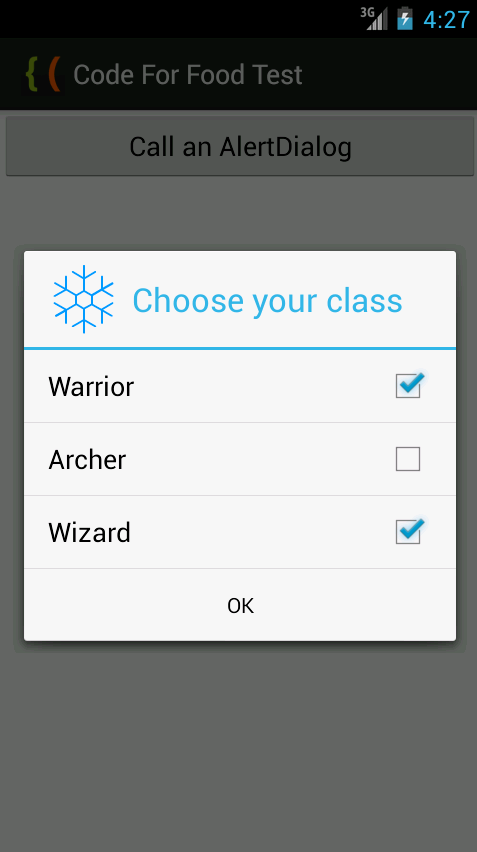
Thanks for reading!
Read more »
As I said in the previous tutorial, there are 2 types of persistent lists to display - a single choice and a multiple choice ones. The single choice list displays a number of radio buttons, while the multiple choice list displays a column of checkboxes and their labels.
First lets create an AlertDialog with a single choice list. The initial code remains from the previous tutorial, all we have to do is edit it now.
Declare a variable selectedItem:
private String selectedItem = "";
This will hold the selected value. It changes when the user clicks on the radio buttons, but it is only displayed after the OK button was pressed.
When building the AlertDialog in onCreate(), use setSingleChoiceItems() method to create a single choice list. It has 3 parameters - data array, selected index by default and an OnClickListener. In the onClick() event handler, update the value of selectedItem variable to whatever was clicked. Set selectedItem to the first item in the list by default.
AlertDialog.Builder builder = new AlertDialog.Builder(MainActivity.this);
builder.setTitle("Choose your class");
builder.setIcon(R.drawable.snowflake);
selectedItem = items[0];
builder.setSingleChoiceItems(items, 0, new DialogInterface.OnClickListener() {

@Override
public void onClick(DialogInterface dialog, int which) {
selectedItem = items[which];
}
});
Then we add an OK button and make it display the selected choice when clicked:
builder.setPositiveButton("OK", new DialogInterface.OnClickListener() {

@Override
public void onClick(DialogInterface dialog, int which) {
Toast toast = Toast.makeText(getApplicationContext(), "Selected: " + selectedItem, Toast.LENGTH_SHORT);
toast.show();
}
});
Full code:
package com.kircode.codeforfood_test;

import android.app.Activity;
import android.app.AlertDialog;
import android.content.DialogInterface;
import android.os.Bundle;
import android.view.Menu;
import android.view.View;
import android.widget.Button;
import android.widget.Toast;

public class MainActivity extends Activity{

private AlertDialog myDialog;
private String[] items = {"Warrior","Archer","Wizard"};
private String selectedItem = "";

@Override
protected void onCreate(Bundle savedInstanceState) {
super.onCreate(savedInstanceState);
setContentView(R.layout.activity_main);

Button button = (Button)findViewById(R.id.testButton);

AlertDialog.Builder builder = new AlertDialog.Builder(MainActivity.this);
builder.setTitle("Choose your class");
builder.setIcon(R.drawable.snowflake);
selectedItem = items[0];
builder.setSingleChoiceItems(items, 0, new DialogInterface.OnClickListener() {

@Override
public void onClick(DialogInterface dialog, int which) {
selectedItem = items[which];
}
});

builder.setPositiveButton("OK", new DialogInterface.OnClickListener() {

@Override
public void onClick(DialogInterface dialog, int which) {
Toast toast = Toast.makeText(getApplicationContext(), "Selected: " + selectedItem, Toast.LENGTH_SHORT);
toast.show();
}
});

builder.setCancelable(false);
myDialog = builder.create();

button.setOnClickListener(new View.OnClickListener() {

@Override
public void onClick(View v) {
myDialog.show();
}
});
}

@Override
public boolean onCreateOptionsMenu(Menu menu) {
// Inflate the menu; this adds items to the action bar if it is present.
getMenuInflater().inflate(R.menu.activity_main, menu);
return true;
}

}
Results:
Next, well create a multiple choice list.
Instead of a String selectedItem, declare an ArrayList of Integers called selectedItems.
private ArrayList<Integer> selectedItems = new ArrayList<Integer>();
Use setMultiChoiceItems() method to add a multi-choice list. Provide data array, array of booleans of what items are selected by default (set to null if none) and a OnMultiChoiceClickListener.
In the onClick() function of that listener add the clicked item to the array if it became checked, and remove it if it is unchecked.
builder.setMultiChoiceItems(items, null, new DialogInterface.OnMultiChoiceClickListener() {

@Override
public void onClick(DialogInterface dialog, int which, boolean isChecked) {
if (isChecked){
selectedItems.add(which);
} else if (selectedItems.contains(which)){
selectedItems.remove(Integer.valueOf(which));
}

}
});
In the onClick() function of the OK buttons click handler loop through all selectedItems elements using a for loop. Display each item in a Toast:
builder.setPositiveButton("OK", new DialogInterface.OnClickListener() {

@Override
public void onClick(DialogInterface dialog, int which) {
for(int i=0; i<selectedItems.size(); i++){
Toast toast = Toast.makeText(getApplicationContext(), "Selected: " + items[(Integer) selectedItems.get(i)], Toast.LENGTH_SHORT);
toast.show();
}
}
});
Full code:
package com.kircode.codeforfood_test;

import java.util.ArrayList;

import android.app.Activity;
import android.app.AlertDialog;
import android.content.DialogInterface;
import android.os.Bundle;
import android.view.Menu;
import android.view.View;
import android.widget.Button;
import android.widget.Toast;

public class MainActivity extends Activity{

private AlertDialog myDialog;
private String[] items = {"Warrior","Archer","Wizard"};
private ArrayList<Integer> selectedItems = new ArrayList<Integer>();

@Override
protected void onCreate(Bundle savedInstanceState) {
super.onCreate(savedInstanceState);
setContentView(R.layout.activity_main);

Button button = (Button)findViewById(R.id.testButton);

AlertDialog.Builder builder = new AlertDialog.Builder(MainActivity.this);
builder.setTitle("Choose your class");
builder.setIcon(R.drawable.snowflake);
builder.setMultiChoiceItems(items, null, new DialogInterface.OnMultiChoiceClickListener() {

@Override
public void onClick(DialogInterface dialog, int which, boolean isChecked) {
if (isChecked){
selectedItems.add(which);
} else if (selectedItems.contains(which)){
selectedItems.remove(Integer.valueOf(which));
}

}
});

builder.setPositiveButton("OK", new DialogInterface.OnClickListener() {

@Override
public void onClick(DialogInterface dialog, int which) {
for(int i=0; i<selectedItems.size(); i++){
Toast toast = Toast.makeText(getApplicationContext(), "Selected: " + items[(Integer) selectedItems.get(i)], Toast.LENGTH_SHORT);
toast.show();
}
}
});

builder.setCancelable(false);
myDialog = builder.create();

button.setOnClickListener(new View.OnClickListener() {

@Override
public void onClick(View v) {
myDialog.show();
}
});
}

@Override
public boolean onCreateOptionsMenu(Menu menu) {
// Inflate the menu; this adds items to the action bar if it is present.
getMenuInflater().inflate(R.menu.activity_main, menu);
return true;
}

}
Results:
Thanks for reading!
Tuesday, January 27, 2015
Android beginner tutorial Part 64 Receiving an Intent using BroadcastReceiver
In this tutorial we are going to create a BroadcastReceiver and an appliaction that sends a broadcast.
There will be 2 applications - one that contains the BroadcastReceiver, the other has an Activity with a button that sends a broadcast. If youve followed my previous tutorials you most likely have 2 applications already, so you can use those.
The first thing we need to do is declare the receiver in the manifest xml of the second application (CodeForFoodTestTwo in my case).
Go to the AndroidManifest.xml of that application and add this to the application tags:
As you can see, I added an intent-filter. BroadcastReceivers respond to implicit Intents, so I specified one filter field - action with a name "com.example.codeforfoodtest_two.MY_RECEIVER".
Now create a TestRecevier.java class in this application, give it an onReceive() callback function. Well receive a string value from the broadcast with the key "myText" and display it using a Toast to the user. Thats all our receiver is going to do this time.
Now go back to the first application, open its layout xml and add a button there:
Listen to the click of the button and dispatch an Intent using sendBroadcast() method when the button is clicked. We use the putExtra() method to send a text value with the key "myText".
Now we have 2 applications, with one being able to send a broadcast message to the other one. The second application receives the message and handles it by displaying a passed text value from the first application.
Thats all for today!
Thanks for reading!
Read more »
There will be 2 applications - one that contains the BroadcastReceiver, the other has an Activity with a button that sends a broadcast. If youve followed my previous tutorials you most likely have 2 applications already, so you can use those.
The first thing we need to do is declare the receiver in the manifest xml of the second application (CodeForFoodTestTwo in my case).
Go to the AndroidManifest.xml of that application and add this to the application tags:
        <receiver android:name="TestReceiver">
            <intent-filter>
                <action android:name="com.example.codeforfoodtest_two.MY_RECEIVER" />
            </intent-filter>
        </receiver>
As you can see, I added an intent-filter. BroadcastReceivers respond to implicit Intents, so I specified one filter field - action with a name "com.example.codeforfoodtest_two.MY_RECEIVER".
Now create a TestRecevier.java class in this application, give it an onReceive() callback function. Well receive a string value from the broadcast with the key "myText" and display it using a Toast to the user. Thats all our receiver is going to do this time.
package com.example.codeforfoodtest_two;

import android.content.BroadcastReceiver;
import android.content.Context;
import android.content.Intent;
import android.os.Bundle;
import android.widget.Toast;

public class TestReceiver extends BroadcastReceiver {

@Override
public void onReceive(Context context, Intent intent) {
Bundle extras = intent.getExtras();
String txt = extras.getString("myText");
    Toast.makeText(context, "Broadcast received! Text: " + txt, Toast.LENGTH_SHORT).show();
}

}
Now go back to the first application, open its layout xml and add a button there:
<LinearLayout xmlns:android="http://schemas.android.com/apk/res/android"
    xmlns:tools="http://schemas.android.com/tools"
    android:layout_width="match_parent"
    android:layout_height="match_parent"
    android:orientation="vertical"
    tools:context=".MainActivity" >

    <Button android:id="@+id/sendButton"
        android:layout_width="match_parent"
        android:layout_height="wrap_content"
        android:text="Send broadcast"
        />

</LinearLayout>
Listen to the click of the button and dispatch an Intent using sendBroadcast() method when the button is clicked. We use the putExtra() method to send a text value with the key "myText".
package com.kircode.codeforfood_test;

import android.app.Activity;
import android.content.Intent;
import android.os.Bundle;
import android.view.View;
import android.widget.Button;

public class MainActivity extends Activity{

@Override
protected void onCreate(Bundle savedInstanceState) {
super.onCreate(savedInstanceState);
setContentView(R.layout.activity_main);

final Button sendbtn = (Button)findViewById(R.id.sendButton);
sendbtn.setOnClickListener(new View.OnClickListener() {

@Override
public void onClick(View v) {
Intent intent = new Intent("com.example.codeforfoodtest_two.MY_RECEIVER");
intent.putExtra("myText", "Hello!");
sendBroadcast(intent);
}
});
}

}
Now we have 2 applications, with one being able to send a broadcast message to the other one. The second application receives the message and handles it by displaying a passed text value from the first application.
Thats all for today!
Thanks for reading!
Wednesday, January 21, 2015
Android beginner tutorial Part 93 XML animation files
In this tutorial well learn about the structure of XML files that are used for defining animations in Android.
The XML files for animation are put into the res/anim/ directory of the Android project. The file has to have a single root node, which can be either of the possible elements:, , , or .
The node can act as a container for all of the elements, including other elements.
Even though the elements are put in a sequence, the animations play at the same time. But you can use the startOffset property to set delay before each animation start.
There are attributes that can be applied to all the listed elements, as well as attributes that can only be applied to a specific type of animation element.
First, lets take a look at the global ones - duration, startOffset, fillBefore, fillAfter, repeatCount, repeatMode, zAdjustment, interpolator.
The duration value is basically the duration time of the animation in milliseconds.
The startOffset value is the time delay before the animation starts.
The fillBefore is a boolean value, which, if set to true, makes sure that the animation transformation is applied before the beginning of the animation (during the startOffset period).
The fillAfter is a boolean value, which, if set to true, makes sure that the animation transformation is applied after the animation ends.
The repeatCount value determines how many times the animation repeats.
The repeatMode can be set to "restart" or "reverse" to make the animation start over or play in reverse when it ends.
The zAdjustment value sets the adjustment of the Z ordering (depth) of the content. Can be set to "normal" to be treated normally and kept in its current Z order, to "top" to put it on top of everything else and "bottom" to put it behind everything else.
The interpolator value holds a reference to an interpolator, which is an animation modifier that can affect the rate of change in your animation. There is a number of pre-defined interpolators that you can use, or you can create custom ones. Example: @android:anim/accelerate_interpolator.
Now lets take a look at the exclusive attributes.
The set container supports a shareInterpolator attribute, which can be used for setting one interpolator for use by all the children of the set.
The alpha element has 2 attributes - fromAlpha and toAlpha, which determine the initial and destination alpha values for the object. Values range from 0 to 1.
The scale element is used for scaling objects. It has 6 new attributes - fromXScale, toXScale, fromYScale, toYScale, pivotX and pivotY. The first four simply determine the initial and destination scaling values on both axes. The pivotX and pivotY determine the coordinates of the anchor position, relative to which the scaling will ocur. This is similar to registration point in DisplayObjects in Flash.
The translate element lets us move an object across the screen. Possible new attributes are fromXDelta, toXDelta, fromYDelta and toYDelta. Possible values can be in 3 formats - an absolute numeric value, a relative value in percentages (from -100% to 100%) and value in percentages relative to the size of the objects parent (-100%p to 100%p).
The rotate element is used for rotating objects and has 4 attributes - fromDegrees, toDegrees, pivotX, pivotY. The first two determine the initial and destination rotation degrees, the second pair detemine the coordinates of the anchor.
Thats all for today.
Thanks for reading!
Read more »
The XML files for animation are put into the res/anim/ directory of the Android project. The file has to have a single root node, which can be either of the possible elements:
The
Even though the elements are put in a sequence, the animations play at the same time. But you can use the startOffset property to set delay before each animation start.
There are attributes that can be applied to all the listed elements, as well as attributes that can only be applied to a specific type of animation element.
First, lets take a look at the global ones - duration, startOffset, fillBefore, fillAfter, repeatCount, repeatMode, zAdjustment, interpolator.
The duration value is basically the duration time of the animation in milliseconds.
The startOffset value is the time delay before the animation starts.
The fillBefore is a boolean value, which, if set to true, makes sure that the animation transformation is applied before the beginning of the animation (during the startOffset period).
The fillAfter is a boolean value, which, if set to true, makes sure that the animation transformation is applied after the animation ends.
The repeatCount value determines how many times the animation repeats.
The repeatMode can be set to "restart" or "reverse" to make the animation start over or play in reverse when it ends.
The zAdjustment value sets the adjustment of the Z ordering (depth) of the content. Can be set to "normal" to be treated normally and kept in its current Z order, to "top" to put it on top of everything else and "bottom" to put it behind everything else.
The interpolator value holds a reference to an interpolator, which is an animation modifier that can affect the rate of change in your animation. There is a number of pre-defined interpolators that you can use, or you can create custom ones. Example: @android:anim/accelerate_interpolator.
Now lets take a look at the exclusive attributes.
The set container supports a shareInterpolator attribute, which can be used for setting one interpolator for use by all the children of the set.
The alpha element has 2 attributes - fromAlpha and toAlpha, which determine the initial and destination alpha values for the object. Values range from 0 to 1.
The scale element is used for scaling objects. It has 6 new attributes - fromXScale, toXScale, fromYScale, toYScale, pivotX and pivotY. The first four simply determine the initial and destination scaling values on both axes. The pivotX and pivotY determine the coordinates of the anchor position, relative to which the scaling will ocur. This is similar to registration point in DisplayObjects in Flash.
The translate element lets us move an object across the screen. Possible new attributes are fromXDelta, toXDelta, fromYDelta and toYDelta. Possible values can be in 3 formats - an absolute numeric value, a relative value in percentages (from -100% to 100%) and value in percentages relative to the size of the objects parent (-100%p to 100%p).
The rotate element is used for rotating objects and has 4 attributes - fromDegrees, toDegrees, pivotX, pivotY. The first two determine the initial and destination rotation degrees, the second pair detemine the coordinates of the anchor.
Thats all for today.
Thanks for reading!
Subscribe to:
Posts (Atom)