Showing posts with label 3. Show all posts
Showing posts with label 3. Show all posts
Monday, March 9, 2015
Google Apps to Snail Mail in 3 easy steps
Editors Note: This article is written by Stuart Keeble and Gwyn Howell who work at Appogee. Appogee is a UK based reseller of Google Apps and has also developed applications such as Domain Management Studio, Docmail Connect, and Bookmarks, which are available in the Google Apps Marketplace.

The days of the paperless office are not yet upon us, with physical mail delivery still popular for many types of communication including marketing information, financial documents and greetings cards. Over 5000 companies in the UK now use CFH Docmail to print, stuff, and deliver their mail, resulting in over 6 million documents being sent every month. By creating Docmail Connect for Google Apps, we at UK Google focused systems integrator, Appogee, have made it simple for Google Apps users to personalize, print and mail their Google documents..
As well as allowing users to send snail mail from the Google Apps menu, we made the code library for Docmail Connect for Google Apps available in project hosting. Other Google Apps Marketplace providers, such as CRM and ERP applications, can now benefit from being able to easily integrate their applications with Docmail services.
Read more »
The days of the paperless office are not yet upon us, with physical mail delivery still popular for many types of communication including marketing information, financial documents and greetings cards. Over 5000 companies in the UK now use CFH Docmail to print, stuff, and deliver their mail, resulting in over 6 million documents being sent every month. By creating Docmail Connect for Google Apps, we at UK Google focused systems integrator, Appogee, have made it simple for Google Apps users to personalize, print and mail their Google documents..
As well as allowing users to send snail mail from the Google Apps menu, we made the code library for Docmail Connect for Google Apps available in project hosting. Other Google Apps Marketplace providers, such as CRM and ERP applications, can now benefit from being able to easily integrate their applications with Docmail services.
The Challenge
In order to implement the solution we needed to take the Docmail web services and create a Python interface to them. To achieve that we needed a simple Python to Web Services layer we could rely on which would allow us to build the bridge between Google App Engine and Docmail’s API, and then we needed to make the bridge work from Google Docs to the CFH Docmail service. The final challenge we faced was achieving a seamless experience for the user which meant focusing on performance each step of the way.The Solution (in 3 easy steps)
Step 1: Invoke a SOAP Web Service from App Engine using Python
Our development language of choice is Python. To invoke a SOAP web service we chose to use the SUDs library rather than create a web service interface from scratch. We tested it locally and seemed to work fine. When we uploaded it to App Engine with some sample code, we found some errors due to limitations in App Engine for using sockets and accessing the file system. To get around this, we extended the SUDS library so that it didn’t use the sockets module, and instead of using the file system we used the App Engine memcache API. This worked very well and we were able to send and receive soap requests from App Engine via the Docmail API. Developers may be interested in additional details:
The Docmail API can accept documents in a variety of formats including doc, docx, PDF and RTF. In order to use the API, we would need to extract Google Docs content in one of these formats. The Google Docs API has support for exporting in doc, RTF and PDF. We experimented with each before settling on RTF, which, although large in file size, did work. However the Google App Engine urlfetch library has a 1MB request limit, so we were not able to send files larger than 1MB. We evaluated a number of workarounds such as cutting the files up into chunks and sending them separately, bouncing the files off another platform but our only option was to simply prevent files larger than 1 MB from being uploaded. To achieve this we used Ajax calls to check (compute) the file size in real time as they are selected and provide appropriate feedback to the user. The file size cut off is a configurable parameter, so if Google increase the limit we can adjust the app without redeploying the code.
Breaking this integration down, we used the Google Docs API together with the Docmail SOAP API, via our modified implementation of the SUDs library as described in step 1.
The Docmail API must be used in a logical order, to coincide with the wizard pages on the Docmail website. We can illustrate these steps in order:
We were conscious that some Google Apps users may have a lot of Google documents, so presenting all of them for selection to a user wasn’t an option. Instead, we load 100 at a time (the default), and send them to the browser using XHR calls so it all happens without the user having to do anything and works quite fast - the user can now select from 1000s of documents within a few seconds.
Next we had to address the connection to the Docmail API, where care must be taken to achieve acceptable throughput. Queries to the API had to be minimized and we didnt want the page submits to be slow - the user should be able to go from one page to the next as quickly as possible. To achieve this, we used the App Engine Task Queue. When a user submits a page which requires communication with the Docmail API we fire off a Task Queue to do the work for us, and then simultaneously navigate the user to the next page in the process. This means that the server is working while the user progresses the workflow. This also means handling timeout errors is easier, as the Task Queue can catch the errors and reinstate another task. But it requires some extra planning as some tasks will not complete until others finish, and process checking needs to ensure new tasks only get fired off when the appropriate time has come.
We hope the wrapper, together with the key learnings written up here will encourage others to have a go at wiring their applications to the Docmail delivery services.
- The HttpTransport class has a u2open method which uses python’s socket module to set the timeout. This is not allowed on App Engine, and the timeout setting can be set later using App Engines urlfetch module. The timeout line was removed in a new method:
def u2open_appengine(self, u2request):
tm = self.options.timeout
url = self.u2opener()
# socket.setdefaulttimeout(tm) cant call this on app engine
if self.u2ver() < 2.6:
  return url.open(u2request)
else:
  return url.open(u2request, timeout=tm)
transport.http.HttpTransport.u2open = u2open_appengine - The SUDs library has an extensible cache class. The SUDs library provides various implementations of this, however we wanted to use the App Engine memcache for performance. To do this, we implemented a new class to use memcache, as shown below:
class MemCache(cache.Cache):
This was then plugged into the SUDs client class by overriding the __init__ method.
def __init__(self, duration=3600):
self.duration = duration
self.client = memcache.Client()
def get(self, id):
return self.client.get(str(id))
def getf(self, id):
return self.get(id)
def put(self, id, object):
self.client.set(str(id), object, self.duration)
def putf(self, id, fp):
self.put(id, fp)
def purge(self, id):
self.client.delete(str(id))
def clear(self):
self.client.flush_all() - We can now use the modified SUDs client class to make SOAP calls on App Engine! The full source code for this is available in project hosting.
Step 2: Google Docs to Docmail
CFH publish a full API to allow developers to integrate their applications with Docmail, a subset of which needed to be used by Appogee to create the interface for users to create mailings from Google Docs. Not every Docmail function is enabled in the wrapper, but the principles used can easily be extrapolated to any other function, and the key to it is getting a satisfactory link from Google Docs to Docmail.The Docmail API can accept documents in a variety of formats including doc, docx, PDF and RTF. In order to use the API, we would need to extract Google Docs content in one of these formats. The Google Docs API has support for exporting in doc, RTF and PDF. We experimented with each before settling on RTF, which, although large in file size, did work. However the Google App Engine urlfetch library has a 1MB request limit, so we were not able to send files larger than 1MB. We evaluated a number of workarounds such as cutting the files up into chunks and sending them separately, bouncing the files off another platform but our only option was to simply prevent files larger than 1 MB from being uploaded. To achieve this we used Ajax calls to check (compute) the file size in real time as they are selected and provide appropriate feedback to the user. The file size cut off is a configurable parameter, so if Google increase the limit we can adjust the app without redeploying the code.
Breaking this integration down, we used the Google Docs API together with the Docmail SOAP API, via our modified implementation of the SUDs library as described in step 1.
The Docmail API must be used in a logical order, to coincide with the wizard pages on the Docmail website. We can illustrate these steps in order:
- Create an instance of the Docmail client, which is an extension to the SUDs client class. The client contains the methods we need for further communication with the Docmail API:
docmail_client = client.Client(USERNAME, PASSWORD, SOURCE)
- Create / Retrieve a mailing. To create a new mailing, we create an instance of the Mailing class, and pass it into the create_mailing method:
mailing = client.Mailing(name=test mailing)
To retrieve an existing mailing, we need to know the mailing guid:
mailing = docmail_client.create_mailing(mailing)mailing = docmail_client.get_mailing(enter-your-mailing-guid)
- Upload a template document. Since we are retrieving documents from Google Docs to be used as the template, we need to download it first. We do this using the Google Docs API:
docs_client = gdata.docs.client.DocsClient()
We now need to extract the document. There are various formats you can do this in, but we found by experimenting that RTF worked best, despite being the largest in file size.
# authenticate client using oauth (see google docs documentation for example code)file_content = docs_client.GetFileContent(uri=doc_url + &exportFormat=rtf)
And finally upload the template file to docmail:docmail_client.add_template_file(mailing.guid, file_content)
- Upload a Mailing List Spreadsheet. This is similar code to uploading a template:
docs_client = gdata.docs.client.DocsClient()
file_content = docs_client.GetFileContent(uri=doc_url + &exportFormat=csv)
docmail_client.add_mailing_list_file(mailing.guid, file_content) - Submit the mailing for processing. The mailing needs to be submitted for processing. Once this has been done, a proof is available for download.
docmail_client.process_mailing(mailing.guid, False, True)
- Finally, we approve and pay for the mailing:
docmail_client.process_mailing(mailing.guid, True, False)
Step 3 - Performance
When creating a system like Docmail Connect for Google Apps, overall acceptability of the system will be driven as much by performance as by functionality, so we paid particular attention to the key components driving this.We were conscious that some Google Apps users may have a lot of Google documents, so presenting all of them for selection to a user wasn’t an option. Instead, we load 100 at a time (the default), and send them to the browser using XHR calls so it all happens without the user having to do anything and works quite fast - the user can now select from 1000s of documents within a few seconds.
Next we had to address the connection to the Docmail API, where care must be taken to achieve acceptable throughput. Queries to the API had to be minimized and we didnt want the page submits to be slow - the user should be able to go from one page to the next as quickly as possible. To achieve this, we used the App Engine Task Queue. When a user submits a page which requires communication with the Docmail API we fire off a Task Queue to do the work for us, and then simultaneously navigate the user to the next page in the process. This means that the server is working while the user progresses the workflow. This also means handling timeout errors is easier, as the Task Queue can catch the errors and reinstate another task. But it requires some extra planning as some tasks will not complete until others finish, and process checking needs to ensure new tasks only get fired off when the appropriate time has come.
We hope the wrapper, together with the key learnings written up here will encourage others to have a go at wiring their applications to the Docmail delivery services.
Want to weigh in on this topic? Discuss on Buzz

Thursday, February 5, 2015
Creating a Pentomino game using AS3 Part 3
In this part well add our first draggable shape.
By saying "first" I mean that only one type of shape is going to be available, and all it is going to do is follow the mouse and scale itself to have cell sizes of the ones in the grid.
Start by creating a new movie clip in your Flash project. Draw a 5x1vertical tiled shape inside of it, make sure each cells dimensions are exactly 100x100 pixels and the center of the movieclip is exactly in the center of the middle square:
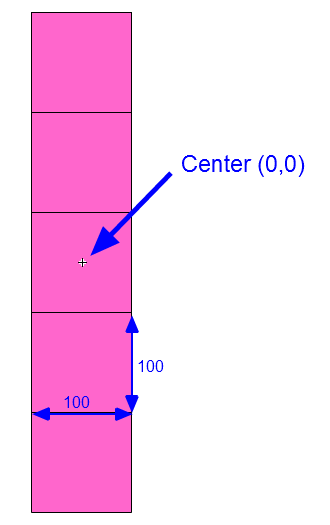
Later on, well be able to add more shapes to this movieclip in other frames. One frame holds one shape, basically. The reason were doing this like that is because this way it is very easy to use nicely drawn game assets instead of simple squares drawn by Flash API. The example above is simply a placeholder.
Now, give this movie clip a class name of "game_shape". Then remove this movie clip from the scene, keeping it only in the library.
Go to pentomino_game.as file. Declare a new "cursor" MovieClip:
In the constructor, set this cursor to a new game_shape instance and add it to the stage. Disable its mouseEnabled, mouseChildren and visible properties, add a MOUSE_MOVE event listener.
Then we also call startDragShape(1). This is temporary line, were only leaving it in the constructor for now:
The mouseMove() function simply makes the cursor follow the mouse:
Now create the startDragShape() function. The "1" that we passed in the parameter is a variable called shapeType, it represents the frame in game_shape MovieClip that holds the wanted graphic.
Because we set the width and height of each single cell in the shape to 100 pixels, we can now easily find the scale multiplier to properly size the shape. Update the cursors size, alpha, visibility and make it go to the shapeType frame.
Full code:
Thanks for reading!
The results:
Read more »
By saying "first" I mean that only one type of shape is going to be available, and all it is going to do is follow the mouse and scale itself to have cell sizes of the ones in the grid.
Start by creating a new movie clip in your Flash project. Draw a 5x1vertical tiled shape inside of it, make sure each cells dimensions are exactly 100x100 pixels and the center of the movieclip is exactly in the center of the middle square:
Later on, well be able to add more shapes to this movieclip in other frames. One frame holds one shape, basically. The reason were doing this like that is because this way it is very easy to use nicely drawn game assets instead of simple squares drawn by Flash API. The example above is simply a placeholder.
Now, give this movie clip a class name of "game_shape". Then remove this movie clip from the scene, keeping it only in the library.
Go to pentomino_game.as file. Declare a new "cursor" MovieClip:
private var cursor:MovieClip;
In the constructor, set this cursor to a new game_shape instance and add it to the stage. Disable its mouseEnabled, mouseChildren and visible properties, add a MOUSE_MOVE event listener.
// cursor
cursor = new game_shape();
addChild(cursor);
cursor.mouseEnabled = false;
cursor.mouseChildren = false;
cursor.visible = false;
addEventListener(MouseEvent.MOUSE_MOVE, mouseMove);
Then we also call startDragShape(1). This is temporary line, were only leaving it in the constructor for now:
// temporary shape
startDragShape(1);
The mouseMove() function simply makes the cursor follow the mouse:
private function mouseMove(evt:MouseEvent):void {
cursor.x = mouseX;
cursor.y = mouseY;
}
Now create the startDragShape() function. The "1" that we passed in the parameter is a variable called shapeType, it represents the frame in game_shape MovieClip that holds the wanted graphic.
Because we set the width and height of each single cell in the shape to 100 pixels, we can now easily find the scale multiplier to properly size the shape. Update the cursors size, alpha, visibility and make it go to the shapeType frame.
private function startDragShape(shapeType:int):void {
cursor.scaleX = gridCellWidth / 100;
cursor.scaleY = gridCellWidth / 100;
cursor.alpha = 0.75;
cursor.visible = true;
cursor.gotoAndStop(shapeType);
}
Full code:
package
{
import flash.display.MovieClip;
import flash.display.Sprite;
import flash.events.MouseEvent;

/**
 * Open-source pentomino game engine
 * @author Kirill Poletaev
 */

public class pentomino_game extends MovieClip
{
private var mapGrid:Array = [];

private var gridShape:Sprite = new Sprite();
private var gridStartX:int;
private var gridStartY:int;
private var gridCellWidth:int;

private var cursor:MovieClip;

public function pentomino_game()
{
// default map
mapGrid = [
[1, 1, 1, 1, 1, 1, 1, 1, 1, 1],
[1, 1, 1, 1, 1, 1, 1, 1, 1, 1],
[1, 1, 1, 1, 0, 0, 1, 1, 1, 1],
[1, 1, 1, 1, 0, 0, 1, 1, 1, 1],
[1, 1, 1, 1, 1, 1, 1, 1, 1, 1],
[1, 1, 1, 1, 1, 1, 1, 1, 1, 1]
];

// grid settings
calculateGrid();
addChild(gridShape);
gridShape.x = gridStartX;
gridShape.y = gridStartY;

// draw tiles
drawGrid();

// cursor
cursor = new game_shape();
addChild(cursor);
cursor.mouseEnabled = false;
cursor.mouseChildren = false;
cursor.visible = false;
addEventListener(MouseEvent.MOUSE_MOVE, mouseMove);

// temporary shape
startDragShape(1);
}

private function calculateGrid():void {
var columns:int = mapGrid[0].length;
var rows:int = mapGrid.length;

// free size: 520x460
// fit in: 510x450

// calculate width of a cell:
gridCellWidth = Math.round(510 / columns);

var width:int = columns * gridCellWidth;
var height:int = rows * gridCellWidth;

// calculate side margin
gridStartX = (520 - width) / 2;

if (height < 450) {
gridStartY = (450 - height) / 2;
}
if (height >= 450) {
gridCellWidth = Math.round(450 / rows);
height = rows * gridCellWidth;
width = columns * gridCellWidth;
gridStartY = (460 - height) / 2;
gridStartX = (520 - width) / 2;
}
}

private function drawGrid():void {
gridShape.graphics.clear();
var width:int = mapGrid[0].length;
var height:int = mapGrid.length;

var i:int;
var u:int;

// draw background
for (i = 0; i < height; i++) {
for (u = 0; u < width; u++) {
if (mapGrid[i][u] == 1) drawCell(u, i, 0xffffff, 1, 0x999999);
}
}
}

private function drawCell(width:int, height:int, fill:uint, thick:Number, line:uint):void {
gridShape.graphics.beginFill(fill);
gridShape.graphics.lineStyle(thick, line);
gridShape.graphics.drawRect(width * gridCellWidth, height * gridCellWidth, gridCellWidth, gridCellWidth);
}

private function mouseMove(evt:MouseEvent):void {
cursor.x = mouseX;
cursor.y = mouseY;
}

private function startDragShape(shapeType:int):void {
cursor.scaleX = gridCellWidth / 100;
cursor.scaleY = gridCellWidth / 100;
cursor.alpha = 0.75;
cursor.visible = true;
cursor.gotoAndStop(shapeType);
}

}

}
Thanks for reading!
The results:
Creating EasyKeyboard class Part 3
Today we will add the ability to add listeners to keyboard by specifying key names instead of keycodes.
This way, well be able to set a key listener to the "A" key, for example, by simply passing "A" as one of the values to one of the methods of EasyKeyboard, instead of sending the key code of the key.
To know which name corresponds to which key, well need to add an array keyLabels in EasyKeyboard.as which contains names for all the keys. The index of each element in this array corresponds to the keys key code:
Now create a new function called addEasyListener. The parameters are the same as in addListener, except for the first one.
Instead of receiving keyCode, we receive a string keyName value. Then, in the function, we check which key code belongs to the specified key by looping through the array. If no match is found, then throw an error. If everything went smoothly, then simply call addListener() method with all the same parameter values as we received, and keyCode set to what weve calculated:
Full EasyKeyboard.as code:
If you go to main.as now, you can call the addEasyListener to add keyboard listeners this way:
Thats all for today.
Thanks for reading!
Read more »
This way, well be able to set a key listener to the "A" key, for example, by simply passing "A" as one of the values to one of the methods of EasyKeyboard, instead of sending the key code of the key.
To know which name corresponds to which key, well need to add an array keyLabels in EasyKeyboard.as which contains names for all the keys. The index of each element in this array corresponds to the keys key code:
private var keyLabels:Array = ["0","1","2","3","4","5","6","7","Backspace","Tab","10","11","Center","Enter","14","15","Shift","Control","Alt","Pause","Caps Lock","21","22","23","24","25","26","27","28","29","30","31","Space","Page Up","Page Down","End","Home","Left","Up","Right","Down","41","42","43","44","Insert","Delete","47","0","1","2","3","4","5","6","7","8","9","58","59","60","61","62","63","64","A","B","C","D","E","F","G","H","I","J","K","L","M","N","O","P","Q","R","S","T","U","V","W","X","Y","Z","Windows","Windows","Menu","94","95","Num 0","Num 1","Num 2","Num 3","Num 4","Num 5","Num 6","Num 7","Num 8","Num 9","Num *","Num +","108","Num -","Num .","Num /","F1","F2","F3","F4","F5","F6","F7","F8","F9","F10","F11","F12","124","125","126","127","128","129","130","131","132","133","134","135","136","137","138","139","140","141","142","143","Num Lock","Scroll Lock","146","147","148","149","150","151","152","153","154","155","156","157","158","159","160","161","162","163","164","165","166","167","168","169","170","171","172","173","174","175","176","177","178","179","180","181","182","183","184","185",";","+",",","-",".","/","~","193","194","195","196","197","198","199","200","201","202","203","204","205","206","207","208","209","210","211","212","213","214","215","216","217","218","[","\","]","","223","224","225","226","227","228","229","230","231","232","233","234","235","236","237","238","239","240","241","242","243","244","245","246","247","248","249","250","251","252","253","254","255"];
Now create a new function called addEasyListener. The parameters are the same as in addListener, except for the first one.
Instead of receiving keyCode, we receive a string keyName value. Then, in the function, we check which key code belongs to the specified key by looping through the array. If no match is found, then throw an error. If everything went smoothly, then simply call addListener() method with all the same parameter values as we received, and keyCode set to what weve calculated:
/**
 * Add event listener for a single key using key string value.
 * @paramkeyName String name of the key.
 * @paramhandlerDown Function to be called when the key is pressed down.
 * @paramhandlerUp Function to be called when the key is released.
 * @paramalt Used in combination with the alt key.
 * @paramctrl Used in combination with the ctrl key.
 * @paramshift Used in combination with the shift key.
 */

public function addEasyListener(keyName:String, handlerDown:Function = null, handlerUp:Function = null, alt:Boolean = false, ctrl:Boolean = false, shift:Boolean = false):void {
var code:int = -1;
for (var i:int = 0; i < keyLabels.length; i++) {
if (keyLabels[i] == keyName) {
code = i;
break;
}
}
if (code == -1) {
throw new Error(Incorrect key string value specified - no " + keyName + " key found.);
return;
}
addListener(code, handlerDown, handlerUp, alt, ctrl, shift);
}
Full EasyKeyboard.as code:
package com.kircode.EasyKeyboard
{
import flash.display.Stage;
import flash.events.Event;
import flash.events.KeyboardEvent;

/**
 * Utility for easy keyboard listener management.
 * @author Kirill Poletaev
 */
public class EasyKeyboard
{
public var listeners:Array = [];
private var keyLabels:Array = ["0","1","2","3","4","5","6","7","Backspace","Tab","10","11","Center","Enter","14","15","Shift","Control","Alt","Pause","Caps Lock","21","22","23","24","25","26","27","28","29","30","31","Space","Page Up","Page Down","End","Home","Left","Up","Right","Down","41","42","43","44","Insert","Delete","47","0","1","2","3","4","5","6","7","8","9","58","59","60","61","62","63","64","A","B","C","D","E","F","G","H","I","J","K","L","M","N","O","P","Q","R","S","T","U","V","W","X","Y","Z","Windows","Windows","Menu","94","95","Num 0","Num 1","Num 2","Num 3","Num 4","Num 5","Num 6","Num 7","Num 8","Num 9","Num *","Num +","108","Num -","Num .","Num /","F1","F2","F3","F4","F5","F6","F7","F8","F9","F10","F11","F12","124","125","126","127","128","129","130","131","132","133","134","135","136","137","138","139","140","141","142","143","Num Lock","Scroll Lock","146","147","148","149","150","151","152","153","154","155","156","157","158","159","160","161","162","163","164","165","166","167","168","169","170","171","172","173","174","175","176","177","178","179","180","181","182","183","184","185",";","+",",","-",".","/","~","193","194","195","196","197","198","199","200","201","202","203","204","205","206","207","208","209","210","211","212","213","214","215","216","217","218","[","\","]","","223","224","225","226","227","228","229","230","231","232","233","234","235","236","237","238","239","240","241","242","243","244","245","246","247","248","249","250","251","252","253","254","255"];
private var st:Stage;

public function EasyKeyboard(stage:Stage)
{
stage.addEventListener(KeyboardEvent.KEY_DOWN, kDown);
stage.addEventListener(KeyboardEvent.KEY_UP, kUp);
stage.addEventListener(Event.ENTER_FRAME, frame);
st = stage;
}

private function frame(evt:Event):void {

}

/**
 * Add event listener for a single key using a keycode.
 * @paramkeyCode Key code of the key.
 * @paramhandlerDown Function to be called when the key is pressed down.
 * @paramhandlerUp Function to be called when the key is released.
 * @paramalt Used in combination with the alt key.
 * @paramctrl Used in combination with the ctrl key.
 * @paramshift Used in combination with the shift key.
 */

public function addListener(keyCode:int, handlerDown:Function = null, handlerUp:Function = null, alt:Boolean = false, ctrl:Boolean = false, shift:Boolean = false):void {
listeners.push(new KeyListener(keyCode, handlerDown, handlerUp, alt, ctrl, shift));
}

/**
 * Add event listener for a single key using key string value.
 * @paramkeyName String name of the key.
 * @paramhandlerDown Function to be called when the key is pressed down.
 * @paramhandlerUp Function to be called when the key is released.
 * @paramalt Used in combination with the alt key.
 * @paramctrl Used in combination with the ctrl key.
 * @paramshift Used in combination with the shift key.
 */

public function addEasyListener(keyName:String, handlerDown:Function = null, handlerUp:Function = null, alt:Boolean = false, ctrl:Boolean = false, shift:Boolean = false):void {
var code:int = -1;
for (var i:int = 0; i < keyLabels.length; i++) {
if (keyLabels[i] == keyName) {
code = i;
break;
}
}
if (code == -1) {
throw new Error(Incorrect key string value specified - no " + keyName + " key found.);
return;
}
addListener(code, handlerDown, handlerUp, alt, ctrl, shift);
}

private function kDown(evt:KeyboardEvent):void {
for (var i:int = 0; i < listeners.length; i++) {
if (evt.keyCode == listeners[i].keyCode && listeners[i] is KeyListener && evt.altKey == listeners[i].alt && evt.ctrlKey == listeners[i].ctrl && evt.shiftKey == listeners[i].shift) {
if (listeners[i].handlerD) listeners[i].handlerD.call();
}
}
}

private function kUp(evt:KeyboardEvent):void {
for (var i:int = 0; i < listeners.length; i++) {
if (evt.keyCode == listeners[i].keyCode && listeners[i] is KeyListener && evt.altKey == listeners[i].alt && evt.ctrlKey == listeners[i].ctrl && evt.shiftKey == listeners[i].shift) {
if (listeners[i].handlerU) listeners[i].handlerU.call();
}
}
}

}

}
If you go to main.as now, you can call the addEasyListener to add keyboard listeners this way:
keyboard = new EasyKeyboard(stage);
keyboard.addEasyListener("A", function() { trace("Down"); },  function() { trace("Up"); } );
// LINE ABOVE EQUALS TO: keyboard.addListener(65, function() { trace("Down"); },  function() { trace("Up"); });
Thats all for today.
Thanks for reading!
Wednesday, February 4, 2015
3 more web development tools youve probably never heard of
A few days ago, I wrote a blog post about 3 web development tools youve probably never heard of and, lo and behold, I was told by many people that, in fact, they had never heard of them. So today, I figured Id share the wealth and let you know about three more. Youre welcome.
1. Visual Event
This is a handy bookmarklet that creates a visual overlay on the current webpage indicating which DOM elements have events bound to them. This is abolutely clutch for cutting your way through the jungle of events handlers that often pollute a complicated page. In a single glance, you can figure out if the button thats misbehaving has a click handler, or if its the div above it, or the body tag all the way at the top.
2. lorempixum
Building a prototype of a website and need a placeholder image? Look no further than this awesome service. Just include a standard `img src` tag in your page and specify the dimensions, colors and even category of the image in the URL, and youre done.
For example:
<img src="http://lorempixum.com/400/200/sports" >
produces the following image:

Of course, an honorable and adorable mention must go out to http://placekitten.com/, a service which offers roughly the same functionality, except all the images are of kittens:

3. loads.in
Test your webpages load time from various locations and web browsers all over the world. Just plug in the URL, click start, and you get back the load time, screenshots of the page loading at various stages, a waterfall chart and even the ability to download the HAR file.
Read more »
1. Visual Event
 |
| http://www.sprymedia.co.uk/article/Visual+Event |
2. lorempixum
 |
| http://lorempixum.com/ |
For example:
<img src="http://lorempixum.com/400/200/sports" >
produces the following image:
Of course, an honorable and adorable mention must go out to http://placekitten.com/, a service which offers roughly the same functionality, except all the images are of kittens:
3. loads.in
 |
| http://loads.in/ |
Monday, February 2, 2015
How to Create a Quiz in Flash ActionScript 3 Tutorial PART 2
[Read PART 1 here]
In the first part of this lesson, we added the functionality that will allow the user to take the quiz - we added the questions and the correct answers, and we enabled the user to submit his or her own answers by using the input field and clicking on the submit button. All of that happens in frame 1 of our simple Flash quiz.
In this part of the How to Create a Quiz in Flash using ActionScript 3 tutorial, we will be working on the following:
TextFields for the USERs answers - userAnswer0_txt, userAnswer1_txt, userAnswer2_txt, userAnswer3_txt
TextFields for the CORRECT answers - correctAnswer0_txt, correctAnswer1_txt, correctAnswer2_txt, correctAnswer3_txt
TextField for the SCORE - score_txt
The TextField names for the answers have numbers in them so that they will match the index values of the answers in the arrays (aUserAnswers and aCorrectAnswers). userAnswer0_txt will be for aUserAnswers[0], userAnswer1_text will be for aUserAnswers[1], and so on...
So now lets go ahead and add the code. Make sure you select frame 2 of Actions layer and then go to the Actions Panel. Lets first create a number variable:
Ok, so in the first method, we displayed the answers this way:
textField.text = array[index];
ex.
correctAnswer0_txt.text = aCorrectAnswers[0];
For this other method that were doing, we need to learn another way of targeting our TextField. For example, instead of typing in correctAnswer0_txt.text, we can replace correctAnswer0_txt with this["correctAnswer0_txt"] instead. So this is what well have:
this["correctAnswer0_txt"].text = aCorrectAnswers[0];
This is but another way of targeting our display objects (like Buttons, MovieClips and TextFields). Lets take a look at the example again:
this["correctAnswer0_txt"]
Here, since our code is placed in the main timeline, then the this keyword in this instance would refer to the main timeline. And then inside the square brackets, we place the name of the child object that we want to target (the name must be specified as a string, so it should be in quotation marks). So what were doing here is we are telling Flash to target the correctAnswer0_txt TextField which can be found inside this (which in this example would be the main timeline).
So what is the benefit of writing it this way instead?
In this other method of targeting display objects, we are specifying the name of the instances as strings. Because were doing it this way, we can replace the numbers in the names with variables instead. That way, we can just have that variable be incremented inside a for loop so that we dont have to hard code in the numbers for each text field (here you see why its important that we numbered our text fields within their respective names). If this sounds a bit confusing, lets take a look at how the new text assignment statement will look inside of the for loop:
this["correctAnswer" + i + "_txt"].text = aCorrectAnswers[i];
Here, the numbers are replaced with the variable i. For the text fields name, the join operator (+) is used to combine the variable with the rest of the name. Then as the for loop updates, so does i, therefore allowing us to iterate through the text fields and the items in the arrays. Note that i is a number, and it is being combined with strings. In this example, there is no need to convert i into a string. Because the number data is being combined with strings, Flash will automatically convert that number data into a string. So now lets go ahead and write our for loop. Well start with the variable i being equal to 0, and then as long as i is less then aQuestions.length, well keep the for loop running (you can also use aCorrectAnswers.length or aUserAnswers.length since they all have the same lengths anyway). So our for loop will look like this:
Go ahead and test your movie and you should see that this will yield the same results as with the previous method that we used. This second method would be more efficient to use since we wont have to type in the text assignment statements one by one. Imagine if our quiz had 100 questions!
Ok, so now we can move on to the part that checks whether the users answers are correct. So how do we write the code that will determine whether each answer is correct or not? If the answer that the user submitted is the same as the corresponding item in the aCorrectAnswers array, then it means that the user got the correct answer. We know that the users answers are stored in the aUserAnswers array so we could just compare if the items in aUserAnswers match their partners (the ones with the same index value) in the aCorrectAnswers array. Well use an if statement for that. For each match that is detected, we will give the user a point by incrementing nScore by 1 (nScore is that variable that we created earlier, which was initialized to 0). We will place that if statement in the for loop as well, since we want to go through each item in both of the arrays. So our updated for loop is now:
So now, if you test the movie and try out the quiz again, you should see nScore update in the output window (provided that you get at least one answer right, if you dont get any answers right, then nScore never gets updated and wont get traced).
Lastly, wed like to display the final score in the score_txt text field. Well display the score once the for loop has finished checking all the answers. To check whether the for loop is finished, we can check whether i is equal to aQuestions.length - 1. If i is equal to the array length minus one, then it means that the for loop is already at the last item (we subtract the length by 1 because the index values start at 0, where as the length count starts at 1). So well use another if statement inside the for loop to check for that. If i is equal to aQuestions.length - 1, then we assign nScore to score_txt using the text property of the TextField class (be sure to convert nScore to a string using the toString() method). So lets go ahead and update the code:
Here is the code in full:
FRAME 1
Read more »
In the first part of this lesson, we added the functionality that will allow the user to take the quiz - we added the questions and the correct answers, and we enabled the user to submit his or her own answers by using the input field and clicking on the submit button. All of that happens in frame 1 of our simple Flash quiz.
In this part of the How to Create a Quiz in Flash using ActionScript 3 tutorial, we will be working on the following:
- Displaying the users answers alongside the correct answers
- Checking the users answers and computing the score
- Displaying the users score
TextFields for the USERs answers - userAnswer0_txt, userAnswer1_txt, userAnswer2_txt, userAnswer3_txt
TextFields for the CORRECT answers - correctAnswer0_txt, correctAnswer1_txt, correctAnswer2_txt, correctAnswer3_txt
TextField for the SCORE - score_txt
The TextField names for the answers have numbers in them so that they will match the index values of the answers in the arrays (aUserAnswers and aCorrectAnswers). userAnswer0_txt will be for aUserAnswers[0], userAnswer1_text will be for aUserAnswers[1], and so on...
So now lets go ahead and add the code. Make sure you select frame 2 of Actions layer and then go to the Actions Panel. Lets first create a number variable:
var nScore:Number = 0;This variable is going to be used to store the users score. Im initializing it to 0 just in case the user does not get any answer correctly. If that happens then the score will just stay at 0. Ok, so well go back to that variable later. For now, lets work on the code that will display the answers in their respective text fields. We will get the data from the arrays using array access notation, and assign each piece of data to its corresponding text field using the text property of the TextField class. We can do it this way:
userAnswer0_txt.text = aUserAnswers[0];If you add in this code and then test the movie, you should see all the answers displayed in the text fields after you answer all the questions. So at this point, we can actually move on to the next part of the code that will check whether the answers the user gave are correct. But before we do that, Id like to show you another way of displaying the answers in the TextFields. Instead of manually assigning each item to its corresponding text field one by one, well use a for loop instead. So go ahead and remove or comment out the code above, and well try this other method of displaying the answers.
userAnswer1_txt.text = aUserAnswers[1];
userAnswer2_txt.text = aUserAnswers[2];
userAnswer3_txt.text = aUserAnswers[3];
correctAnswer0_txt.text = aCorrectAnswers[0];
correctAnswer1_txt.text = aCorrectAnswers[1];
correctAnswer2_txt.text = aCorrectAnswers[2];
correctAnswer3_txt.text = aCorrectAnswers[3];
Ok, so in the first method, we displayed the answers this way:
textField.text = array[index];
ex.
correctAnswer0_txt.text = aCorrectAnswers[0];
For this other method that were doing, we need to learn another way of targeting our TextField. For example, instead of typing in correctAnswer0_txt.text, we can replace correctAnswer0_txt with this["correctAnswer0_txt"] instead. So this is what well have:
this["correctAnswer0_txt"].text = aCorrectAnswers[0];
This is but another way of targeting our display objects (like Buttons, MovieClips and TextFields). Lets take a look at the example again:
this["correctAnswer0_txt"]
Here, since our code is placed in the main timeline, then the this keyword in this instance would refer to the main timeline. And then inside the square brackets, we place the name of the child object that we want to target (the name must be specified as a string, so it should be in quotation marks). So what were doing here is we are telling Flash to target the correctAnswer0_txt TextField which can be found inside this (which in this example would be the main timeline).
So what is the benefit of writing it this way instead?
In this other method of targeting display objects, we are specifying the name of the instances as strings. Because were doing it this way, we can replace the numbers in the names with variables instead. That way, we can just have that variable be incremented inside a for loop so that we dont have to hard code in the numbers for each text field (here you see why its important that we numbered our text fields within their respective names). If this sounds a bit confusing, lets take a look at how the new text assignment statement will look inside of the for loop:
this["correctAnswer" + i + "_txt"].text = aCorrectAnswers[i];
Here, the numbers are replaced with the variable i. For the text fields name, the join operator (+) is used to combine the variable with the rest of the name. Then as the for loop updates, so does i, therefore allowing us to iterate through the text fields and the items in the arrays. Note that i is a number, and it is being combined with strings. In this example, there is no need to convert i into a string. Because the number data is being combined with strings, Flash will automatically convert that number data into a string. So now lets go ahead and write our for loop. Well start with the variable i being equal to 0, and then as long as i is less then aQuestions.length, well keep the for loop running (you can also use aCorrectAnswers.length or aUserAnswers.length since they all have the same lengths anyway). So our for loop will look like this:
for(var i:Number = 0; i < aQuestions.length; i++)
{
     this["userAnswer" + i + "_txt"].text = aUserAnswers[i];
     this["correctAnswer" + i + "_txt"].text = aCorrectAnswers[i];
}Go ahead and test your movie and you should see that this will yield the same results as with the previous method that we used. This second method would be more efficient to use since we wont have to type in the text assignment statements one by one. Imagine if our quiz had 100 questions!
Ok, so now we can move on to the part that checks whether the users answers are correct. So how do we write the code that will determine whether each answer is correct or not? If the answer that the user submitted is the same as the corresponding item in the aCorrectAnswers array, then it means that the user got the correct answer. We know that the users answers are stored in the aUserAnswers array so we could just compare if the items in aUserAnswers match their partners (the ones with the same index value) in the aCorrectAnswers array. Well use an if statement for that. For each match that is detected, we will give the user a point by incrementing nScore by 1 (nScore is that variable that we created earlier, which was initialized to 0). We will place that if statement in the for loop as well, since we want to go through each item in both of the arrays. So our updated for loop is now:
for(var i:Number = 0; i < aQuestions.length; i++)
{
     this["userAnswer" + i + "_txt"].text = aUserAnswers[i];
     this["correctAnswer" + i + "_txt"].text = aCorrectAnswers[i];
     if(aUserAnswers[i] == aCorrectAnswers[i])
     {
          nScore++;
          trace(nScore);
     }
}for(var i:Number = 0; i < aQuestions.length; i++)
{
this["userAnswer" + i + "_txt"].text = aUserAnswers[i];
this["correctAnswer" + i + "_txt"].text = aCorrectAnswers[i];
if(aUserAnswers[i].toUpperCase() == aCorrectAnswers[i].toUpperCase())
{
nScore++;
trace(nScore);
}
}So now, if you test the movie and try out the quiz again, you should see nScore update in the output window (provided that you get at least one answer right, if you dont get any answers right, then nScore never gets updated and wont get traced).
Lastly, wed like to display the final score in the score_txt text field. Well display the score once the for loop has finished checking all the answers. To check whether the for loop is finished, we can check whether i is equal to aQuestions.length - 1. If i is equal to the array length minus one, then it means that the for loop is already at the last item (we subtract the length by 1 because the index values start at 0, where as the length count starts at 1). So well use another if statement inside the for loop to check for that. If i is equal to aQuestions.length - 1, then we assign nScore to score_txt using the text property of the TextField class (be sure to convert nScore to a string using the toString() method). So lets go ahead and update the code:
for(var i:Number = 0; i < aQuestions.length; i++)
{
     this["userAnswer" + i + "_txt"].text = aUserAnswers[i];
     this["correctAnswer" + i + "_txt"].text = aCorrectAnswers[i];
     if(aUserAnswers[i].toUpperCase() == aCorrectAnswers[i].toUpperCase())
     {
          nScore++;
     }
     if(i == aQuestions.length - 1)
     {
          score_txt.text = nScore.toString();
     }
}Here is the code in full:
FRAME 1
stop();

var nQNumber:Number = 0;
var aQuestions:Array = new Array();
var aCorrectAnswers:Array = new Array("Jupiter", "Mars", "war", "Titan");
var aUserAnswers:Array = new Array();

aQuestions[0] = "What is the biggest planet in our solar system?";
aQuestions[1] = "Which planet in our solar system is the 4th planet from the sun?";
aQuestions[2] = "Mars is named after the Roman god of ___.";
aQuestions[3] = "What is the name of Saturns largest moon?";

questions_txt.text = aQuestions[nQNumber];

submit_btn.addEventListener(MouseEvent.CLICK, quiz);

function quiz(e:MouseEvent):void
{
     aUserAnswers.push(answers_txt.text);
     answers_txt.text = "";
     nQNumber++;
     if(nQNumber < aQuestions.length)
     {
          questions_txt.text = aQuestions[nQNumber];
     }
     else
     {
          nextFrame();
     }
}var nScore:Number = 0;
for(var i:Number = 0; i < aQuestions.length; i++)
{
this["userAnswer" + i + "_txt"].text = aUserAnswers[i];
this["correctAnswer" + i + "_txt"].text = aCorrectAnswers[i];
if(aUserAnswers[i].toUpperCase() == aCorrectAnswers[i].toUpperCase())
{
nScore++;
}
if(i == aQuestions.length - 1)
{
score_txt.text = nScore.toString();
}
}Wednesday, January 28, 2015
Zenithink C71A 7 8GB Android4 1 2013 06 15 V1 3 With HDMI Firmware
C71A (7"+8GB) Android4.1 2013-06-15 V1.3 With HDMI
This version suits to C71A model with barcode C71A-H-8GB-
xxxxxx and HDMI port.
Using TF card
First extract the firmware which you get or download, then copy the whole "zt-update" directory into the root directory of TF card.
Shutdown your tablet and put the TF card into TF card slot, then hold the power-on button for 5-10 seconds, then you will see Upgrading logo, the machine will be installed the firmware and then reboot automatically.
Note: keep charged when the machine is being installed the firmware.
Please do remember to take your TF card out after upgrading because this version include the automatical script file.
DOWNLOAD OFFICIAL 4.1
Tuesday, January 27, 2015
Flash ActionScript 3 Tutorials Beginners
ActionScript is a programming language used to develop applications that will run on the Adobe Flash Player platform. In this page, youll find a list of beginners level ActionScript 3 tutorials that will help you understand how to use the ActionScript 3 language to add interactivity to your Flash movies. If youre a Flash designer or animator who is looking to expand your skills in Flash by learning ActionScript 3, I encourage you to browse through these articles, and hope that you will learn a few new things. The lessons are grouped into different categories, which include topics such as Flash AS3 Event Handling, Working with Sound in AS3, and Creating ActionScript 3 Preloaders to name a few. This page is also updated whenever new tutorials are available. And to provide a more hands-on approach to learning, some lessons come with exercise files as well, which you can download for free and work with as you read the articles. So if youre ready to learn ActionScript 3, start reading the lessons and get on track to becoming knowledgeable in this powerful programming language. Have fun learning ActionScript 3!
Introduction to Flash AS3 Variables
Expressions and Operators in ActionScript 3
How to Create an AS3 Event Listener
The AS3 Event Object
Using the AS3 EnterFrame Event to Create Coded Animation in Flash
Enabling Users to Drag and Drop MovieClips
Testing Collision Between Two MoveClips
Preloading in Flash AS3 [PART 2]
Working with AS3 Input Text Fields
Formatting Text in AS3
ActionScript 3 String to Number Conversion
ActionScript 3 Number to String Conversion
Enabling the User to Submit the Contents Inside an Input Text Field
[PART 1] Working with External Text in Flash ActionScript 3 - Loading the Text
[PART 2] Working with External Text in Flash ActionScript 3 - Formatting the Text
[PART 3] Working with External Text in Flash ActionScript 3 - Scrolling the Text
Playing Sound from the Library and Making a Sound Clip Loop in AS3
Pausing and Resuming Sound using Flash AS3
Flash AS3 Volume Controls
Creating a Simple Quiz Game with Flash AS3 [PART 2]
Creating Multiple TextFields and Arranging their Positions using Arrays and For Loops in AS3
Retrieving the Index Value of an Item in a Flash AS3 Array
Flash AS3 Tween Events
How to Fix the Error #1009 Preloading Issue in Flash AS3
Flash AS3 Stage Focus and Keyboard Event Issue and How to Remove the Yellow Border around Objects in Focus
AS3 Random Numbers Generator
Featured ActionScript 3 Video Tutorial


Featured ActionScript 3 Training Courses
If youre looking for more ActionScript 3 training, check out these great training courses from lynda.com. Click on the links below to learn more about the courses, and to watch some free sample videos. If you want free access to all of the videos in these courses, you can sign-up for a free 7-day trial pass. Lynda.com is a great site for software training, and I use it myself so that I can stay updated on the latest training courses for Adobe products, and more.
Thank you for visiting our Flash ActionScript 3 Tutorials for Beginners page. Like us on Facebook if you enjoyed this page, and feel free to share this with others who might be interested. We hope you visit us again! :)
Read more »
Introduction to AS3
Assigning Instance Names and Modifying some Movie Clip Properties in AS3Introduction to Flash AS3 Variables
Expressions and Operators in ActionScript 3
Flash AS3 Events
Introduction to Flash AS3 Event HandlingHow to Create an AS3 Event Listener
The AS3 Event Object
Using the AS3 EnterFrame Event to Create Coded Animation in Flash
Working with MovieClips
The AS3 this keyword and how to randomize the size of a MovieClip instance on the stageEnabling Users to Drag and Drop MovieClips
Testing Collision Between Two MoveClips
Flash ActionScript 3.0 Preloader Tutorial
Preloading in Flash AS3 [PART 1]Preloading in Flash AS3 [PART 2]
Working with the Flash ActionScript 3.0 Timer Class
Introduction to the Flash ActionScript 3 Timer ClassWorking with Text in Flash AS3
AS3 TextFields - The BasicsWorking with AS3 Input Text Fields
Formatting Text in AS3
ActionScript 3 String to Number Conversion
ActionScript 3 Number to String Conversion
Enabling the User to Submit the Contents Inside an Input Text Field
[PART 1] Working with External Text in Flash ActionScript 3 - Loading the Text
[PART 2] Working with External Text in Flash ActionScript 3 - Formatting the Text
[PART 3] Working with External Text in Flash ActionScript 3 - Scrolling the Text
Working with Sound in Flash ActionScript 3
Introduction to the AS3 Sound and SoundChannel ClassesPlaying Sound from the Library and Making a Sound Clip Loop in AS3
Pausing and Resuming Sound using Flash AS3
Flash AS3 Volume Controls
Working with Arrays in Flash ActionScript 3.0
Creating a Simple Quiz Game with Flash AS3 [PART 1]Creating a Simple Quiz Game with Flash AS3 [PART 2]
Creating Multiple TextFields and Arranging their Positions using Arrays and For Loops in AS3
Retrieving the Index Value of an Item in a Flash AS3 Array
Working with the Flash AS3 Tween Class
The Flash AS3 Tween Class - IntroductionFlash AS3 Tween Events
Miscellaneous Flash AS3 Topics
Passing Custom Parameters to Flash ActionScript 3 Event HandlersHow to Fix the Error #1009 Preloading Issue in Flash AS3
Flash AS3 Stage Focus and Keyboard Event Issue and How to Remove the Yellow Border around Objects in Focus
AS3 Random Numbers Generator
Featured ActionScript 3 Video Tutorial
Animating an Object Using the AS3 Enter Frame Event
Featured ActionScript 3 Training Courses
If youre looking for more ActionScript 3 training, check out these great training courses from lynda.com. Click on the links below to learn more about the courses, and to watch some free sample videos. If you want free access to all of the videos in these courses, you can sign-up for a free 7-day trial pass. Lynda.com is a great site for software training, and I use it myself so that I can stay updated on the latest training courses for Adobe products, and more.
ActionScript 3.0 Training by 
- ActionScript 3.0 in Flash Professional CS5 Essential Training
- Flash Professional CS5: Code Snippets and Templates in Depth
- Flash Professional CS5: Creating a Simple Game for Android Devices
- Flash Professional CS5: Creating a Simple Game for iOS Devices
START LEARNING TODAY!


Thank you for visiting our Flash ActionScript 3 Tutorials for Beginners page. Like us on Facebook if you enjoyed this page, and feel free to share this with others who might be interested. We hope you visit us again! :)
How to Change the Size of a Movie Clip Using ActionScript 3 Assigning AS3 instance names and modifying some AS3 movie clip properties
by Alberto Medalla
Lecturer, Ateneo de Manila University
In this lesson, Im going to discuss the concept of instance names and how they are needed in ActionScript in order to control display objects (objects that can be seen on the stage). Lets say that youve got a display object on the stage (such as an instance of a movie clip symbol that you created), how can you use ActionScript 3 in order to make that object change in size? By the end of this lesson, that is something that you should already be able to do.
Lets begin.
Ive mentioned that we can control display objects using ActionScript. Think of ActionScript as the language that we use so that we can "communicate" with these objects and tell them what to do (e.g. change color, change size, change location, become clickable, etc...). We refer to each individual display object on the stage as an instance - it can be a button, a movie clip or a text field. In order to be able to "communicate" with these instances, we must give them names.
When we communicate with real people, we address them by name - "Hey, John. Can you send me that document from our previous meeting?" In ActionScript, to communicate with these instances on the stage, we must address them by their names as well. These names are referred to as instance names.
NOTE: Instances of graphic symbols and static text fields cannot be used with ActionScript, because they cannot be given instance names. But instances of movie clips and buttons, as well as text fields that are of the dynamic, input and all TLF types can be given instance names.
In the following exercise, you will learn how to assign instance names to display objects.
HOW TO GIVE OBJECTS INSTANCE NAMES
1. Create a new Flash ActionScript 3 document.
2. Draw a circle on the stage.
3. Convert this circle into a movie clip symbol. You must convert the shape into a movie clip or button symbol in order to be able to give it an instance name.

NOTE: The symbol name (the one you type in the Convert to Symbol dialog box) is NOT the same as the instance name.
4. Make sure that the circle is selected, then go to the Properties Inspector.
NOTE: When selecting instances of symbols on the stage, do NOT double-click them. Double-clicking will open up symbol-editing mode. To select an instance, just click on it once using the selection tool (the black arrow).
5. Then in the properties inspector, you will see an input field for the instance name. Type circle1_mc inside the input field.

Youve now given the currently selected instance the name circle1_mc. The same step is followed if you wish to give buttons or text fields instance names as well.
6. Add another instance of the circle symbol by dragging it from the library down to the stage.

7. Make sure that this second instance is selected, then go to the Properties Inspector and give it the name circle2_mc.
You now have 2 movie clip instances on the stage, each one with a unique instance name.
And this concludes the first exercise of this lesson.
Instance names are author defined, meaning you decide what names to give them. But there are still some rules that you need to follow. Lets take a look at those rules.
RULES TO FOLLOW WHEN GIVING INSTANCE NAMES
Make sure you follow these rules to help avoid some errors.
MODIFYING PROPERTIES OF AN INSTANCE
Now that the instances have names, you will be able to target them using ActionScript. In this exercise, you will add some ActionScript code that will modify some of the properties of the instances on the stage. You will modify the size using the scaleX and scaleY ActionScript 3 properties. Youll also modify the opacity using the alpha property.
1. Create a new layer for the ActionScript code. You can name this one Actions, but its not required.

2. Make sure that frame 1 of the Actions layer is selected, then launch the Actions Panel by choosing Window > Actions from the main menu.

3. In the Script Pane of the Actions Panel, type in the following lines of code:
circle1_mc.scaleX = 2;
circle1_mc.scaleY = 2;
These lines of code will scale up the circle1_mc instance to 2 times its original size (or 200%). The scaleX property controls the horizontal scaling, while the scaleY property controls the vertical scaling.
4. Then add one more line below the first 2 lines of code:
circle2_mc.alpha = .5;
This reduces the alpha property value of circle2_mc to .5. The alpha property controls the opacity. A value of .5 brings the opacity down to 50%. You can assign a value from 0 to 1 for the alpha property. The object becomes less visible as the value approaches 0.
5. Test the movie by pressing ctrl + enter (pc) or cmd + return (mac) on your keyboard. You should see that the circle1_mc instance is now larger, and the circle2_mc instance is lighter.
What are properties?
In the exercise above, you modified some properties of movie clip instances. Think of properties as characteristics that describe instances (e.g. size, color, rotation).
Some properties of MovieClip instances are:
To access a property, add a dot to the end of the instance name followed by the property name. Then use the equals sign to assign a property value.
Syntax:
instanceName.property = value;
*This is referred to as dot syntax, because it uses dots.
Examples:
circle1_mc.x = 50;
circle1_mc.rotation = 45;
circle2_mc.scaleY = .5;
*Each statement is ended with a semi-colon.
In summation, instance names allow us to target the instances on our stage so that we can control them using ActionScript 3. Each instance name must be unique in order to differentiate the instances from each other, therefore allowing us to target each instance individually. Once an instance has a name, its properties can be accessed using dot syntax, and can be modified by assigning new values to these properties.
And that concludes this basic tutorial on how to assign instance names in order to control instances using ActionScript 3. I hope you learned something useful. To support this site and expand your knowledge further, please consider signing up for a lynda.com online training membership. Or you can start with a free 7-day trial so you can check out as much of the 1000+ training courses in their learning library.
Read more »
Lecturer, Ateneo de Manila University
In this lesson, Im going to discuss the concept of instance names and how they are needed in ActionScript in order to control display objects (objects that can be seen on the stage). Lets say that youve got a display object on the stage (such as an instance of a movie clip symbol that you created), how can you use ActionScript 3 in order to make that object change in size? By the end of this lesson, that is something that you should already be able to do.
Lets begin.
Ive mentioned that we can control display objects using ActionScript. Think of ActionScript as the language that we use so that we can "communicate" with these objects and tell them what to do (e.g. change color, change size, change location, become clickable, etc...). We refer to each individual display object on the stage as an instance - it can be a button, a movie clip or a text field. In order to be able to "communicate" with these instances, we must give them names.
When we communicate with real people, we address them by name - "Hey, John. Can you send me that document from our previous meeting?" In ActionScript, to communicate with these instances on the stage, we must address them by their names as well. These names are referred to as instance names.
NOTE: Instances of graphic symbols and static text fields cannot be used with ActionScript, because they cannot be given instance names. But instances of movie clips and buttons, as well as text fields that are of the dynamic, input and all TLF types can be given instance names.
In the following exercise, you will learn how to assign instance names to display objects.
HOW TO GIVE OBJECTS INSTANCE NAMES
1. Create a new Flash ActionScript 3 document.
2. Draw a circle on the stage.
3. Convert this circle into a movie clip symbol. You must convert the shape into a movie clip or button symbol in order to be able to give it an instance name.
NOTE: The symbol name (the one you type in the Convert to Symbol dialog box) is NOT the same as the instance name.
4. Make sure that the circle is selected, then go to the Properties Inspector.
NOTE: When selecting instances of symbols on the stage, do NOT double-click them. Double-clicking will open up symbol-editing mode. To select an instance, just click on it once using the selection tool (the black arrow).
5. Then in the properties inspector, you will see an input field for the instance name. Type circle1_mc inside the input field.
Youve now given the currently selected instance the name circle1_mc. The same step is followed if you wish to give buttons or text fields instance names as well.
6. Add another instance of the circle symbol by dragging it from the library down to the stage.
7. Make sure that this second instance is selected, then go to the Properties Inspector and give it the name circle2_mc.
You now have 2 movie clip instances on the stage, each one with a unique instance name.
And this concludes the first exercise of this lesson.
++++++
Instance names are author defined, meaning you decide what names to give them. But there are still some rules that you need to follow. Lets take a look at those rules.
RULES TO FOLLOW WHEN GIVING INSTANCE NAMES
- Instance names must be unique. No instances within the same scope should have the same name.
- The characters in an instance name can only be made up of: letters, numerical characters, underscores (_), and dollar signs ($). No other characters can be used.
- The first character in an instance name can only be: a letter, an underscore (_), or a dollar sign ($). You CANNOT start an instance name with a numerical character.
- Instance names are case-sensitive. John is different from john.
Make sure you follow these rules to help avoid some errors.
++++++
MODIFYING PROPERTIES OF AN INSTANCE
Now that the instances have names, you will be able to target them using ActionScript. In this exercise, you will add some ActionScript code that will modify some of the properties of the instances on the stage. You will modify the size using the scaleX and scaleY ActionScript 3 properties. Youll also modify the opacity using the alpha property.
1. Create a new layer for the ActionScript code. You can name this one Actions, but its not required.
2. Make sure that frame 1 of the Actions layer is selected, then launch the Actions Panel by choosing Window > Actions from the main menu.
3. In the Script Pane of the Actions Panel, type in the following lines of code:
circle1_mc.scaleX = 2;
circle1_mc.scaleY = 2;
These lines of code will scale up the circle1_mc instance to 2 times its original size (or 200%). The scaleX property controls the horizontal scaling, while the scaleY property controls the vertical scaling.
4. Then add one more line below the first 2 lines of code:
circle2_mc.alpha = .5;
This reduces the alpha property value of circle2_mc to .5. The alpha property controls the opacity. A value of .5 brings the opacity down to 50%. You can assign a value from 0 to 1 for the alpha property. The object becomes less visible as the value approaches 0.
5. Test the movie by pressing ctrl + enter (pc) or cmd + return (mac) on your keyboard. You should see that the circle1_mc instance is now larger, and the circle2_mc instance is lighter.
What are properties?
In the exercise above, you modified some properties of movie clip instances. Think of properties as characteristics that describe instances (e.g. size, color, rotation).
Some properties of MovieClip instances are:
- scaleX - scales the instance horizontally by a specified number
- scaleY - scales the instance vertically by a specified number
- x - controls the x coordinate of the instance
- y - controls the y coordinate of the instance
- rotation - rotates the instance to the angle specified
- width - adjusts the width of the instance
- height - adjusts the height of the instance
- alpha - adjusts the opacity level of the instance
To access a property, add a dot to the end of the instance name followed by the property name. Then use the equals sign to assign a property value.
Syntax:
instanceName.property = value;
*This is referred to as dot syntax, because it uses dots.
Examples:
circle1_mc.x = 50;
circle1_mc.rotation = 45;
circle2_mc.scaleY = .5;
*Each statement is ended with a semi-colon.
In summation, instance names allow us to target the instances on our stage so that we can control them using ActionScript 3. Each instance name must be unique in order to differentiate the instances from each other, therefore allowing us to target each instance individually. Once an instance has a name, its properties can be accessed using dot syntax, and can be modified by assigning new values to these properties.
And that concludes this basic tutorial on how to assign instance names in order to control instances using ActionScript 3. I hope you learned something useful. To support this site and expand your knowledge further, please consider signing up for a lynda.com online training membership. Or you can start with a free 7-day trial so you can check out as much of the 1000+ training courses in their learning library.
Subscribe to:
Posts (Atom)