Showing posts with label 1. Show all posts
Showing posts with label 1. Show all posts
Thursday, January 29, 2015
Creating a Pentomino game using AS3 Part 1
Today well start making a game based on pentomino.
Basically, I have a school project to do on Pentomino, and Im going to create a game based on the principle. I also want to share the code with other programmers, so Im writing a step-by-step tutorial series and then releasing the game as an open-source project.
The game is made using Flash and FlashDevelop, although you dont need to follow my example strictly and as long as you understand the code, you can use any IDE you like.
I am going to use Flash for animations and graphics mostly, and have all my code written in FlashDevelop (because I like it a lot better than the built in actions editor in Flash).
If you want to do this the same way as me, create a new AS3 project and add a new empty MovieClip to stage. Make sure its coordinates are 0,0. Set its class path to "pentomino_game".
Now open FlashDevelop, Project > New Project. Choose Flash IDE project and select the folder your Flash file is in. When the project is created, add a new .as class to the directory and edit it using FlashDevelop. Import two classes for now - MovieClip and Sprite. Make the pentomino_game class extend MovieClip.
Declare five private variables - mapGrid, gridShape, gridStartX, gridStartY and gridCellWidth and set their values as shown below:
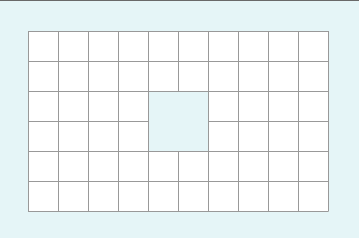
Now, in the constructor, were going to add a temporary value for mapGrid. Why temporary? Because in the future, all the maps will be stored somewhere and not hardcoded in the constructor function. Right now, make it a 10x6 grid with values "1" and "0".
Basically, "1" means a tile and "0" means a hole. Using this method youll be able to create more complex grids than just boring rectangles.
Note that the map I created is not a valid one. It will not work for a pentomino puzzle. The reason for that is the number of tiles cant be divided by 5 and remain a round number. But just for the sake of this tutorial and debugging, were going to leave these 4 holes there.
Now we add the gridShape Sprite to stage and set its coordinates:
Then we call a function drawGrid() that draws the map.
The map is drawn by first clearing gridShapes graphics, then looping through all mapGrid items and drawing a cell where it is needed:
You can see that we use the drawing API to draw the tiles.
Now we have a working tile map system. You can create maps and change their appearance. The results may vary, but it should look something like this:
Full code so far:
Thanks for reading!
Read more »
Basically, I have a school project to do on Pentomino, and Im going to create a game based on the principle. I also want to share the code with other programmers, so Im writing a step-by-step tutorial series and then releasing the game as an open-source project.
The game is made using Flash and FlashDevelop, although you dont need to follow my example strictly and as long as you understand the code, you can use any IDE you like.
I am going to use Flash for animations and graphics mostly, and have all my code written in FlashDevelop (because I like it a lot better than the built in actions editor in Flash).
If you want to do this the same way as me, create a new AS3 project and add a new empty MovieClip to stage. Make sure its coordinates are 0,0. Set its class path to "pentomino_game".
Now open FlashDevelop, Project > New Project. Choose Flash IDE project and select the folder your Flash file is in. When the project is created, add a new .as class to the directory and edit it using FlashDevelop. Import two classes for now - MovieClip and Sprite. Make the pentomino_game class extend MovieClip.
Declare five private variables - mapGrid, gridShape, gridStartX, gridStartY and gridCellWidth and set their values as shown below:
package
{
import flash.display.MovieClip;
import flash.display.Sprite;

/**
 * Open-source pentomino game engine
 * @author Kirill Poletaev
 */

public class pentomino_game extends MovieClip
{
private var mapGrid:Array = [];

private var gridShape:Sprite = new Sprite();
private var gridStartX:int = 30;
private var gridStartY:int = 30;
private var gridCellWidth:int = 30;

public function pentomino_game() {}

}

}
Now, in the constructor, were going to add a temporary value for mapGrid. Why temporary? Because in the future, all the maps will be stored somewhere and not hardcoded in the constructor function. Right now, make it a 10x6 grid with values "1" and "0".
Basically, "1" means a tile and "0" means a hole. Using this method youll be able to create more complex grids than just boring rectangles.
// default map
mapGrid = [
[1, 1, 1, 1, 1, 1, 1, 1, 1, 1],
[1, 1, 1, 1, 1, 1, 1, 1, 1, 1],
[1, 1, 1, 1, 0, 0, 1, 1, 1, 1],
[1, 1, 1, 1, 0, 0, 1, 1, 1, 1],
[1, 1, 1, 1, 1, 1, 1, 1, 1, 1],
[1, 1, 1, 1, 1, 1, 1, 1, 1, 1]
];
Note that the map I created is not a valid one. It will not work for a pentomino puzzle. The reason for that is the number of tiles cant be divided by 5 and remain a round number. But just for the sake of this tutorial and debugging, were going to leave these 4 holes there.
Now we add the gridShape Sprite to stage and set its coordinates:
// grid settings
addChild(gridShape);
gridShape.x = gridStartX;
gridShape.y = gridStartY;
Then we call a function drawGrid() that draws the map.
public function pentomino_game()
{
// default map
mapGrid = [
[1, 1, 1, 1, 1, 1, 1, 1, 1, 1],
[1, 1, 1, 1, 1, 1, 1, 1, 1, 1],
[1, 1, 1, 1, 0, 0, 1, 1, 1, 1],
[1, 1, 1, 1, 0, 0, 1, 1, 1, 1],
[1, 1, 1, 1, 1, 1, 1, 1, 1, 1],
[1, 1, 1, 1, 1, 1, 1, 1, 1, 1]
];

// grid settings
addChild(gridShape);
gridShape.x = gridStartX;
gridShape.y = gridStartY;

// draw tiles
drawGrid();
}
The map is drawn by first clearing gridShapes graphics, then looping through all mapGrid items and drawing a cell where it is needed:
private function drawGrid():void {
gridShape.graphics.clear();
var width:int = mapGrid[0].length;
var height:int = mapGrid.length;

var i:int;
var u:int;

// draw background
for (i = 0; i < height; i++) {
for (u = 0; u < width; u++) {
if (mapGrid[i][u] == 1) drawCell(u, i, 0xffffff, 1, 0x999999);
}
}
}

private function drawCell(width:int, height:int, fill:uint, thick:Number, line:uint):void {
gridShape.graphics.beginFill(fill);
gridShape.graphics.lineStyle(thick, line);
gridShape.graphics.drawRect(width * gridCellWidth, height * gridCellWidth, gridCellWidth, gridCellWidth);
}
You can see that we use the drawing API to draw the tiles.
Now we have a working tile map system. You can create maps and change their appearance. The results may vary, but it should look something like this:
Full code so far:
package
{
import flash.display.MovieClip;
import flash.display.Sprite;

/**
 * Open-source pentomino game engine
 * @author Kirill Poletaev
 */

public class pentomino_game extends MovieClip
{
private var mapGrid:Array = [];

private var gridShape:Sprite = new Sprite();
private var gridStartX:int = 30;
private var gridStartY:int = 30;
private var gridCellWidth:int = 30;

public function pentomino_game()
{
// default map
mapGrid = [
[1, 1, 1, 1, 1, 1, 1, 1, 1, 1],
[1, 1, 1, 1, 1, 1, 1, 1, 1, 1],
[1, 1, 1, 1, 0, 0, 1, 1, 1, 1],
[1, 1, 1, 1, 0, 0, 1, 1, 1, 1],
[1, 1, 1, 1, 1, 1, 1, 1, 1, 1],
[1, 1, 1, 1, 1, 1, 1, 1, 1, 1]
];

// grid settings
addChild(gridShape);
gridShape.x = gridStartX;
gridShape.y = gridStartY;

// draw tiles
drawGrid();
}

private function drawGrid():void {
gridShape.graphics.clear();
var width:int = mapGrid[0].length;
var height:int = mapGrid.length;

var i:int;
var u:int;

// draw background
for (i = 0; i < height; i++) {
for (u = 0; u < width; u++) {
if (mapGrid[i][u] == 1) drawCell(u, i, 0xffffff, 1, 0x999999);
}
}
}

private function drawCell(width:int, height:int, fill:uint, thick:Number, line:uint):void {
gridShape.graphics.beginFill(fill);
gridShape.graphics.lineStyle(thick, line);
gridShape.graphics.drawRect(width * gridCellWidth, height * gridCellWidth, gridCellWidth, gridCellWidth);
}

}

}
Thanks for reading!
Wednesday, January 28, 2015
Zenithink C71A 7 8GB Android4 1 2013 06 15 V1 3 With HDMI Firmware
C71A (7"+8GB) Android4.1 2013-06-15 V1.3 With HDMI
This version suits to C71A model with barcode C71A-H-8GB-
xxxxxx and HDMI port.
Using TF card
First extract the firmware which you get or download, then copy the whole "zt-update" directory into the root directory of TF card.
Shutdown your tablet and put the TF card into TF card slot, then hold the power-on button for 5-10 seconds, then you will see Upgrading logo, the machine will be installed the firmware and then reboot automatically.
Note: keep charged when the machine is being installed the firmware.
Please do remember to take your TF card out after upgrading because this version include the automatical script file.
DOWNLOAD OFFICIAL 4.1
Saturday, January 24, 2015
Up all night the LinkedIn Intern Hackday Day 1
Update: the official photos, videos, and submitted projects are now available on the Intern Hackday site.
Friday, July 29, we kicked off the LinkedIn Intern Hackday. It was the first ever public hackday weve had at LinkedIn: interns from all over Silicon Valley were invited to come down to LinkedIn headquarters, form teams, hack for 24 hours, and build something awesome. Roughly 165 interns came and just about all of them stayed up all night. To keep them going, we had a ton of food delivered - sandwiches at 7, pizza at 9, Chinese food at 2am, breakfast burritos at 7am, more pizza at noon, hot truck at 4 - and vast quantities of caffeine at all hours.
This is a quick blog post with some of the sights and sounds from day 1. These are mostly from my iPhone (apparently, the only camera I have on me during most LinkedIn events), the LinkedIn University Facebook Page and one of our volunteers, Hemendra. Keep your eye on the Intern Hackday site for the full official set of photos, videos and, most importantly, the submitted hacks from the event.
Check out pictures and videos from day 2 here!
Read more »
Friday, July 29, we kicked off the LinkedIn Intern Hackday. It was the first ever public hackday weve had at LinkedIn: interns from all over Silicon Valley were invited to come down to LinkedIn headquarters, form teams, hack for 24 hours, and build something awesome. Roughly 165 interns came and just about all of them stayed up all night. To keep them going, we had a ton of food delivered - sandwiches at 7, pizza at 9, Chinese food at 2am, breakfast burritos at 7am, more pizza at noon, hot truck at 4 - and vast quantities of caffeine at all hours.
This is a quick blog post with some of the sights and sounds from day 1. These are mostly from my iPhone (apparently, the only camera I have on me during most LinkedIn events), the LinkedIn University Facebook Page and one of our volunteers, Hemendra. Keep your eye on the Intern Hackday site for the full official set of photos, videos and, most importantly, the submitted hacks from the event.
 |
| The interns check-in at 6pm on Friday |
 |
| One intern came prepared, ready with his own case of energy drinks |
 |
| But dont worry, we were well stocked with food and drinks of our own |
 |
| And, of course, plenty of caffeine |
 |
| Getting settled in |
 |
| Cal Poly represent |
 |
| 165+ laptops, phones, monitors, and keyboard meant a lot of wires |
 |
| Every type of laptop, netbook, headphone, phone, tablet and gizmo could be found |
 |
| Adam Nash kicks off the hacking at 7pm |
 |
| The planning begins |
 |
| Secret tactics |
 |
| A few interns figured out the winning strategy early on |
 |
| The hacking begins. |
| And finally, a video of 165 hackers hard at work. |
Check out pictures and videos from day 2 here!
Friday, January 23, 2015
Zenithink 10 1 C93 8GB 20A13 08 15 version dual camera Firmware
Zenithink 10.1" C93 8GB 20A13-08-15 version dual camera
This version suits to C93(two cameras) model with barcode C93-K5-xxx-8GB-ZNSxxx-xx.
Using TF card
First extract the firmware which you get or download, then copy the whole "zt-update" directory into the root directory of TF card.
Put the TF card into TF card slot, then press the "Volume Plus" button at the same time to press the power-on button, then operate as per the reminders shown on the screen, the machine will be installed the firmware and then reboot.
Note: keep charged when the machine is being installed the firmware.
DOWNLOAD OFFICIAL FIRMWARE
Wednesday, January 21, 2015
Allwinner A13 Q88d v1 1 Android Tablet Firmware
Q88d v1.1 Allwinner A13 7 inch Tablet Firmware
Flashing Tools,Tutorials and Rom
Read Article About Allwinner A1X Chips
Why I need to Flashing Tablet ?
Encyclopedia:-
Read Article About Allwinner A1X Chips
Specifications
Chipset : Allwinner A13
Board ID : Q88D V1.1
Brand: Various Companies use this board
Android Version : 4.0.4
CPU : 1.2 Ghz
Display: 800 x 600
Display: 800 x 600
Ram : 512 / IGB
flash Memory : 4GB / 8GB
Flashing Tools
- Flashing Tool : LiveSuit Pack
- Flashing Tool: Phoenix Usb Pro
Flashing Tutorials
- Livesuit Tutorial : how to flashing tablet with Livesuit
- Phoenix Usb PrO Video Tutorial :Tutorial
Recommended Tools
You can also use : Android Multi Tools
How to Update Android Tablet with microSD Card.
1. Unzip the update file, and copy the 3 files to an empty microsd card. (the 3 files must be copied to the root of the microSD card) Then turn off your Android Tablet , insert the MicroSD card into the android tablet.
2. Push and hold volume - key on the tablet, and while holding this push and hold POWER button aswell. Wait until screen flickers and release power key, but keep on pushing
volume - key until the green Android robot is shown.
3.Now you can release keys and wait for the update to finish.
When updated, the tablet starts up all over.
Note:
Please notice that firmware update will delete all settings, apps etc. you may have downloaded to your tablet.
Why I need to Flashing Tablet ?
When your Android tablet facing various problems . In case of
1. Forgotten Pattern Lock ,
2.Too many pattern attempt / Reset user lock
3. Android Tablet stuck on Gmail account
4. Android Tablet stuck on Android logo
5.Android Tablet hang on start up
you can use this Android Tablet firmware ROM to make your Android China tablet working again . Make sure to charge battery . Power failure during flashing may result dead or broken tablet.
Flashing stock firmware should be last option.
Download :
Download Tested Firmware
You may also like :
Q88D V1.2 Stock Rom for Allwinner
Q88d Nova Nutica 4g 4.1 Stock Rom for Allwinner
Q88d Nova Nutica 4g 4.1 Stock Rom for Allwinner
Subscribe to:
Posts (Atom)