Showing posts with label size. Show all posts
Showing posts with label size. Show all posts
Thursday, February 26, 2015
Sanitizer Trick for Child Size Squirts!!!
When I decided to try this in class the other day, I immediately kicked myself for not having discovered it sooner! I took a rubberband that was sitting on my desk and wrapped it around the top of the sanitizer bottle. I had to adjust it a little bit (I wrapped it a few extra times) to get it to be the perfect amount of sanitizer, but it truly is that... perfect!

I was inspired to at do this by this genius pin that recommended using a hair tie on a soap bottle! Ive actually had this pinned for months and never though about using it on a sanitizer bottle before today!

Read more »
I was inspired to at do this by this genius pin that recommended using a hair tie on a soap bottle! Ive actually had this pinned for months and never though about using it on a sanitizer bottle before today!
Click the picture to see the original pin!

Tuesday, January 27, 2015
How to Change the Size of a Movie Clip Using ActionScript 3 Assigning AS3 instance names and modifying some AS3 movie clip properties
by Alberto Medalla
Lecturer, Ateneo de Manila University
In this lesson, Im going to discuss the concept of instance names and how they are needed in ActionScript in order to control display objects (objects that can be seen on the stage). Lets say that youve got a display object on the stage (such as an instance of a movie clip symbol that you created), how can you use ActionScript 3 in order to make that object change in size? By the end of this lesson, that is something that you should already be able to do.
Lets begin.
Ive mentioned that we can control display objects using ActionScript. Think of ActionScript as the language that we use so that we can "communicate" with these objects and tell them what to do (e.g. change color, change size, change location, become clickable, etc...). We refer to each individual display object on the stage as an instance - it can be a button, a movie clip or a text field. In order to be able to "communicate" with these instances, we must give them names.
When we communicate with real people, we address them by name - "Hey, John. Can you send me that document from our previous meeting?" In ActionScript, to communicate with these instances on the stage, we must address them by their names as well. These names are referred to as instance names.
NOTE: Instances of graphic symbols and static text fields cannot be used with ActionScript, because they cannot be given instance names. But instances of movie clips and buttons, as well as text fields that are of the dynamic, input and all TLF types can be given instance names.
In the following exercise, you will learn how to assign instance names to display objects.
HOW TO GIVE OBJECTS INSTANCE NAMES
1. Create a new Flash ActionScript 3 document.
2. Draw a circle on the stage.
3. Convert this circle into a movie clip symbol. You must convert the shape into a movie clip or button symbol in order to be able to give it an instance name.

NOTE: The symbol name (the one you type in the Convert to Symbol dialog box) is NOT the same as the instance name.
4. Make sure that the circle is selected, then go to the Properties Inspector.
NOTE: When selecting instances of symbols on the stage, do NOT double-click them. Double-clicking will open up symbol-editing mode. To select an instance, just click on it once using the selection tool (the black arrow).
5. Then in the properties inspector, you will see an input field for the instance name. Type circle1_mc inside the input field.

Youve now given the currently selected instance the name circle1_mc. The same step is followed if you wish to give buttons or text fields instance names as well.
6. Add another instance of the circle symbol by dragging it from the library down to the stage.

7. Make sure that this second instance is selected, then go to the Properties Inspector and give it the name circle2_mc.
You now have 2 movie clip instances on the stage, each one with a unique instance name.
And this concludes the first exercise of this lesson.
Instance names are author defined, meaning you decide what names to give them. But there are still some rules that you need to follow. Lets take a look at those rules.
RULES TO FOLLOW WHEN GIVING INSTANCE NAMES
Make sure you follow these rules to help avoid some errors.
MODIFYING PROPERTIES OF AN INSTANCE
Now that the instances have names, you will be able to target them using ActionScript. In this exercise, you will add some ActionScript code that will modify some of the properties of the instances on the stage. You will modify the size using the scaleX and scaleY ActionScript 3 properties. Youll also modify the opacity using the alpha property.
1. Create a new layer for the ActionScript code. You can name this one Actions, but its not required.

2. Make sure that frame 1 of the Actions layer is selected, then launch the Actions Panel by choosing Window > Actions from the main menu.

3. In the Script Pane of the Actions Panel, type in the following lines of code:
circle1_mc.scaleX = 2;
circle1_mc.scaleY = 2;
These lines of code will scale up the circle1_mc instance to 2 times its original size (or 200%). The scaleX property controls the horizontal scaling, while the scaleY property controls the vertical scaling.
4. Then add one more line below the first 2 lines of code:
circle2_mc.alpha = .5;
This reduces the alpha property value of circle2_mc to .5. The alpha property controls the opacity. A value of .5 brings the opacity down to 50%. You can assign a value from 0 to 1 for the alpha property. The object becomes less visible as the value approaches 0.
5. Test the movie by pressing ctrl + enter (pc) or cmd + return (mac) on your keyboard. You should see that the circle1_mc instance is now larger, and the circle2_mc instance is lighter.
What are properties?
In the exercise above, you modified some properties of movie clip instances. Think of properties as characteristics that describe instances (e.g. size, color, rotation).
Some properties of MovieClip instances are:
To access a property, add a dot to the end of the instance name followed by the property name. Then use the equals sign to assign a property value.
Syntax:
instanceName.property = value;
*This is referred to as dot syntax, because it uses dots.
Examples:
circle1_mc.x = 50;
circle1_mc.rotation = 45;
circle2_mc.scaleY = .5;
*Each statement is ended with a semi-colon.
In summation, instance names allow us to target the instances on our stage so that we can control them using ActionScript 3. Each instance name must be unique in order to differentiate the instances from each other, therefore allowing us to target each instance individually. Once an instance has a name, its properties can be accessed using dot syntax, and can be modified by assigning new values to these properties.
And that concludes this basic tutorial on how to assign instance names in order to control instances using ActionScript 3. I hope you learned something useful. To support this site and expand your knowledge further, please consider signing up for a lynda.com online training membership. Or you can start with a free 7-day trial so you can check out as much of the 1000+ training courses in their learning library.
Read more »
Lecturer, Ateneo de Manila University
In this lesson, Im going to discuss the concept of instance names and how they are needed in ActionScript in order to control display objects (objects that can be seen on the stage). Lets say that youve got a display object on the stage (such as an instance of a movie clip symbol that you created), how can you use ActionScript 3 in order to make that object change in size? By the end of this lesson, that is something that you should already be able to do.
Lets begin.
Ive mentioned that we can control display objects using ActionScript. Think of ActionScript as the language that we use so that we can "communicate" with these objects and tell them what to do (e.g. change color, change size, change location, become clickable, etc...). We refer to each individual display object on the stage as an instance - it can be a button, a movie clip or a text field. In order to be able to "communicate" with these instances, we must give them names.
When we communicate with real people, we address them by name - "Hey, John. Can you send me that document from our previous meeting?" In ActionScript, to communicate with these instances on the stage, we must address them by their names as well. These names are referred to as instance names.
NOTE: Instances of graphic symbols and static text fields cannot be used with ActionScript, because they cannot be given instance names. But instances of movie clips and buttons, as well as text fields that are of the dynamic, input and all TLF types can be given instance names.
In the following exercise, you will learn how to assign instance names to display objects.
HOW TO GIVE OBJECTS INSTANCE NAMES
1. Create a new Flash ActionScript 3 document.
2. Draw a circle on the stage.
3. Convert this circle into a movie clip symbol. You must convert the shape into a movie clip or button symbol in order to be able to give it an instance name.
NOTE: The symbol name (the one you type in the Convert to Symbol dialog box) is NOT the same as the instance name.
4. Make sure that the circle is selected, then go to the Properties Inspector.
NOTE: When selecting instances of symbols on the stage, do NOT double-click them. Double-clicking will open up symbol-editing mode. To select an instance, just click on it once using the selection tool (the black arrow).
5. Then in the properties inspector, you will see an input field for the instance name. Type circle1_mc inside the input field.
Youve now given the currently selected instance the name circle1_mc. The same step is followed if you wish to give buttons or text fields instance names as well.
6. Add another instance of the circle symbol by dragging it from the library down to the stage.
7. Make sure that this second instance is selected, then go to the Properties Inspector and give it the name circle2_mc.
You now have 2 movie clip instances on the stage, each one with a unique instance name.
And this concludes the first exercise of this lesson.
++++++
Instance names are author defined, meaning you decide what names to give them. But there are still some rules that you need to follow. Lets take a look at those rules.
RULES TO FOLLOW WHEN GIVING INSTANCE NAMES
- Instance names must be unique. No instances within the same scope should have the same name.
- The characters in an instance name can only be made up of: letters, numerical characters, underscores (_), and dollar signs ($). No other characters can be used.
- The first character in an instance name can only be: a letter, an underscore (_), or a dollar sign ($). You CANNOT start an instance name with a numerical character.
- Instance names are case-sensitive. John is different from john.
Make sure you follow these rules to help avoid some errors.
++++++
MODIFYING PROPERTIES OF AN INSTANCE
Now that the instances have names, you will be able to target them using ActionScript. In this exercise, you will add some ActionScript code that will modify some of the properties of the instances on the stage. You will modify the size using the scaleX and scaleY ActionScript 3 properties. Youll also modify the opacity using the alpha property.
1. Create a new layer for the ActionScript code. You can name this one Actions, but its not required.
2. Make sure that frame 1 of the Actions layer is selected, then launch the Actions Panel by choosing Window > Actions from the main menu.
3. In the Script Pane of the Actions Panel, type in the following lines of code:
circle1_mc.scaleX = 2;
circle1_mc.scaleY = 2;
These lines of code will scale up the circle1_mc instance to 2 times its original size (or 200%). The scaleX property controls the horizontal scaling, while the scaleY property controls the vertical scaling.
4. Then add one more line below the first 2 lines of code:
circle2_mc.alpha = .5;
This reduces the alpha property value of circle2_mc to .5. The alpha property controls the opacity. A value of .5 brings the opacity down to 50%. You can assign a value from 0 to 1 for the alpha property. The object becomes less visible as the value approaches 0.
5. Test the movie by pressing ctrl + enter (pc) or cmd + return (mac) on your keyboard. You should see that the circle1_mc instance is now larger, and the circle2_mc instance is lighter.
What are properties?
In the exercise above, you modified some properties of movie clip instances. Think of properties as characteristics that describe instances (e.g. size, color, rotation).
Some properties of MovieClip instances are:
- scaleX - scales the instance horizontally by a specified number
- scaleY - scales the instance vertically by a specified number
- x - controls the x coordinate of the instance
- y - controls the y coordinate of the instance
- rotation - rotates the instance to the angle specified
- width - adjusts the width of the instance
- height - adjusts the height of the instance
- alpha - adjusts the opacity level of the instance
To access a property, add a dot to the end of the instance name followed by the property name. Then use the equals sign to assign a property value.
Syntax:
instanceName.property = value;
*This is referred to as dot syntax, because it uses dots.
Examples:
circle1_mc.x = 50;
circle1_mc.rotation = 45;
circle2_mc.scaleY = .5;
*Each statement is ended with a semi-colon.
In summation, instance names allow us to target the instances on our stage so that we can control them using ActionScript 3. Each instance name must be unique in order to differentiate the instances from each other, therefore allowing us to target each instance individually. Once an instance has a name, its properties can be accessed using dot syntax, and can be modified by assigning new values to these properties.
And that concludes this basic tutorial on how to assign instance names in order to control instances using ActionScript 3. I hope you learned something useful. To support this site and expand your knowledge further, please consider signing up for a lynda.com online training membership. Or you can start with a free 7-day trial so you can check out as much of the 1000+ training courses in their learning library.
Sunday, January 25, 2015
How to Compress Large Files to Small size

Asalam-o-Alaikum Friends!!!
Dosto ap sub kase hain Umeed Kerta hou ap sub Teek Taak honge,, Dosto Chalte hai apne Tutorial ki taraf, Aj mai ap ko is Tutorial k zarye btao ga k Big File ko Winrar k zarye kase Highly Compressed kia jata hain. Highly Compressed karne se pehle ap apne PC pr jitne Program Run hai wo sub closed kar dain or System ko bilkul Free kar de Pir Winrar open kare Task Manager main jakar is ki Property Real Time ker de es k leye ap k pass Winrar Full Version hona zarori ha, Trail bhi Work kerta But kabi kabi Teek se Compress nahi kerta os k bd Task Manager ko close kerde or Winrar ko Open rehne de. os k bd Screen shot Follow kare baki tarika Screen Shot k zarye bta dia hai.
I hope ap logo ko ye Tutorial Passand aye ga.


Saturday, January 24, 2015
Making of 8 passport size photos in single maxi
Hai frnds, today im showing how to make passport size photo or 8 passport size photos in single maxi easily in photoshop. By using this procedure we can get 8 passport size photos just for 5 or 6 rupees by taking this maxi to photo studio then take a print and cut it in 8 pieces. Here we can use any version of photoshop like 7.0,cs,cs1,2,3,4,5,6. Iam sure that every one should easily understand this tutorial. Get ready with your are photoshop and image.
About Photoshop
Adobe Photoshop is a famous professional photo editing software that can be used by experts and web designers for designing greeting cards, wedding cards, banners, invitations, movie titles and we can also do image manipulations like cropping the pictures, applying effects, changing colours, making gif animations etc. It has so many things like blending options, brushes, styles, shapes etc. Using this we can create our own desktop and mobile screen backgrounds. In latest version photoshop having different inbuild screen sizes and also providing various document sizes like A4, A3, legal etc. The main advantage of photoshop is we can edit any image as you like and very easy to do any modifications.
Photoshop is more usefull for photographers. Photoshop contains the wide range of tools, effects, filters and third party plugins by using this photographers can easily edit there images. For example if you want to change background of the image we can do it using photoshop with in small amount of time very effectively. It has very easy user interface. We can install photoshop on different platforms like mac, linux and windows.
Photoshop Requirements
Before installing photoshop we have to keep one thing in your mind. Photoshop is so powerful it requires good working environment to run the photoshop application. I would recommended to have at least 128mb of Ram for Adobe Photoshop 7. If you are using latest version photoshop then the ram should be more.
Screenshot
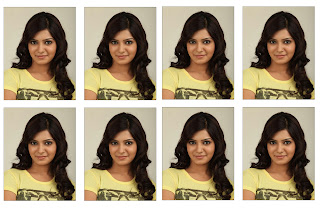

Step by Step Procedure :
1) First of all take a nice photo and open it with photoshop or go to file click on the open and browse your image.
2) Press ctrl+c (means crop) and give size 1.35 inch width and 1.75 inch height, resolution should be 300 pixels/inch.
3) Select the image crop the image now your passport size image is ready.

4) Goto edit option, click the stroke and give width 2 px, colour black then click ok.
5) Now open new document size should be 6 inch width and 4 inch height, resolution should be 300 pixels/inch.
6) Then make 8 copies of above passport size photo with (ctrl+j) layer copy.
7) Arrange the 8 copies in 2 rows and 4 colums.
8) Go to file click on the Save As or use CTRL + SHIFT + S and save it as .jpg format then give quality 12 and click the ok button.
9) Finally we will get the above maxi size screenshot. Enjoy..
Thank You For Visiting StudywithDemo
Subscribe to:
Posts (Atom)